
White label integration allows you to use TrustBuilder to secure your applications without showing the TrustBuilder brand. Users only see your company’s branding, your logos and your colors. TrustBuilder runs in the background as the authentication engine.
A white-label integration can include:
-
Mobile authentication
Integrate TrustBuilder authentication features into your mobile application using Trustbuilder Android or iOS SDK. -
Web authentication page available soon
Integrate TrustBuilder authentication features into a web application using Trustbuilder Web SDK. -
Custom login portal
Provide your users with a portal that handles the web authentication experience. -
User management
-
Self-care → users manage their authentication methods
Admin management → administrators manage users authentication methods
-
The authentication logic and API interactions are handled by TrustBuilder, while your applications control the look and feel.
Main phases

1 - API credentials
Get API credentials (Client ID / Client Secret) to communicate with TrustBuilder.

2 - Application and Policies configuration
In Trustbuilder admin portal:
-
Declare your custom applications and create a custom internal authentication method
-
Define registration policies and configure authorization rules.
-
Connect your business application

3 - User provisioning
-
SCIM
-
API
-
JIT

4 - Technical Integration
-
Embed TrustBuilder SDKs into mobile and/or web apps
-
Connect a custom login portal

5 - Operations management
Manage authentication flows, transaction confirmations, user self-care, and administrative operations.
1. API credentials
Create OAuth M2M application
To generate access tokens and access APIs, login to Trustbuilder admin portal and first create an OAuth application with the following settings:
-
Application type: Machine to machine
-
Subject: Not used (you can select any value)
-
API & Scopes: Internal API --> Click Open and then Select all
-
Authentication methods: Client secret Basic
-
Authorization policy: Not used (you can select any value)
-
Access token: RS256
Once the application is created, you will obtain: Client ID and the Client Secret.
⚠️ Make sure to securely save the Client Secret as it will not be displayed again after creation.
These credentials (Client ID and Client Secret) are then used to generate access tokens, which allow your application to call the TrustBuilder APIs.
Generate an access token
The OAuth application you have previously created has a unique token endpoint. This must be used to generate an access token:
-
In TrustBuilder Admin portal, click on the OAuth application created.
-
Go to the Endpoints tab.
-
Copy the OAuth Token endpoint.
-
To request an access token, make a POST call to the token endpoint.
grant_type=client_credentials
client_id=YOUR_CLIENT_ID
client_secret=YOUR_CLIENT_SECRET
The response includes:
-
access_token→ to be used in API requests to Trustbuilder -
expires_in→ token lifetime in seconds -
token_type→Bearer
-
-
The successful response includes
access_token,token_typeandexpires_invalues. -
The access token value should be included in API requests:
Authorization: Bearer ACCESS_TOKEN
By default, the access token is valid for 900 seconds. You can adjust the lifetime in the TrustBuilder Admin Portal, under the Security Settings tab of the OAuth application.
2. Application and Policies configuration
In Trustbuilder admin portal:
-
-
Once created, an appID will be generated. It will be needed for the SDK app integration.
-
-
-
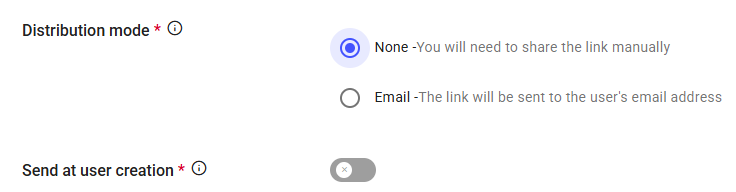
For white label integration, set the distribution mode to None and disable Send at creation to prevent users from receiving Trustbuilder registration emails.
-
-
Connect a Service Provider (OIDC only)
3. User provisioning
-
SCIM: use the SCIM protocol to synchronize your identity directory with the platform in real time.
See SCIM provisioning -
API: call the REST user management endpoints
-
Just-In-Time provisioning
See OIDC IdP integration
4. Technical integration
The technical integration phase consists in embedding TrustBuilder authentication capabilities into your applications using SDKs and APIs.
Trustbuilder SDKs
Integrate TrustBuilder authentication directly into your application:
Custom login portal
The custom portal acts as the bridge between the user interface and the authentication backend (Trustbuilder). It handles the web authentication experience. It must be developed and hosted on your side.
Out-of-Band (OOB) authentication is when a user receives an authentication request on a separate device (mobile app) to approve a login or transaction. In this case, the custom login portal calls Trustbuilder APIs to track authentication requests status and then display the right screens to users.
API endpoints:
-
Send authentication notification to user devices
/api/v1/mfa/login/tenants/{tntAlias}/auth-sessions/{authSessionId}/outofband-request -
Check the status on ongoing authentication sessions
/api/v1/mfa/login/tenants/{tntAlias}/auth-sessions/{authSessionId}/status -
Retrieve redirection information after user authentication
/api/v1/mfa/login/tenants/{tntAlias}/auth-sessions/{authSessionId}/get-auth-code
The interactions between the custom login portal and TrustBuilder are described in the Operations section below.
Authentication Method selection
The Service Provider backend should retrieve authentication methods available for users:
API endpoints:
-
Retrieve authentication methods for a user
/api/v1/sso/registration/enroll/users/{user_id}/method-selection -
Send to Trustbuilder the selected authentication method for a user
/api/v1/sso/registration/enroll/users/{user_id}/select-method
Trustbuilder Authenticator Web SDK available soon
The custom login portal can embed TrustBuilder Authenticator Web SDK to implement browser-based authentication directly in your portal.
5. Operations
User first registration
User first registration is the process that allows a user to register an authentication method for the first time and define their secret code.
coming soon
Authentication with SDK mobile app (OOB)
This flow describes an out-of-band (OOB) authentication scenario where a user accesses a web application (Service Provider) from a browser and validates the authentication request using a mobile application embedding the TrustBuilder SDK.
The authentication process relies on OpenID Connect (OIDC) and uses a custom login portal to provide a white-label authentication experience and orchestrate the communication with TrustBuilder during the authentication flow.
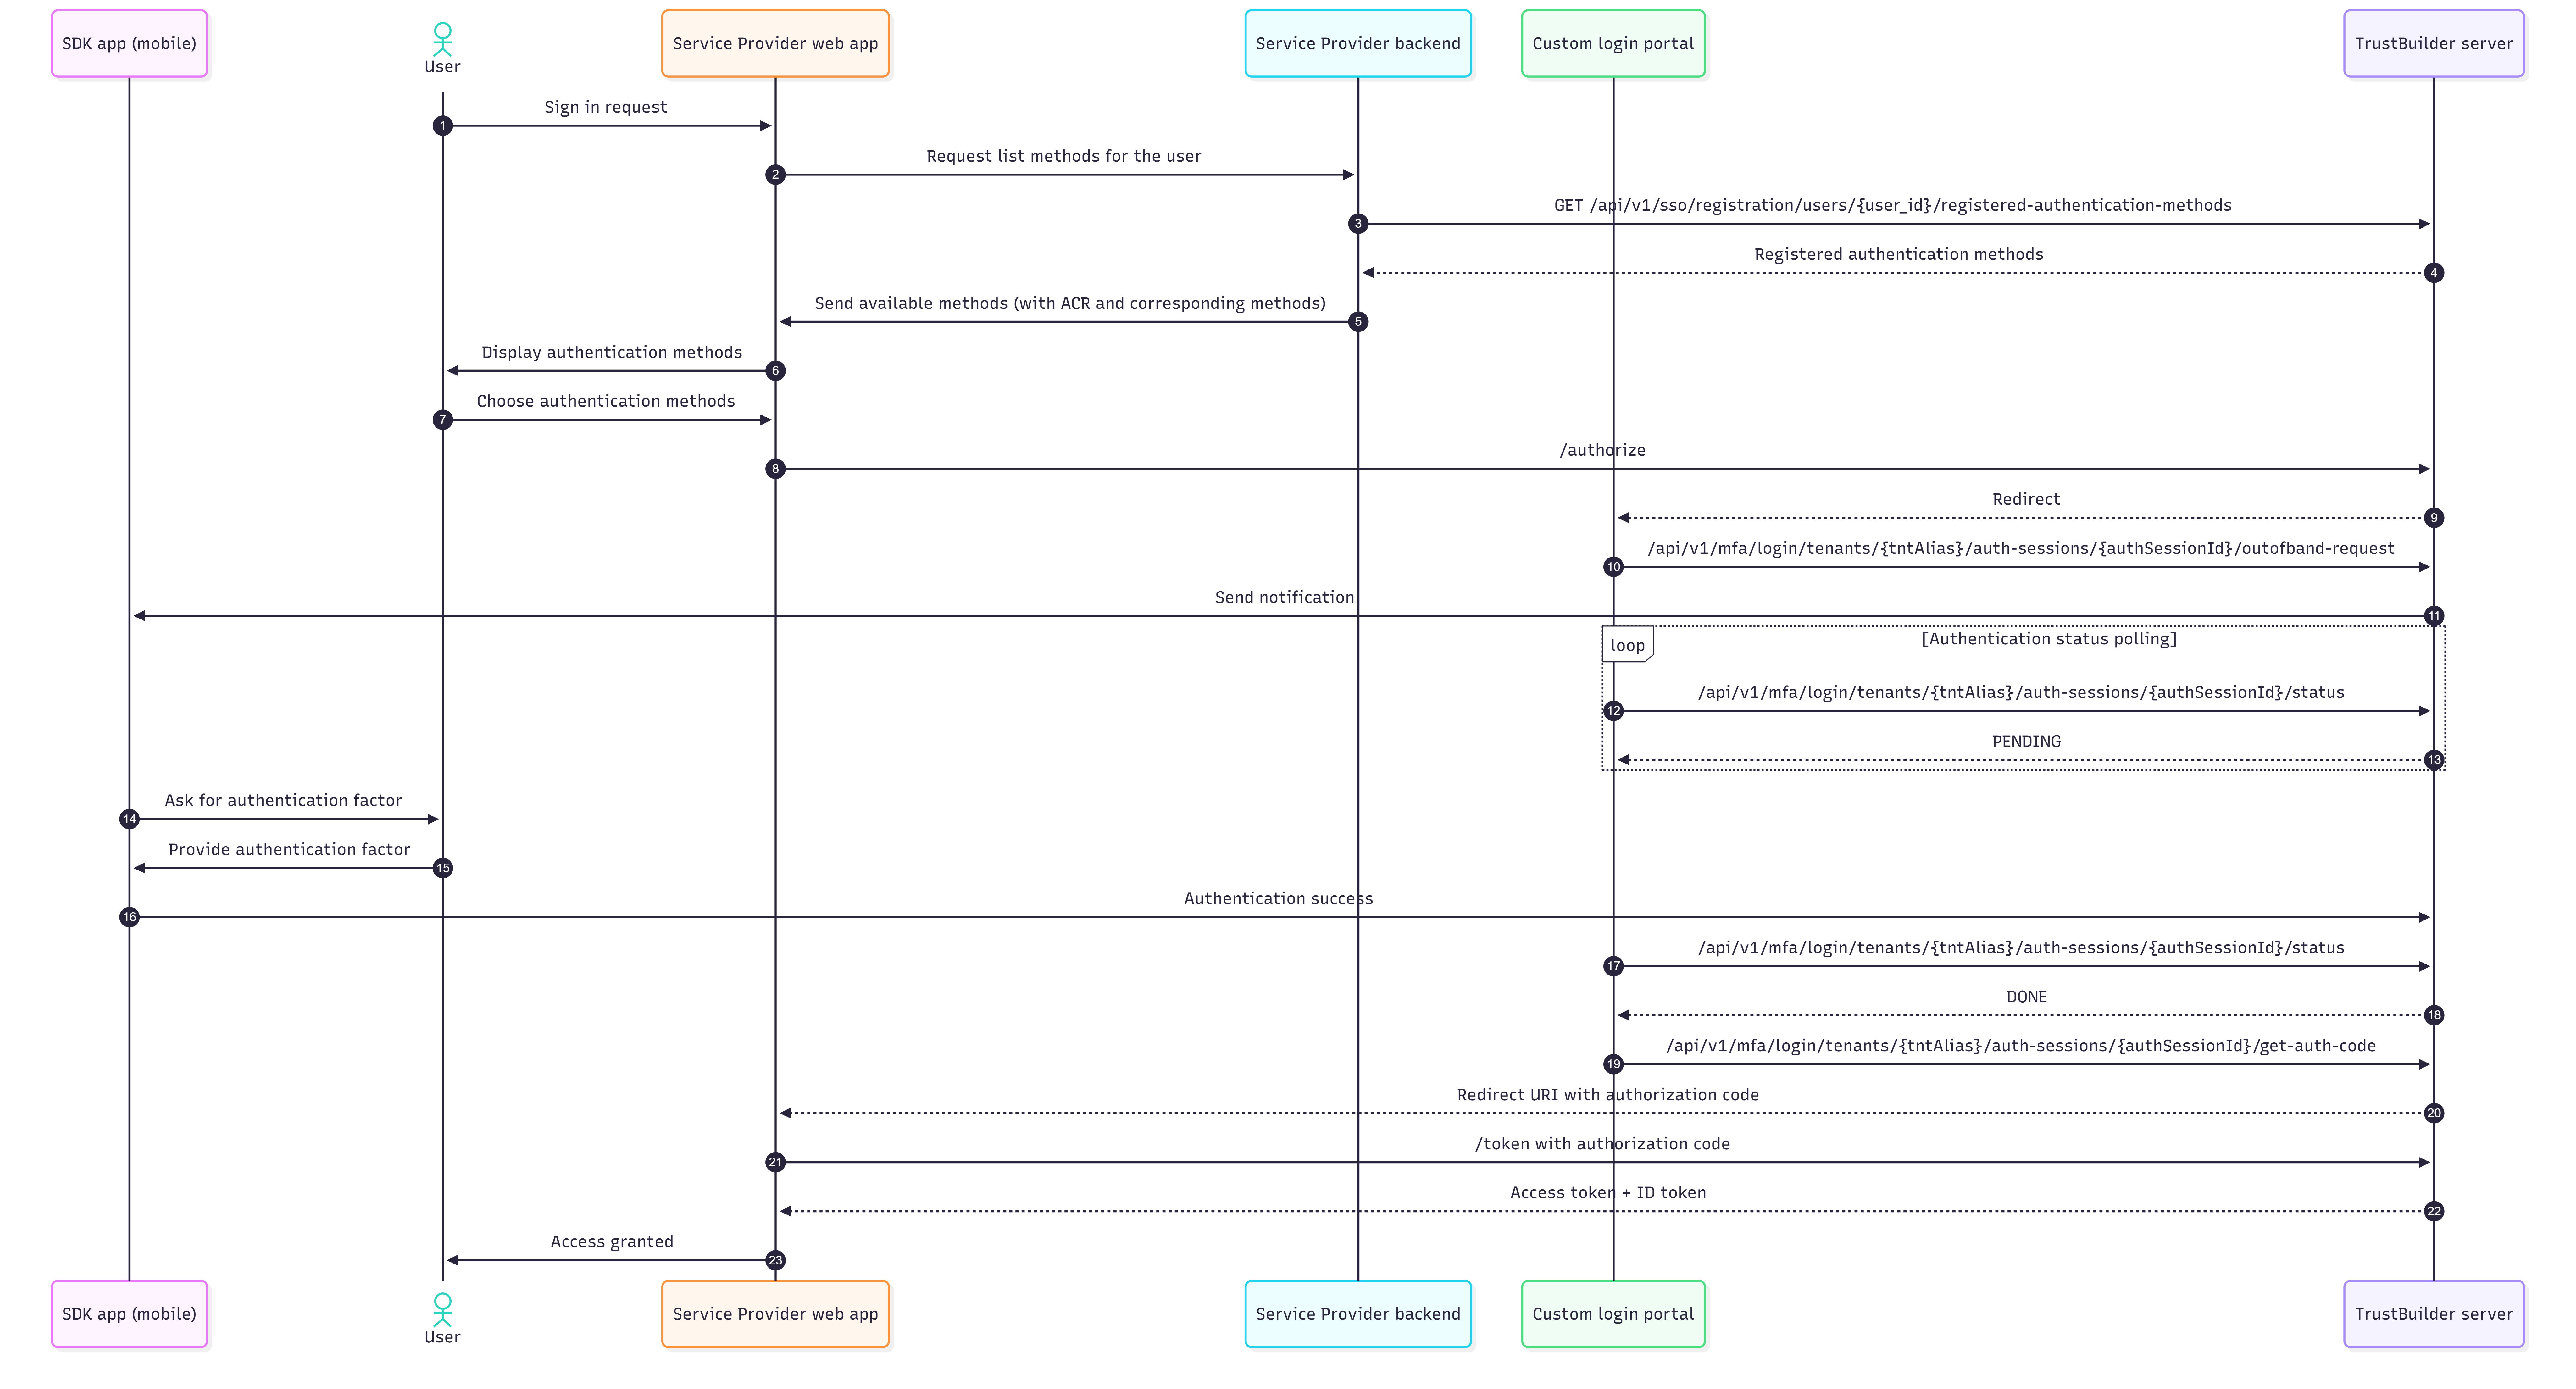
The following diagram illustrates a specific OOB authentication scenario. The flow may need to be adapted according to the project requirements and architecture.
STEPS
|
Participant |
Description |
|---|---|
|
SDK mobile application |
The mobile application integrating the TrustBuilder SDK. It is used to receive authentication requests and perform strong authentication. |
|
User |
The end user attempting to authenticate and access the application. |
|
Service Provider Web app |
The client application that initiates the OIDC authentication flow and grants access after successful authentication. It should be declared in TrustBuilder as an OIDC Regular Web App. |
|
Service Provider Backend |
The backend service responsible for securely calling TrustBuilder APIs, such as retrieving the user's registered authentication methods, and providing the required data to the Web Application. It should be declared in TrustBuilder as an OAuth Machine-to-Machine application. |
|
Custom Login Portal |
Frontend application used to customize the user authentication experience and manage the out-of-band authentication workflow. |
|
TrustBuilder Server |
Server handling authorization and authentication. |
-
The user initiates a sign-in request from the Service Provider web application using a browser.
-
The Service Provider web application requests the list of authentication methods available for the user from the Service Provider backend.
-
The Service Provider backend calls the TrustBuilder API to retrieve the authentication methods registered for the user account.
-
Trustbuilder retrieves the user then their registered authentication method. It sends it back to the Service Provider backend.
registered type (TB_MFA_MOBILE, TB_MFA_BROWSER, TB_MFA_DESKTOP) id osName appId appVersion isBlocked lastAuthDate -
The Service Provider Backend retrieves the user's registered authentication methods and matches them with the ACR. It then sends the list of available authentication methods to the Service Provider Web Application.
-
The web application displays the available authentication methods to the user, allowing them to select the preferred authentication option.
-
The user selects the authentication method linked to the mobile SDK app.
-
The Service Provider web application initiates the OIDC authentication flow by calling the /authorize endpoint.
-
TrustBuilder redirects the browser to the Custom Login Portal to continue the authentication journey using the white-label interface.
-
The Custom Login Portal creates an out-of-band authentication request by calling
/api/v1/mfa/login/tenants/{tntAlias}/auth-sessions/{authSessionId}/outofband-request. This triggers the authentication request. -
TrustBuilder sends a push notification to the mobile application embedding the TrustBuilder SDK.
-
While waiting for the user authentication, the Custom Login Portal periodically polls the TrustBuilder authentication session status endpoint
/api/v1/mfa/login/tenants/{tntAlias}/auth-sessions/{authSessionId}/status. -
Initially, the session status is returned as
pending. -
The mobile application prompts the user to validate the authentication request using the required authentication factor.
-
The user provides the requested authentication factor, such as biometric or secret code.
-
The SDK application sends the successful authentication result to TrustBuilder.
-
The custom login portal keep polling the authentication session status endpoint.
/api/v1/mfa/login/tenants/{tntAlias}/auth-sessions/{authSessionId}/status -
Once authentication succeeds, TrustBuilder returns a
donestatus. -
The custom login portal request the authentication result by calling
/api/v1/mfa/login/tenants/{tntAlias}/auth-sessions/{authSessionId}/get-auth-code. -
TrustBuilder finalizes the OIDC
/authorizeflow and redirects the browser back to the Service Provider web application using the redirect URI and an authorization code. -
The Service Provider webapp securely exchanges the authorization code for OIDC tokens by calling the
/tokenendpoint on TrustBuilder. -
TrustBuilder validates the authorization code and returns the OIDC tokens, including the access token and ID token.
-
Access to the Service Provider is granted to the user.