As an administrator, you can define which authentication methods are visible and usable by users. You can also customize name, logo and description to ensure clarity during user authentication method selection.
Authentication methods in TrustBuilder are grouped into two categories: internal and external.
-
Internal: managed by TrustBuilder
-
Built-in: Trustbuilder Authenticator Web, Mobile and Desktop, Security keys (Trustbuilder FIDO2).
-
Custom: application relying on TrustBuilder SDK.
-
-
External: based on third-party Identity Providers (IdP).
Enable / Disable authentication methods
For each authentication method, use toggles to enable or disable authentication and registration:
|
Allow authentication |
Controls whether users can authenticate using the authentication method.
|
|---|---|
|
Allow registration |
Controls whether users can register the authentication method
This is only available for internal methods. For external methods, the authentication methods are directly registered on the IdP. |
Add an authentication method
TrustBuilder allows you to add internal and external authentication methods.
Internal method
Internal authentication methods are maintained by TrustBuilder. To add a custom authentication method embedding Trustbuilder SDK:
-
Go to Authentication > Authentication Methods.
-
Click + Add an internal method.
-
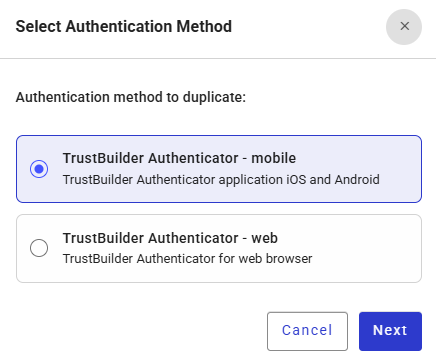
Select the application type:
-
Trustbuilder Authenticator - mobile for mobile app integrating Trustbuilder mobile SDK,
-
Trustbuilder Authenticator - web for page integrating Trustbuilder web SDK.
-
-
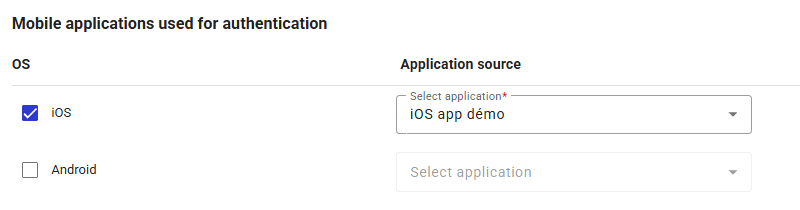
For Trustbuilder Authenticator - mobile, select the operating system(s) (Android and/or iOS) and the associated Custom Application (see Custom Applications).
-
Optional - Select the login portal used for users authentications.
By default, Trustbuilder login portal is selected. Select the custom login portal embedding Trustbuilder Authenticator SDK. (see Custom Applications)
-
Customize the user-facing content:
-
Display Name: Label shown on the button. It should be clear and user-friendly.
Max 50 characters -
Description: Optional text under the display name, giving users additional information.
Max 120 characters -
Logo: Icon shown on the button.
-
Preview authentication button: Preview of what users will see at authentication method selection.
-
-
Click Add.
The custom internal authentication method is successfully created. -
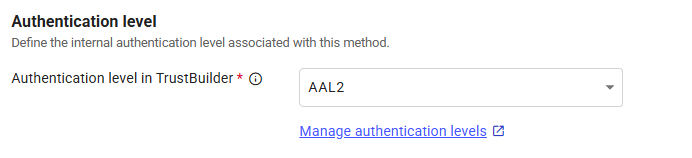
Configure the authentication level of this authentication method:
-
Click on the

-
Select the authentication level associated with this method. This is used in authorization policies.
-
External method
External authentication methods rely on third-party Identity Providers (IdP).
-
Go to Authentication > Authentication Methods.
-
Click + Add an external method.
-
Select the Identity Provider associated with this authentication method.

An IdP can support multiple authentication methods but each method must have a different authentication context.
-
Configure the authentication level:
-
Select the authentication level associated with this method. This is used in authorization policies.
-
Select the authentication level to indicate what TrustBuilder expects from external IdP:
-
No value expected (default)
-
Authentication Context Class Reference (ACR) the expected ACR value.
Example:urn:oasis:names:tc:SAML:2.0:ac:classes:PasswordProtectedTransport -
Authentication Methods References (AMR): the expected AMR value.
Examples:pwd(password),mfa(multi-factor),otp(one-time passcode)The IdP returns what it applied during authentication and TrustBuilder checks if it matches expectations.
-
-
-
Customize the user-facing content:
-
Display Name: Label shown on the button. It should be clear and user-friendly.
Max 50 characters -
Description: Optional text under the display name, giving users additional information.
Max 120 characters -
Logo: Icon shown on the button.
-
Preview authentication button: Preview of what users will see at authentication method selection.
-
-
Click Add.
The authentication method is successfully created.
Edit an authentication method
-
Go to Authentication > Authentication Methods.
-
Click
-
Switch between tabs to configure parameters.
-
Click on Save changes.
Delete an authentication method
-
Go to Authentication > Authentication Methods.
-
Click

-
Click on Delete to confirm.
The authentication method is successfully deleted.
This authentication method will be permanently deleted. It will no longer be available in your authorization policies and users relying on it exclusively will be unable to sign in.