
TrustBuilder Safe-T

TrustBuilder Authenticator - Mobile app

Installing Authenticator app

TrustBuilder Authenticator App for mobile is available for the following operating systems:

First app launch

To get started with TrustBuilder Authenticator app, you should first add a new account.

Prerequisite: an activation code or link. To get an activation code or link, contact your administrator or generate it by yourself.

  1. Launch TrustBuilder Authenticator application.

  2. Check “I agree” to give your consent to the Privacy Policy.

  3. Allow Authenticator to take pictures (this is used to scan QR codes).

  4. Enter a valid activation code and click the validate button.

  5. Define or enter your Secret code.

You have successfully added your account. This device is now registered as an authentication method. You can use it for authentication.

Overview

From the home page you can perform several actions:
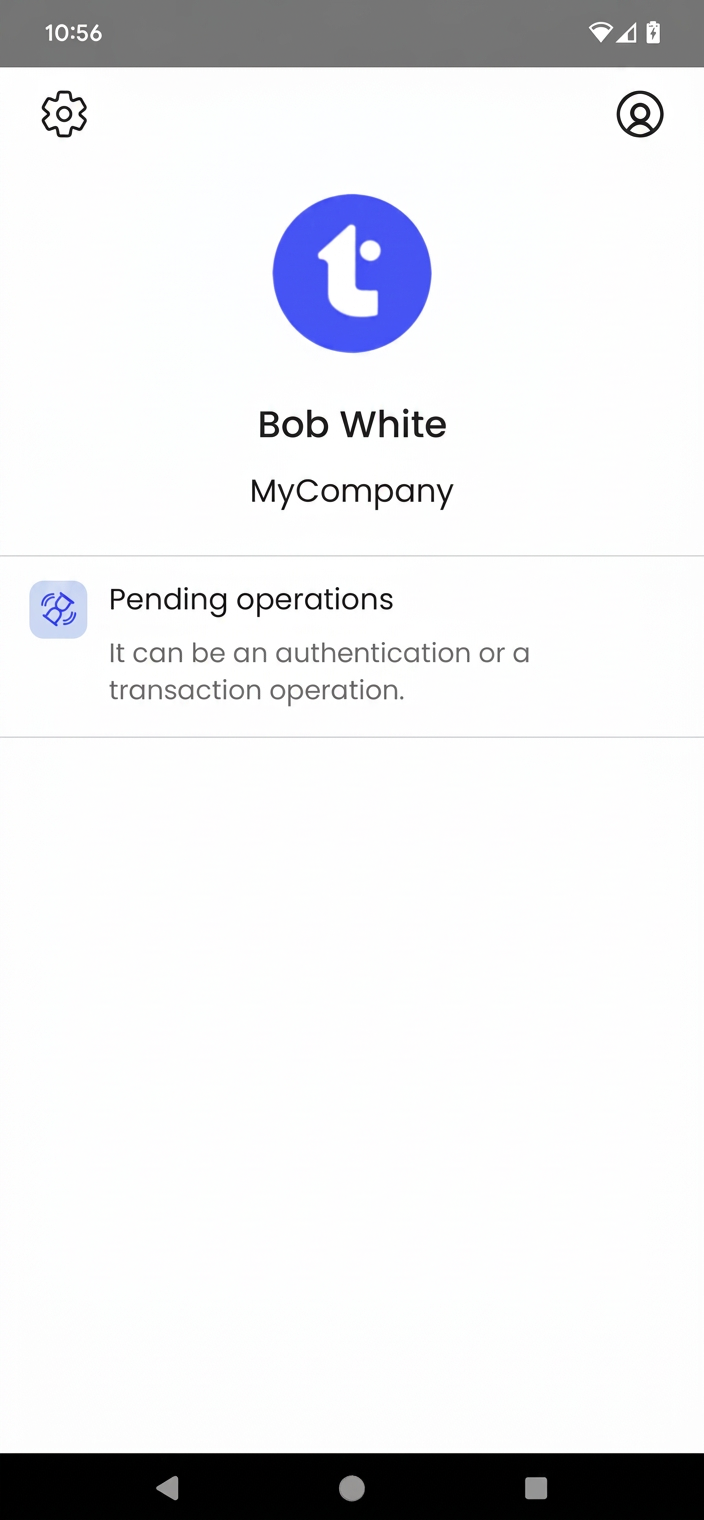

The screen shows Bob White from MyCompany with a notification for pending operations.

Pending operations: check pending operation such as authentication requests or transaction confirmation requests.


image-20240729-095159.png (user icon): manage your account (Secret code, authentication methods) or add a new account.

image-20240729-095353.png (cogwheel icon): see and configure your application (language, theme, app version).


Authenticate with the app

There are several ways to authenticate using the TrustBuilder Authenticator application. Depending on how the settings are configured, you may be able to authenticate using the following methods:

Receive a push notification

You will receive a push notification trough TrustBuilder Authenticator app. You should then approve or reject the pending operation. Each approval operation is protected by secret code or biometric.

  1. Click on the notification to open the application.

    Authentication request (1).gif
  2. Accept or reject the authentication request.
    Enter your secret code or provide a biometric factor if requested.

Retrieve pending operations

This feature allows the app to fetch any active pending operations when no notifications are available.

  1. On the app’s home page, click on Pending operations.

    The screen shows Bob White from MyCompany with a notification for pending operations.
  2. If there is more than on pending operations, select the relevant one from the list.

  3. Approve or reject the operation.
    Enter your secret code or provide the biometric factor if requested.

Accept or Reject an authentication request

When receiving an authentication request, the app will ask 'Did you initiate this authentication?'.
There are two options:

  • Yes, it's me – Confirm your identity by entering your authentication factor to proceed.

  • No – In this case, you can choose one of the following actions:

    • Ignore this authentication: the request remains active. It can still be approved from another device.

    • Reject this authentication: the request is canceled and cannot be approved anymore. This option is useful if you suspect the request is malicious.

Screenshot_20250123-112534.png

Configuration

Managing accounts

Adding a new account
  • Prerequisite: you should have a valid activation code or a valid QR code for the account you wish to add.

  1. Click on the user icon in the top-right corner.

  2. Click on Add an account.

  3. Select QR code or Activation code depending on your case.

  4. Enter a valid Activation code or scan a valid QR code to add a new account on this device.

Your account is successfully added to TrustBuilder Authenticator app on the current device.

Switching between accounts

If you registered more than one account, you may need to switch from one account to another.

  1. Click on the user icon on the top right corner.

  2. Click on the account you wish to use.

Removing account from the app

Removing your account from the application in the current device means that the account and all its data will be removed from the current trusted device.

  1. Click on the user icon in the top-right corner.

  2. Go to Manage my account > Remove this account.

  3. Click on Remove this account then on Yes, remove to confirm your choice.

Your account has successfully been removed from this device.

Managing secret code

Modifying your secret code
  1. Click on the user icon in the top-right corner.

  2. Go to Manage my account > Security.

  3. In secret code section, click on Modify.

  4. Enter your current secret code and define your new secret code.

  5. Click on Modify my secret code to save.

Your new secret code has been successfully modified.

Resetting your secret code

Prerequisite: a Reset code (or a QR code for secret code reset)

  1. Click on the user icon in the top-right corner.

  2. Go to Manage my account > Security.

  3. In secret code section, click on I forgot my secret code.

  4. Enter your reset code (or scan a QR code for secret code reset).
    If you don’t have a reset code, click on “I don’t have a reset code” and follow the instructions.

  5. Click on Verify.

  6. Define your new secret code.

  7. Click on Define my new secret code to save.

Your new secret code has been successfully reset.

Configuring biometric

Registering biometric

You can register biometric information (fingerprint and/or facial recognition).

  1. Click on the user icon in the top-right corner.

  2. Go to Manage my account > Security.

  3. In Biometrics section, enable biometric authentication.

  4. Click on I agree to approve the listed statements.

  5. Follow the instructions (press the touch sensor or put the phone in front of your face).
    This action compares your fingerprint/face with the one stored on your device. Both must match to link the biometric data on your phone to your current account in the app.

If the provided biometric matches the information stored on your device, biometric authentication will be successfully enabled. You can now use it for authentication.

About supported biometrics

  • On iOS:

    • When Touch Id (fingerprint sensor) is available on system, it can be used in TrustBuilder Authenticator as biometric factor

    • When Face Id (facial recognition) is available on system, it can be used in TrustBuilder Authenticator as biometric factor

  • On Android:

    • When fingerprint sensor is available on system, it can be used in TrustBuilder Authenticator as biometric factor

    • When facial recognition is available on system, it cannot be used in TrustBuilder Authenticator as biometric factor (Currently not supported)

Disabling biometric autenthication

Biometric authentication is automatically disabled if you change your biometric data on your phone. Note that you cannot disable biometric authentication directly from the application.

Displaying account information

To display your account information:

  1. Click on the user icon in the top-right corner.

  2. Go to Manage my account > Account information.

Your account and some context information are displayed. This could be useful for the helpdesk team when troubleshooting any issue the user might have.

Account information

  • Account :

    • Login → current user’s login

  • Support information:

    • Device alias → the alias of the current device

    • Notification reception →

    • Platform version → this information will be useful during platform upgrades.

Displaying account information

To display your account information:

  1. Click on the user icon in the top-right corner.

  2. Go to Manage my account > Account information.

Your account and some context information are displayed. This could be useful for the helpdesk team when troubleshooting any issue the user might have.

Account information

  • Account :

    • Login → current user’s login

  • Support information:

    • Device alias → the alias of the current device

    • Notification reception → the status of the notification registration

    • Platform version → this information will be useful during platform upgrades.
      Default is 1 for the current platform

Managing trusted devices

Adding a new trusted device

You can generate an activation code and a QR code to be used to add a new trusted device to your account.

  1. Click on the user icon in the top-right corner.

  2. Go to Manage my account > Trusted devices.

  3. Click on + Add a trusted device.

A QR code and an activation code will be displayed. Use either one on the new trusted device to add it to your account.

Renaming a trusted device
  1. Click on the user icon in the top-right corner.

  2. Go to Manage my account > Trusted devices.

  3. In your trusted devices list, click on the trusted device to be renamed.

  4. Click on the pen icon in the top-right corner.

  5. Rename the trusted device and click on Update to save.

The selected trusted device has been successfully renamed.

Lock a trusted device

You can lock any trusted devices registered in your account, except the one you are currently using.

  1. Click on the user icon in the top-right corner.

  2. Go to Manage my account > Trusted devices.

  3. In your trusted devices list, click on the trusted device you want to lock.

  4. Click on Lock this trusted device, then confirm by clicking Yes, lock.

The selected trusted device has been successfully locked.

Deleting a trusted device

You can delete any trusted devices registered in your account, except the one you are currently using.

  1. Click on the user icon in the top-right corner.

  2. Go to Manage my account > Trusted devices.

  3. In your trusted devices list, click on the trusted device you want to delete.

  4. Click on Delete this trusted device, then confirm by clicking Yes, delete.

The selected trusted device has been successfully deleted.

App settings

Setting the app's language
  1. Click on the cogwheel icon in the top-left corner to access the application settings.

  2. Click on Language.

  3. Select your language.

The application switches to selected language.

The application's default language is determined by the phone's system language. If the system language is not supported, the application will default to English.

The following languages are supported by the application:

  • English

  • Deutsch (German)

  • Nederlands (Dutch)

  • Español (Spanish)

  • Français (French)

  • Italiano (Italian)

  • 中文 (Chinese)

Setting light/dark mode
  1. Click on the cogwheel icon in the top-left corner to access the application settings.

  2. Click on Mode.

  3. Select a mode:

    • Light → your application will switch to light mode.

    • Dark → your application will switch to dark mode.

    • System → the mode will follow your device’s settings.

The application switches to the selected mode.

The application's default mode is determined by the phone's system mode.

App version

To get your application version, click on the cogwheel icon in the top-left corner. In the About section, you will see the “Application version” parameter.

Accessibility Features

TrustBuilder Authenticator 7th version is designed to be accessible for users with various disabilities, in line with WCAG 2.1 guidelines. Below are the key accessibility features available in the app:

  • Screen Reader compatibility
    TrustBuilder Authenticator is fully compatible with VoiceOver (iOS) and TalkBack (Android). Users can navigate the app's menus, input fields, and authentication processes. Just turn on the screen reader on your device, and the app will provide voice instructions.

  • Keyboard navigation
    Users can navigate the app using keyboard shortcuts. Use the “Tab key” to move between elements and “Enter” to select. The app follows a logical tab order to ensure seamless navigation.

  • Text Size and Contrast
    TrustBuilder Authenticator app supports dynamic text scaling. Users can adjust the font size in their device settings and the app will automatically update to reflect the changes. The app also supports the high-contrast text mode, which changes the text to black or white to improve visibility against the background.

Compatibility

  • Minimum requirements are the minimum version of the device operating system on which the Authenticator application can be installed. User’s devices currently running an earlier version of the operating system cannot upgrade to the current version of Authenticator. While the previously installed version of Authenticator may still function, it will no longer fall within TrustBuilder’s recommended usage or support scope.

  • Supported OS version. For security reasons we highly recommend using an operating system that is supported and that benefits from security patches. In case of a reported issue, TrustBuilder will reproduce it on a supported OS version.

You will find the details of minimum requirements and supported version by operating system in the following table:

Operating System

Minimum requirements

Supported Versions

Android

Android 8

Android 12 and higher

iOS

iOS 15.2

iOS 16 and higher

Authenticator version lifecycle

The current version is the most recent version of the application that is available for download or update through app stores (e.g., Google Play or Apple App Store). It is actively maintained and updated at least twice a year, it includes the latest features and security patches, and is recommended for all users as the primary version to install and use. As the current version is regularly updated, is is recommended to turn auto-update ON.

For older versions, TrustBuilder will provide support for versions released within the past year. In the event of a blocking issue, our investigation may lead to one of two outcomes: either the issue has already been resolved in the latest version, or it will be addressed in the next release. In both cases, upgrading to the latest version (current version) will be required to benefit from the fix.

Versions older than one year ago are deprecated. TrustBuilder does not accept support calls on these versions. Usage is discouraged as they pose potential risks (e.g., security vulnerabilities or reduced functionality). Sooner or later they will experience compatibility issues with either the environment or the platform and will no longer be functional.

Summary table

Version

Support provided

Updates

Recommendation

Current Version

Full support and updates

Yes

Turn auto-update on to stay up-to-date

Less than one year

Support calls

No

Upgrade to current version is recommended

Older than one year ago

Deprecated. No support calls.

No

Upgrade to current version