SAML
SAML (Security Assertion Markup Language) is an open standard used to exchange authentication and authorization data between an Identity Provider (IdP) and a Service Provider (SP).
It enables Single Sign-On (SSO) by allowing users to authenticate once with a trusted IdP and then access multiple applications without re-entering their credentials.
When integrating with Trustbuilder as the Identity Provider, your application relies on Trustbuilder to authenticate users and issue a SAML Assertion, a digitally signed XML token containing identity information (e.g., name, email, unique identifier). This assertion allows your application to verify who the user is and what they are allowed to access.
Example
A user attempts to access your application (Service Provider).
The user is redirected to Trustbuilder, acting as the Identity Provider
After successful authentication, Trustbuilder sends a SAML Response containing a SAML Assertion.
Your application validates the response signature and grants access based on the information in the assertion.
Set up a SAML-based integration
Log in to the Admin Portal.
Go to Applications > Applications > + Set up app integration.
Select SAML.
Configure the application parameters:
Parameter | Description |
|---|---|
Name | Give your application a clear and descriptive name. This name will appear in the applications list and on authentication pages. |
Description | (Optional) Add a short description for your application. |
Logo | Upload an image file. The logo will be visible in the applications list and on the authentication pages. |
Subject Management | Select the user attribute that uniquely identifies the user. This value will be used as the NameID in the SAML assertion to identify the user.
|
Policies | Select the authorization policy that defines the access rules for this application. If not created click on Create a new authorization policy. More information |
For SP Metadata configuration, select one of the following options depending on whether the Service Provider has already provided its metadata:
Option A - Generate metadata automatically when the Service Provider hasn't shared its metadata. This will generate temporary Service Provider metadata. These metadata must be replaced later with the official SP metadata once they are available. You will be able to download Trustbuilder IdP metadata and provide it to the SP.
Option B - Import your metadata file when the Service Provider has already provided its metadata. This allows to provide the official SP metadata to Trustbuilder.
Option A - Generate metadata automatically
Use this option when the Service Provider hasn't shared its metadata yet.
Click Create.
The application will be created with temporary SP metadata first.Go to IdP Metadata tab to get the Trustbuilder IdP URL.
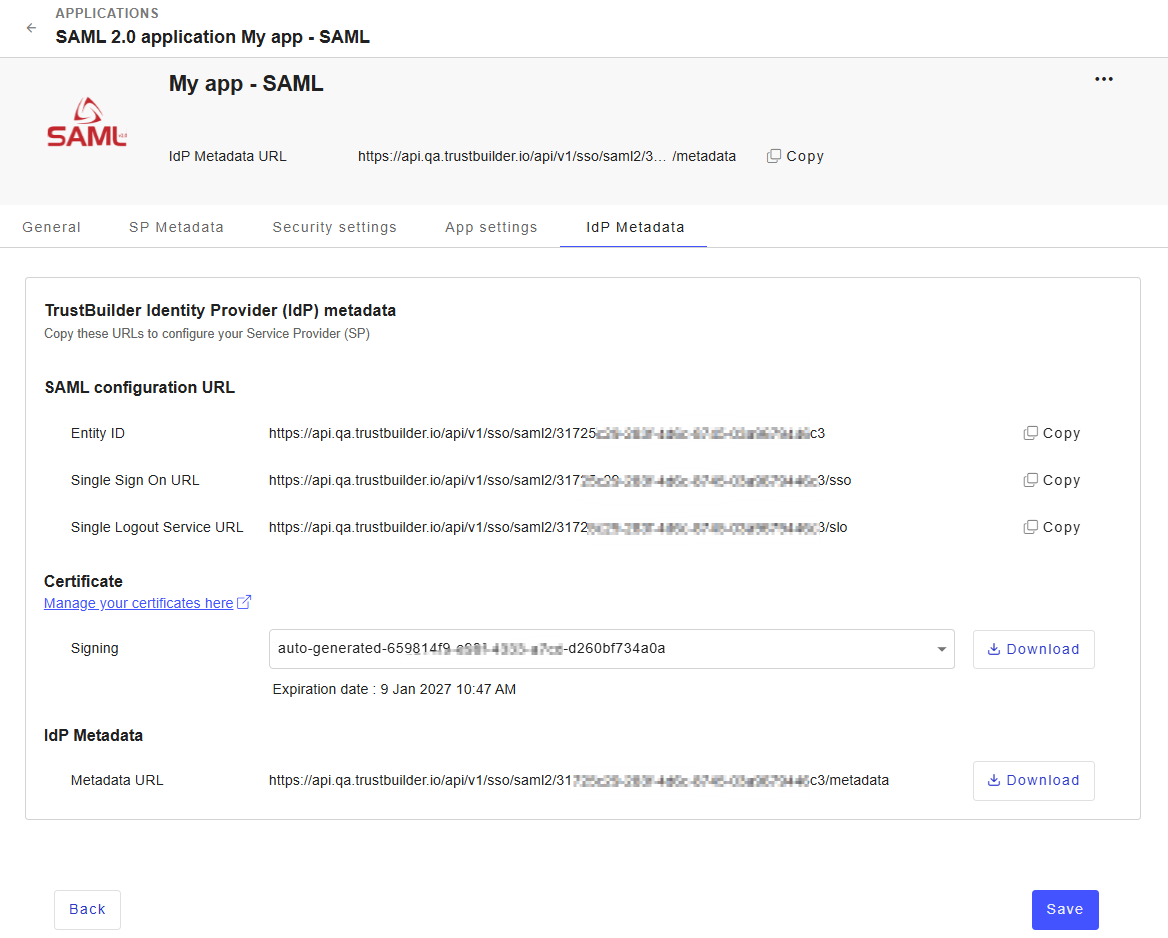
Go to your SP interface and provide the following URL to the Service Provider:
⚠️ The procedure defers depending on the SP.Entity ID → Trustbuilder IdP identifier
Single Sign On URL → URL used by the SP to initiate SSO
Single Logout Service URL → URL used for SAML logout requests
You can also copy the full IdP Metadata URL from the header.
Once the SP returns its metadata, go back to Trustbuilder admin portal.
In the application you created, go to SP metadata tab.
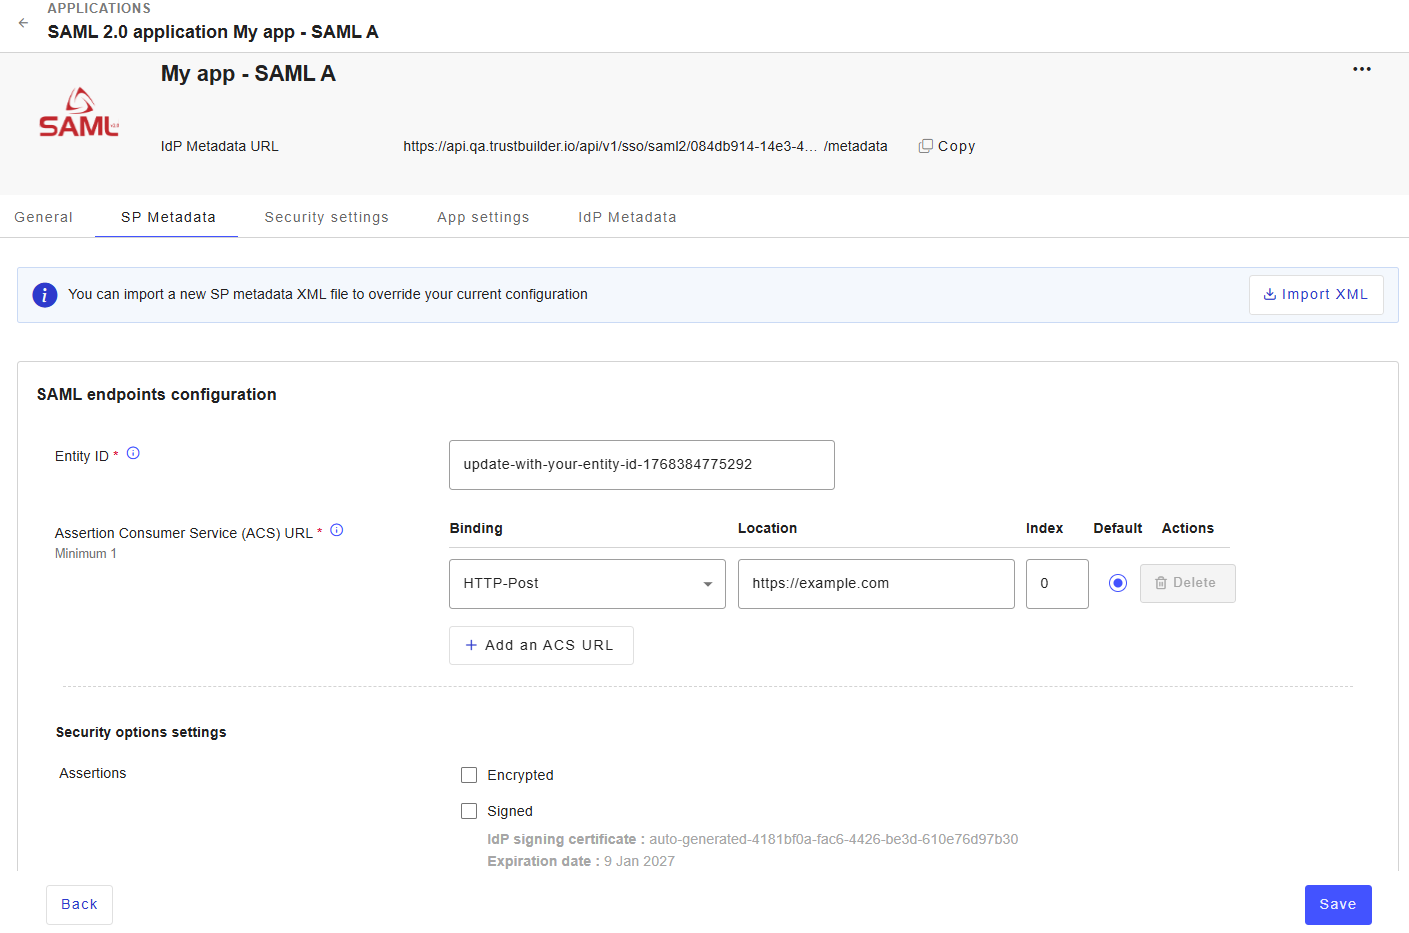
Click Import XML to upload the SP metadata XML file.

This automatically fills in the configuration with values from the SP metadata:
Entity ID → the unique identifier of the SAML application on the SP side.
ACS URL → Endpoint where Trustbuilder sends the SAML Response after authentication. At least one ACS URL is required.
The security options settings define how SAML exchanges between the SP and Trustbuilder are secured.
Assertions:
Encrypted → when enabled, Trustbuilder encrypts the SAML Assertion using the SP encryption certificate. The SP uses its private key to decrypt the assertion.
Signed → when enabled, Trustbuilder signs the SAML Assertion using its signing certificate. The current certificate and its expiration date are displayed. Click Change certificate if needed.
AuthnRequests:
Signed → when enabled, Trustbuilder expects signed AuthnRequests from the Service Provider. Trustbuilder validates the signature using the configured SP signing certificates.
Manage certificates used to secure SAML exchanges:
Encryption certificates are used by Trustbuilder to encrypt SAML Assertions for the Service Provider. Only one active encryption certificate is supported.
Signing certificates are used to verify signed AuthnRequests sent by the Service Provider. Multiple certificates can be configured to support certificate rotation. When multiple signing certificates are configured, Trustbuilder checks each one until the AuthnRequest signature is successfully validated.
 EXPIRED CERTIFICATES: Encryption and signing certificates are flagged when expired. You must replace them as soon as possible.
Click Save.
Option B - Import SP metadata file
Use this option when the Service Provider has already provided its metadata file or metadata URL.
You can upload an XML file or paste the metadata content directly.
Click Continue.
This automatically fills in the configuration with values from the SP metadata:
Entity ID → the unique identifier of the SAML application on the SP side.
ACS URL → Endpoint where Trustbuilder sends the SAML Response after authentication. At least one ACS URL is required.
The security options settings define how SAML exchanges between the SP and Trustbuilder are secured.
Assertions:
Encrypted → when enabled, Trustbuilder encrypts the SAML Assertion using the SP encryption certificate. The SP uses its private key to decrypt the assertion.
Signed → when enabled, Trustbuilder signs the SAML Assertion using its signing certificate. The current certificate and its expiration date are displayed. Click Change certificate if needed.
AuthnRequests:
Signed → when enabled, Trustbuilder expects signed AuthnRequests from the Service Provider. Trustbuilder validates the signature using the configured SP signing certificates.
Manage certificates used to secure SAML exchanges:
Encryption certificates are used by Trustbuilder to encrypt SAML Assertions for the Service Provider. Only one active encryption certificate is supported.
Signing certificates are used to verify signed AuthnRequests sent by the Service Provider. Multiple certificates can be configured to support certificate rotation. When multiple signing certificates are configured, Trustbuilder checks each one until the AuthnRequest signature is successfully validated.
EXPIRED CERTIFICATES: Encryption and signing certificates are flagged when expired. You must replace them as soon as possible.
Click Create.
Go to IdP Metadata tab to get the Trustbuilder IdP URL.
Go to your SP interface and provide the following URL to the Service Provider:
⚠️ The procedure defers depending on the SP.Entity ID → Trustbuilder IdP identifier
Single Sign On URL → URL used by the SP to initiate SSO
Single Logout Service URL → URL used for SAML logout requests
You can also copy the full IdP Metadata URL from the header.