Skip table of contents

TrustBuilder Authenticator (mobile app)

Version 7.x for Android and iOS

TrustBuilder Authenticator 7 is currently in beta on Android and iOS. Fill out this form if you wish to participate to the beta phase.

TrustBuilder Authenticator has been fully redesigned in version 7, offering an enhanced user experience. This page refers to the latest version.

If you are still using version 6 of TrustBuilder Authenticator, please refer to the previous documentation.

Installing Authenticator app

TrustBuilder Authenticator App for mobile is available for the following operating systems:

First app launch

To get started with TrustBuilder Authenticator app, you should first add a new account.

Prerequisite: an activation code (contact your administrator).

  1. Launch TrustBuilder Authenticator application.

  2. Check “I agree” to give your consent to the Privacy Policy.

  3. Allow Authenticator to take pictures (this is used to scan QR codes).

  4. Enter a valid activation code and click the validate button.

  5. Define a new PIN code.

You have successfully added your account. Your device is now activated as a trusted device. You can use it for authentication.

Overview

From the home page you can perform several actions:

Get pending operations: check pending operation such as authentication requests or transaction confirmation requests.

Scan a QR code: scan the QR code displayed in the authentication page to authenticate (from TrustBuilder Authenticator 6.31)

Generate One Time Password: generate a One-Time Password (OTP) and enter it in the authentication page.

Windows Logon: open a Windows session..

image-20240729-095159.png (user icon): manage your account (PIN, trusted devices) or add a new account.

image-20240729-095353.png (cogwheel icon): see and configure your application (language, theme, app version).

Authenticate with the app

There are several ways to authenticate using the TrustBuilder Authenticator application. Depending on how your service settings are configured, you may be able to authenticate using the following methods:

  • Receive a push notification,

  • Retreive pending operations,

  • Scan a QR code,

  • Generate a One-Time-Password (OTP),

  • Windows Logon

Receive a push notification

You will receive a push notification trough TrustBuilder Authenticator app. Push notifications can be sent automatically or triggered manually, depending on configuration. You should then approve or reject the pending operation. Each approval operation is protected by PIN code or biometric (except for services without PIN).

  1. On the authentication page, click OK to trigger the push notification.
    This step may not occur depending on the configuration. The push notification can be sent automatically.

  2. Click on the notification to open the application.

    Authentication request (1).gif
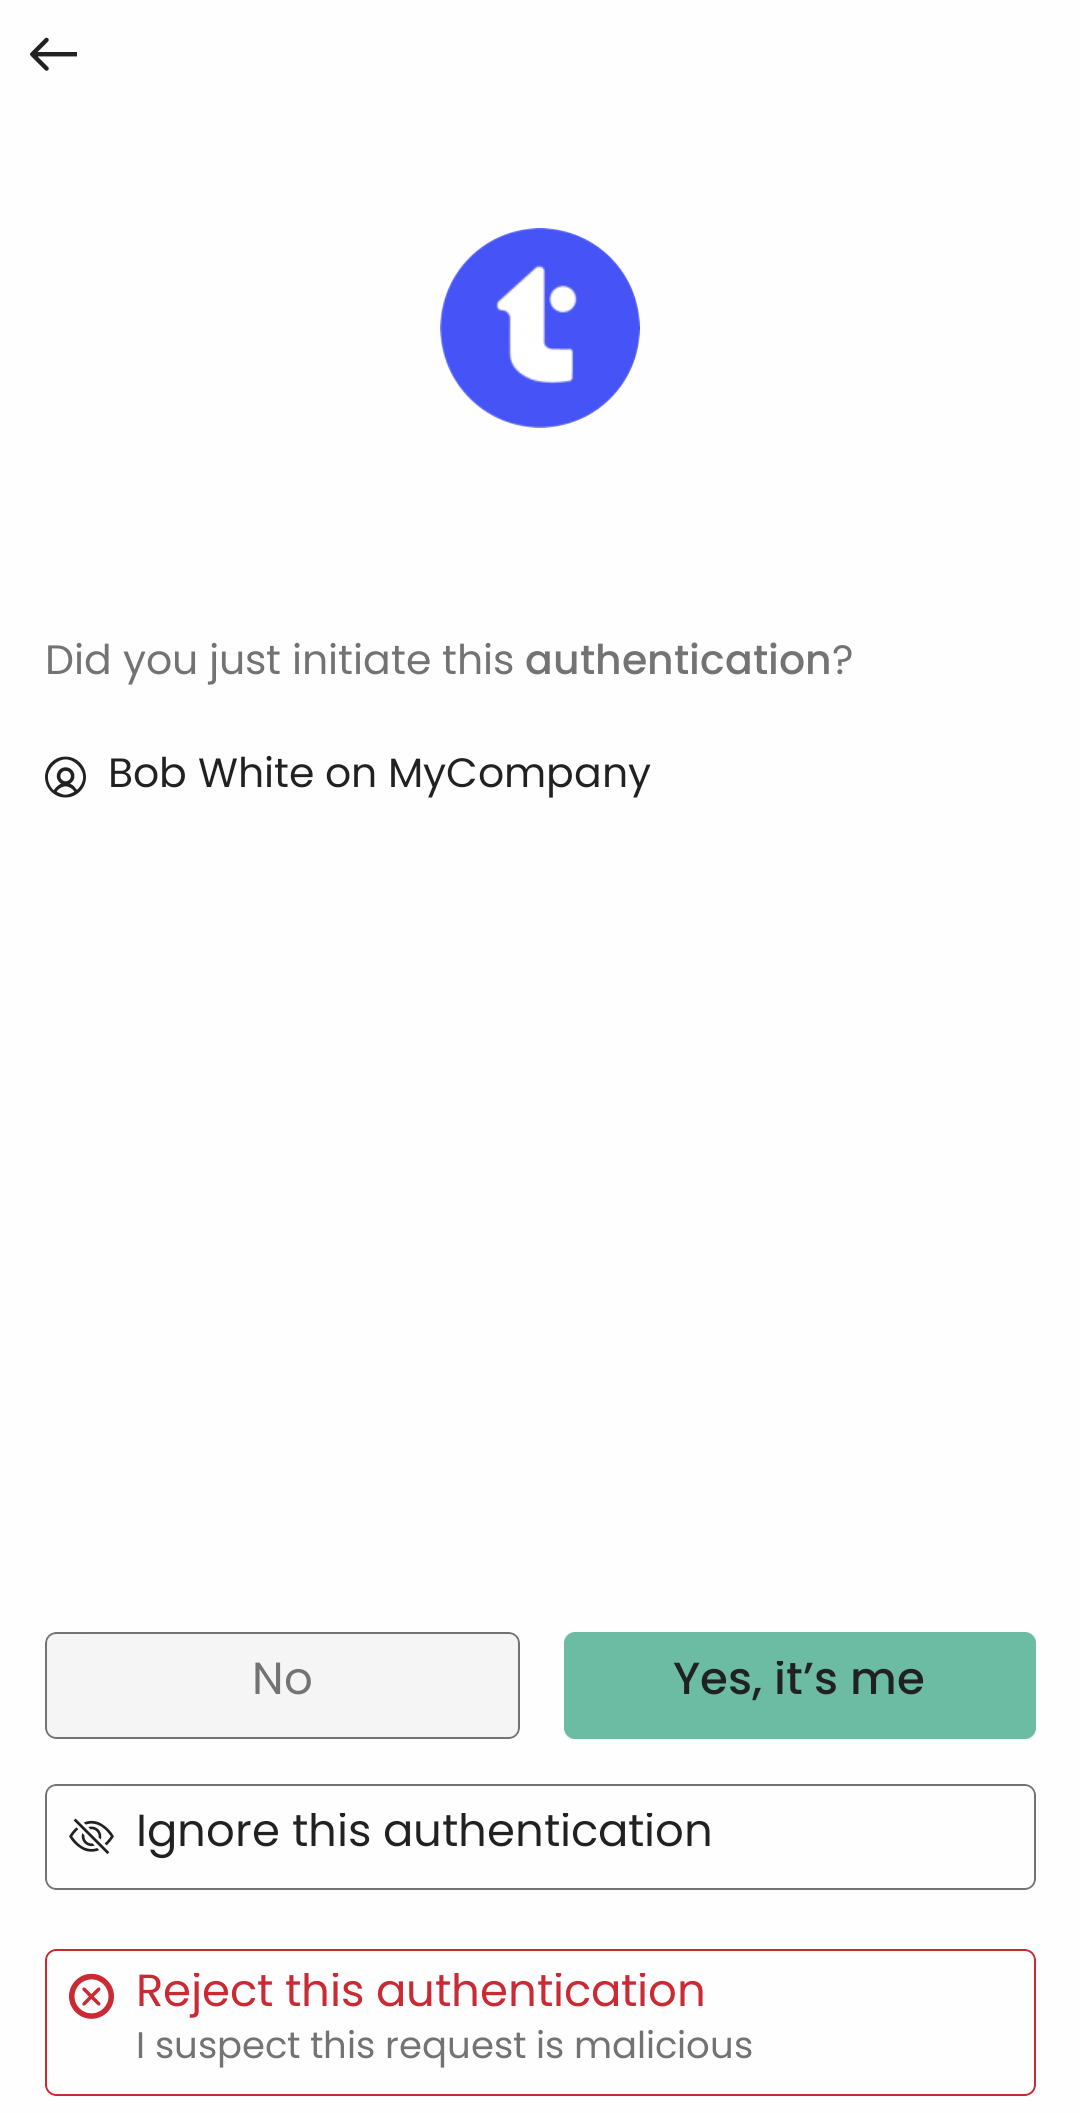
  3. Accept or reject the authentication request.
    Enter your PIN or provide a biometric factor if requested.

Retrieve pending operations

(Previously called "Authorize a connection" in version 6)
This feature allows the app to fetch any active pending operations when no notifications are available.

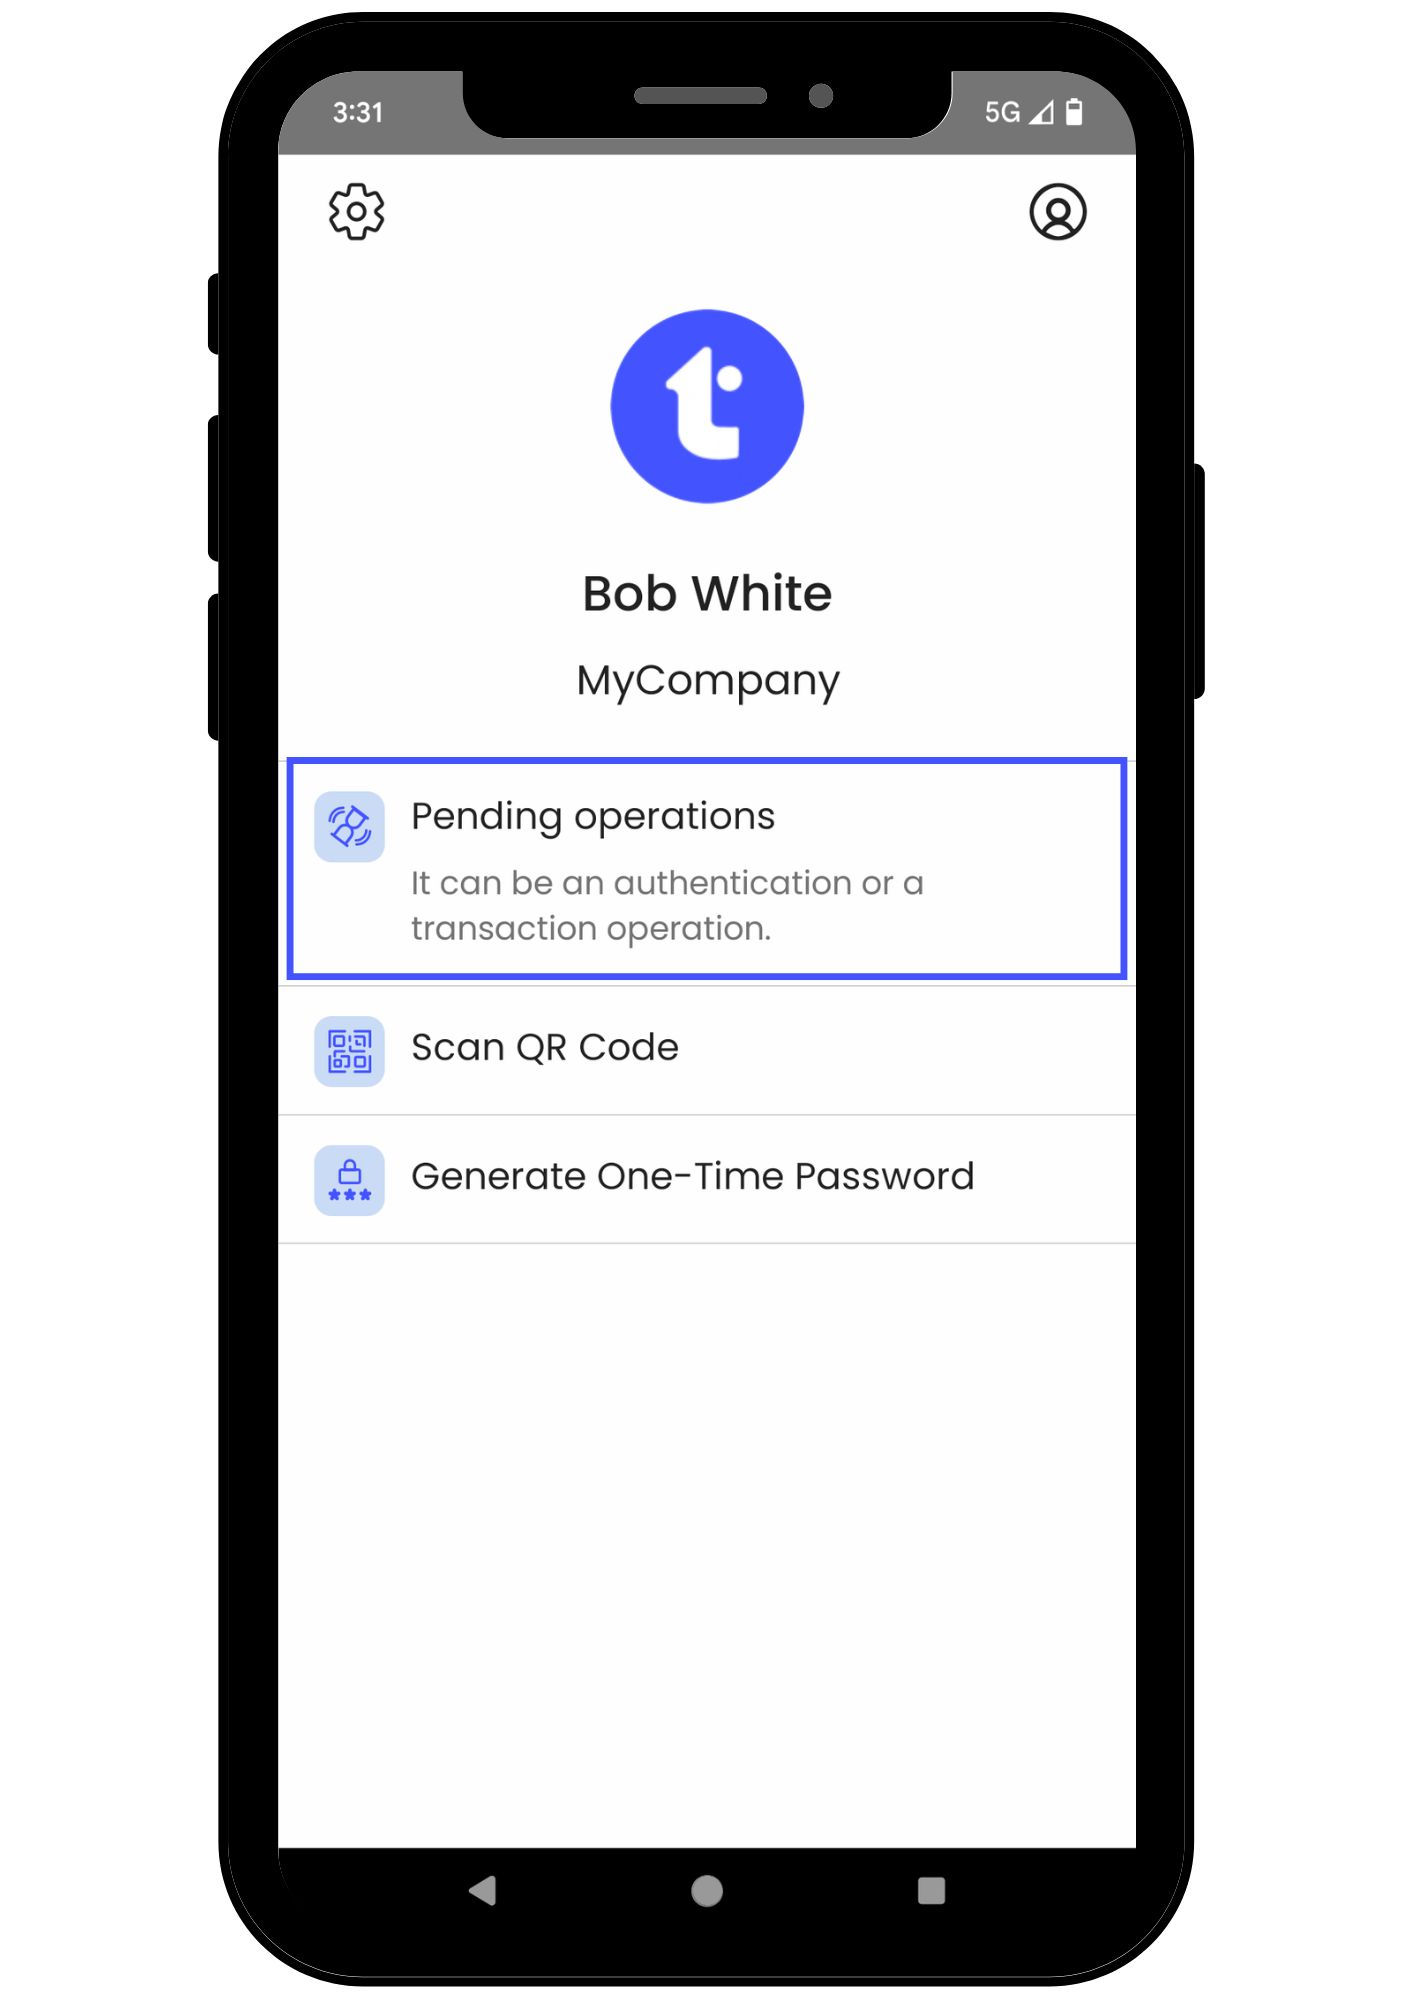
  1. On the app’s home page, click on Pending operations.
    Auth7 - Pending operation.jpg
  2. If there is more than on pending operations, select the relevant one from the list.

  3. Approve or reject the operation.
    Enter your PIN code or provide the biometric factor if requested.

Scan a QR code

Available since version 6.31.

The authentication page displays a QR code that you should scan with TrustBuilder Authenticator app. You should then approve or reject the pending operation. Each approval operation is protected by PIN code or biometric (except for services without PIN).

  1. Go to “Scan a QR Code”.

  2. Scan the QR code displayed in the authentication page.
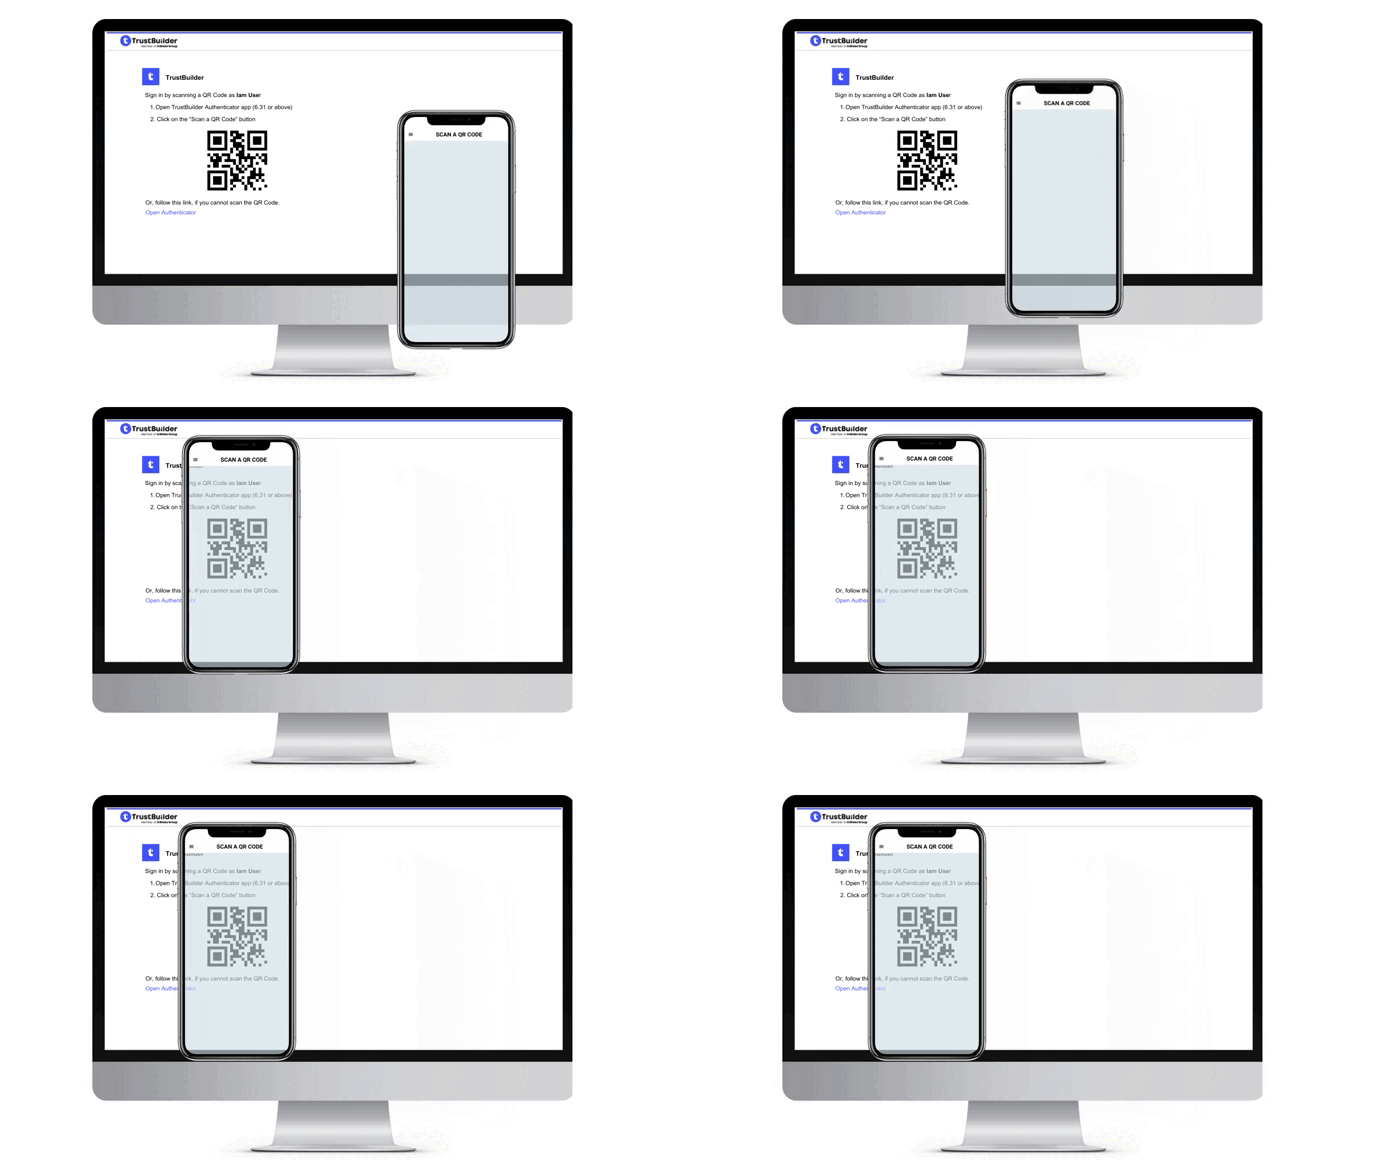
    If you cannot scan the QR code, click on the Open Authenticator link on the authentication page. It will open the Authenticator app.

  3. Accept (or reject) the authentication request.
    Enter your PIN or provide provide the biometric authentication factor that is enabled on your phone (fingerprint or face recognition).

Generate a One-Time-Password (OTP)

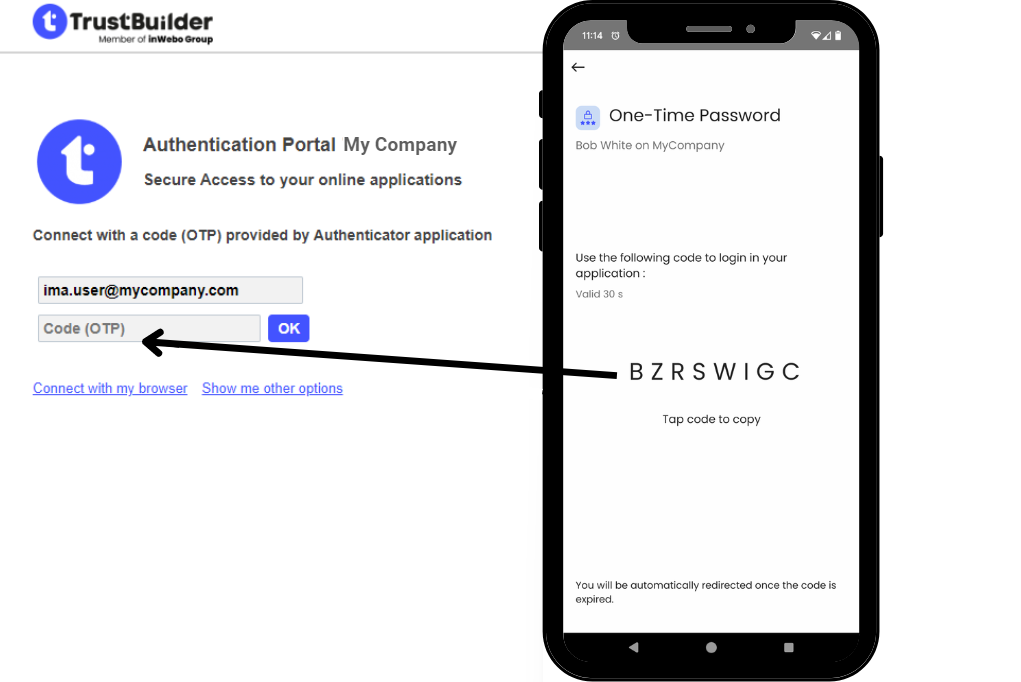
Generate a One-Time-Password (OTP) in TrustBuilder Authenticator app. The generated OTP should be manually entered in the TrustBuilder MFA authentication page. You have 30 seconds to input the OTP. To generate an OTP, the user must provide the PIN code or biometric factor (except for services without PIN).

  1. Go to “Generate One-Time Password”.

  2. Enter your PIN or provide a biometric factor if requested.

  3. On the authentication page, enter the OTP and click on OK.
    You have 30 seconds to input the OTP.
    OTP-Auth7.png

Windows Logon

For Windows sessions protected by TrustBuilder MFA, you can authenticate by:

  • Receiving a push notification,

  • Retrieving pending operations,

  • Generating a code if offline.

    WL-pushsent.png

For more details, see the TrustBuilder User Experience.

Configuration

Managing accounts

Adding a new account
  • Prerequisite: you should have a valid activation code or a valid QR code for the account you wish to add.

How to get an activation code (or a QR code for activation) ?

  • Contact your administrator
    or

  • From a web-browser, go to https://www.myinwebo.com/ > My Devices > Add a device
    or

  • From TrustBuilder Authenticator app, click on the user icon > Manage my account > Trusted devices > + Add a trusted device

  1. Click on the user icon in the top-right corner.

  2. Click on Add an account.

  3. Select QR code or Activation code depending on your case.

  4. Enter a valid Activation code or scan a valid QR code to add a new account on this device.

Your account is successfully added to TrustBuilder Authenticator app on the current device.

Switching between accounts

If you registered for more than one service, you may need to switch from one account to another.

  1. Click on the user icon on the top right corner.

  2. Click on the account you wish to use.

Removing account from the app

You can remove your account from the application in the current trusted device. This means that the account and all its data will be removed from the current trusted device.

  1. Click on the user icon in the top-right corner.

  2. Go to Manage my account > Remove this account.

  3. Click on Remove this account then on Yes, remove to confirm your choice.

Your account has successfully been removed

The account will still be effective if it is activated on another trusted device. You can always reactivate your account on the current trusted device using an activation code.

Setting account recovery information

TrustBuilder requires a valid email address in case your account gets locked or your devices are lost. This email may be used for identification purposes when requesting account restoration via http://myinwebo.com. It may also be used to receive a restore code to unlock your trusted authentication devices.

To set or update your account recovery email:

  1. Click on the user icon in the top-right corner.

  2. Go to Manage my account > Recovery email.

    • If the email address is verified, you can update it.

    • If the email address is not verified, you can:

      • Click Resend email to receive a verification email. Follow the instructions to verify your email address.

      • Click Modify email address to change the registered email address.

Managing PIN

Modifying your PIN
  1. Click on the user icon in the top-right corner.

  2. Go to Manage my account > Security.

  3. In PIN section, click on Modify.

  4. Enter your current PIN and define your new PIN (4 to 6 digits).

  5. Click on Modify my PIN to save.

Your new PIN has been successfully modified.

Resetting your PIN

Prerequisite: a Reset code (or a QR code for PIN reset)

  1. Click on the user icon in the top-right corner.

  2. Go to Manage my account > Security.

  3. In PIN section, click on I forgot my PIN.

  4. Enter your reset code (or scan a QR code for PIN reset).
    If you don’t have a reset code, click on “I don’t have a reset code” and follow the instructions.

  5. Click on Verify.

  6. Define your new PIN (4 to 6 digits).

  7. Click on Define my new PIN to save.

Your new PIN has been successfully reset.

Configuring biometrics

Registering biometric

You can register biometric information (fingerprint and/or facial recognition).

  1. Click on the user icon in the top-right corner.

  2. Go to Manage my account > Security.

  3. In Biometrics section, enable biometric authentication.

  4. Click on I agree to approve the listed statements.

  5. Follow the instructions (press the touch sensor or put the phone in front of your face).
    This action compares your fingerprint/face with the one stored on your device. Both must match to link the biometric data on your phone to your current account in the app.

If the provided biometric matches the information stored on your device, biometric authentication will be successfully enabled. You can now use it for authentication.

About supported biometrics

  • On iOS:

    • When Touch Id (fingerprint sensor) is available on system, it can be used in TrustBuilder Authenticator as biometric factor

    • When Face Id (facial recognition) is available on system, it can be used in TrustBuilder Authenticator as biometric factor

  • On Android:

    • When fingerprint sensor is available on system, it can be used in TrustBuilder Authenticator as biometric factor

    • When facial recognition is available on system, it cannot be used in TrustBuilder Authenticator as biometric factor (Currently not supported)

Disabling biometric autenthication

Biometric authentication is automatically disabled if you change your biometric data on your phone. Note that you cannot disable biometric authentication directly from the application.

Managing trusted devices

Adding a new trusted device

You can generate an activation code and a QR code to be used to add a new trusted device to your account.

  1. Click on the user icon in the top-right corner.

  2. Go to Manage my account > Trusted devices.

  3. Click on + Add a trusted device.

A QR code and an activation code will be displayed. Use either one on the new trusted device to add it to your account.

Renaming a trusted device
  1. Click on the user icon in the top-right corner.

  2. Go to Manage my account > Trusted devices.

  3. In your trusted devices list, click on the trusted device to be renamed.

  4. Click on the pen icon in the top-right corner.

  5. Rename the trusted device and click on Update to save.

The selected trusted device has been successfully renamed.

Lock a trusted device

You can lock any trusted devices registered in your account, except the one you are currently using.

  1. Click on the user icon in the top-right corner.

  2. Go to Manage my account > Trusted devices.

  3. In your trusted devices list, click on the trusted device you want to lock.

  4. Click on Lock this trusted device, then confirm by clicking Yes, lock.

The selected trusted device has been successfully locked.

Deleting a trusted device

You can delete any trusted devices registered in your account, except the one you are currently using.

  1. Click on the user icon in the top-right corner.

  2. Go to Manage my account > Trusted devices.

  3. In your trusted devices list, click on the trusted device you want to delete.

  4. Click on Delete this trusted device, then confirm by clicking Yes, delete.

The selected trusted device has been successfully deleted.

Setting the app

Setting the app's language
  1. Click on the cogwheel icon in the top-left corner to access the application settings.

  2. Click on Language.

  3. Select your language.

The application switches to selected language.

The application's default language is determined by the phone's system language. If the system language is not supported, the application will default to English.

The following languages are supported by the application:

  • English

  • Deutsch (German)

  • Nederlands (Dutch)

  • Español (Spanish)

  • Français (French)

  • Italiano (Italian)

  • 中文 (Chinese)

Setting light/dark mode
  1. Click on the cogwheel icon in the top-left corner to access the application settings.

  2. Click on Mode.

  3. Select a mode:

    • Light → your application will switch to light mode.

    • Dark → your application will switch to dark mode.

    • System → the mode will follow your device’s settings.

The application switches to the selected mode.

The application's default mode is determined by the phone's system mode.

App version

To get your application version, click on the cogwheel icon in the top-left corner. In the About section, you will see the “Application version” parameter.

Defining your Antiphishing seal

This secret sentence is displayed in browsers authentication pages, whenever you are requested to enter your PIN code. It gives you a guarantee that you are directly connected with TrustBuilder servers and not with anyone else.

  1. Click on the user icon in the top-right corner.

  2. Go to Manage my account > Security > Antiphishing sentence.

  3. Define or edit your antiphishing sentence.

  4. Click on Save.

Your antiphishing sentence has been successfully defined/updated. It will be displayed in browsers authentication pages.

Accessibility Features

TrustBuilder Authenticator 7th version is designed to be accessible for users with various disabilities, in line with WCAG 2.1 guidelines. Below are the key accessibility features available in the app:

  • Screen Reader compatibility
    TrustBuilder Authenticator is fully compatible with VoiceOver (iOS) and TalkBack (Android). Users can navigate the app's menus, input fields, and authentication processes. Just turn on the screen reader on your device, and the app will provide voice instructions.

  • Keyboard navigation
    Users can navigate the app using keyboard shortcuts. Use the “Tab key” to move between elements and “Enter” to select. The app follows a logical tab order to ensure seamless navigation.

  • Text Size and Contrast
    TrustBuilder Authenticator app supports dynamic text scaling. Users can adjust the font size in their device settings and the app will automatically update to reflect the changes. The app also supports the high-contrast text mode, which changes the text to black or white to improve visibility against the background.

Known Issues

  • In previous versions, the display name of the device was “Authenticator 6 on <phone name” if the user has not modified this default name. After upgrading, this name is still the same, and the user can modify it. - there is no consequence as this is only a default name.

  • If your organization uses a customized graphical theme, please note that the app will have a standard graphical theme at first launch, and will only apply your customized theme after the first authentication.

  • Notification: no redirection to the authentication request page when “Enter PIN” page is open

  • Multi-service account: when a user has two account, in a service with PIN and another without, generating an OTP in the PIN service leads to a connection error

  • Android: when the app is open, clicking on a notification does not lead to the right page

  • Android: when scanning a QR code on Android 15, the button “Enter an activation code” is not present

JavaScript errors detected

Please note, these errors can depend on your browser setup.

If this problem persists, please contact our support.