Version 7.x for Windows, MacOS and Linux
TrustBuilder Authenticator has been fully redesigned in version 7, offering an enhanced user experience. This page refers to the latest version.
If you are still using version 6 of TrustBuilder Authenticator, please refer to the previous documentation.
Installing TrustBuilder Authenticator
TrustBuilder Authenticator Desktop is compatible with the following operating systems:
Please check the details of the Minimum Requirements and Supported Versions for Windows, as well as the Authenticator version lifecycle.
Windows
TrustBuilder Authenticator 7 for Windows is available as:
|
File |
Purpose |
Steps |
|
Executable file (.exe) |
For individual users downloading manually from the App Downloads page. |
|
|
MSI package (.msi) |
For administrators deploying across multiple machines using scripting or GPO. |
|
|
Windows Store |
Simplified installation and update process. |
Download and install from the Windows Store. |
Upgrading from version 6 to 7
Upgrading from versions older than 6.19.3 to version 7 will delete your account data and you will need to reactivate your account. Install version 6.19.3 first to avoid data loss.
|
Versions |
Upgrade procedure |
|---|---|
|
Version 6.19.3 and higher
|
Your account data will be preserved, and you can start using the app. |
|
Versions lower than 6.19.3 |
|
Proxy
TrustBuilder Authenticator for Windows will use the PROXY - HTTP_PROXY - HTTPS_PROXY environment variables when they are defined.
To ignore any proxy settings, you can add the environment variable NO_PROXY with any value.
Log file location
Available from version 7.4.
The log files are stored in the following directories, depending on the installation method:
-
.exe →
C:\Users\{user}\AppData\Roaming\Authenticator 6\logs -
.msi →
C:\Users\{user}\AppData\Roaming\Authenticator 6\logs -
Windows Store →
C:\Users\{user}\AppData\Local\Packages\inWebo.inWeboAuthenticator6_w5tsbdy5jdsxj\LocalCache\Roaming\Authenticator 6\logs
These logs provide insights into the application's operations and can be used for troubleshooting if needed.
MacOS
TrustBuilder Authenticator is available for MacOS as a .pkg package:
1. Download the .pkg file from the App Downloads page.
2. Double-click the file to launch the installer.
3. Follow the installer instructions to complete the installation.
Upgrading from version 6 to 7
Installing the .pkg file automatically replaces the previous version. Your data will be preserved.
Linux
TrustBuilder Authenticator for Linux is delivered in AppImage format. This format is compatible with a wide range of 64-bits Linux distributions, however TrustBuilder is using the latest version of Ubuntu LTS as a reference platform. The reference platform is used by TrustBuilder as follows:
-
The app is validated by TrustBuilder on the reference platform
-
If an issue is reported, TrustBuilder will use the reference platform to reproduce and fix the issue
-
The AppImage format will ensure compatibility with other Linux distributions
Download TrustBuilder Authenticator app for Linux
Prerequisites
-
The Keyring package is mandatory as it is used to store the user secrets in the user keychain.
If the package is not present, you can install it usingsudo apt install gnome-keyring.
When launching the application, the Keyring must be unlocked by the user. -
AppImages require FUSE version 2 to run. Depending on the Linux distribution you are using, you may have to install it. You can install it using
sudo apt install libfuse2. For more information see FUSE.
Installation
1. Make the .AppImage file executable. You can do this in two ways:
-
Using the graphical interface
Right-click the file > Properties > Permissions > check “Allow executing file as a program” -
Using the terminal
chmod a+x Authenticator-Linux-<version>-setup.AppImageReplace <version> with the actual version number, for example 7.4.1.
2. Run the application. You can start the application by:
-
Double-clicking the
.AppImagefile -
Or using the terminal:
./Authenticator-Linux-<version>-setup.AppImage
Uninstall the app
To uninstall the app:
-
Delete the following folder
~/.config/Authenticator 6 -
Delete the following file
~/.local/share/applications/Authenticator.desktop -
Run the following command to update the list of applications:
update-desktop-database ~/.local/share/applications/
Notes and Tips
-
The reference platform Ubuntu LTS is available for 64-bits only
-
Automated launch at session opening is possible with a command-line, see AppImage documentation . You can also use AppImage Launcher.
-
When launching the application, the Keyring must be unlocked by the user.
-
The deeplinking (direct link to an application page) is not yet available on Linux.
-
The connection to the Admin Console v2 with Authenticator for Linux is not supported. Administrators with a Linux workstation can use Virtual Authenticator.
Network Prerequisites for Notifications
TrustBuilder Authenticator uses Google’s Firebase Cloud Messaging (FCM) services to register devices and deliver notifications to these devices. If you are using notifications, and if your organization uses a firewall to restrict traffic to or from the Internet, you need to configure it to allow mobile or desktop devices to connect with FCM.
-
The very minimum requirements are to allow:
-
firebaseinstallations.googleapis.com on port 443 (TLS)
-
fcmregistrations.googleapis.com on port 443 (TLS)
-
fcm.googleapis.com on port 443 (TLS)
-
android.clients.google.com on port 443 (TLS)
-
mtalk.google.com on port 5228, 5229 or 5230
-
The IP address used by Authenticator for the notification mechanism belongs to block ASN 15169 (Google).
Notes
-
TrustBuilder Authenticator maintains an open session with FCM to receive notifications.
-
Notifications do not contain sensitive or secure data.
-
They are identical for both mobile and desktop applications.
-
Notifications improve the user experience. Users can always retrieve pending authentication requests manually in the Authenticator app.
Related documentation: Our recommendation is to apply the official Firebase network prerequisites by Google. This is documented here and may vary over time: https://firebase.google.com/docs/cloud-messaging/concept-options#messaging-ports-and-your-firewall.
Known limitations
-
Authentication to the Admin Console V2 is not supported
-
Current known issue: Error pop-up at startup and missing push notifications
Workaround → delete the
config.jsonfile, then restart the application.-
Close the application
-
Delete
config.jsonfrom the folder below:
(replace[UserName]with your username)-
Windows (Microsoft Store)
C:\Users\[UserName]\AppData\Local\Packages\inWebo.inWeboAuthenticator6_w5tsbdy5jdsxj\LocalCache\Roaming\Authenticator 6 -
Windows (.exe/.msi)
C:\Users\[UserName]\AppData\Roaming\Authenticator 6 -
macOS
/Users/[UserName]/Library/Application Support/Authenticator 6 -
Linux
/home/[UserName]/.config/Authenticator 6/
-
-
Relaunch the application
-
First app launch
To get started with TrustBuilder Authenticator app, you should first add a new account.
Prerequisite: an activation code (contact your administrator).
-
Launch TrustBuilder Authenticator application.
-
Check “I agree” to give your conse
-
nt to the Privacy Policy.
-
Click on Activation code.
-
Enter a valid Activation code and click the validate button.
-
Define or enter your PIN code.
You have successfully added your account. Your device is now activated as a trusted device. You can use it for authentication.
Overview
From the home page you can perform several actions:
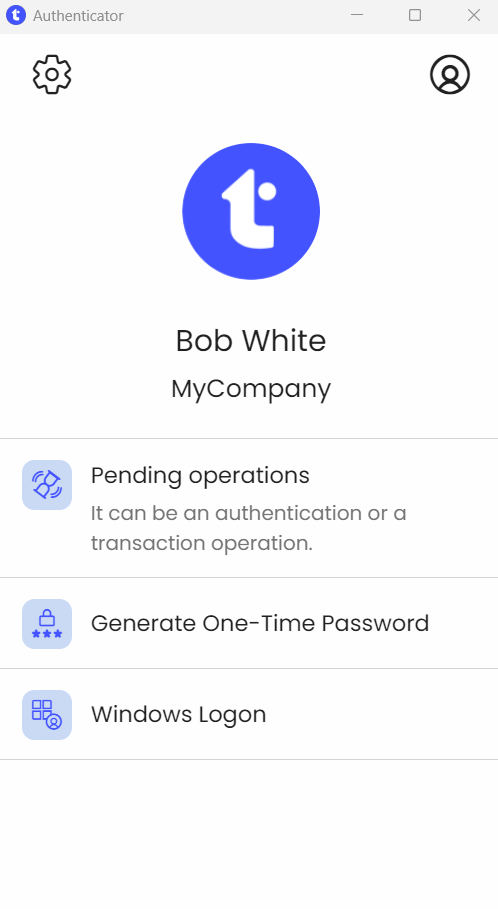
Get pending operations: check pending operation such as authentication requests or transaction confirmation requests.
Generate One Time Password: generate a One-Time Password (OTP) and enter it in the authentication page.
Windows Logon (see below “Authenticate with the app“) : open a Windows session.


Authenticate with the app
There are several ways to authenticate using the TrustBuilder Authenticator application. Depending on how your service settings are configured, you may be able to authenticate using the following methods:
-
Receive a push notification,
-
Retreive pending operations,
-
Generate a One-Time-Password (OTP),
-
Windows Logon.
Receive a push notification
You will receive a push notification trough TrustBuilder Authenticator app. Push notifications can be sent automatically or triggered manually, depending on the configuration. You should then approve or reject the pending operation. Each approval operation is protected by PIN code (except for services without PIN).
-
On the authentication page, click OK to trigger the push notification.
This step may not occur depending on the configuration. The push notification can be sent automatically. -
Click on the notification to open the application.

-
Accept or reject the authentication request.
Enter your PIN if requested.
Retrieve pending operations
(Previously called "Authorize a connection" in version 6)
This feature allows the app to fetch any active pending operations when no notifications are available.
-
On the app’s home page, click on Pending operations.
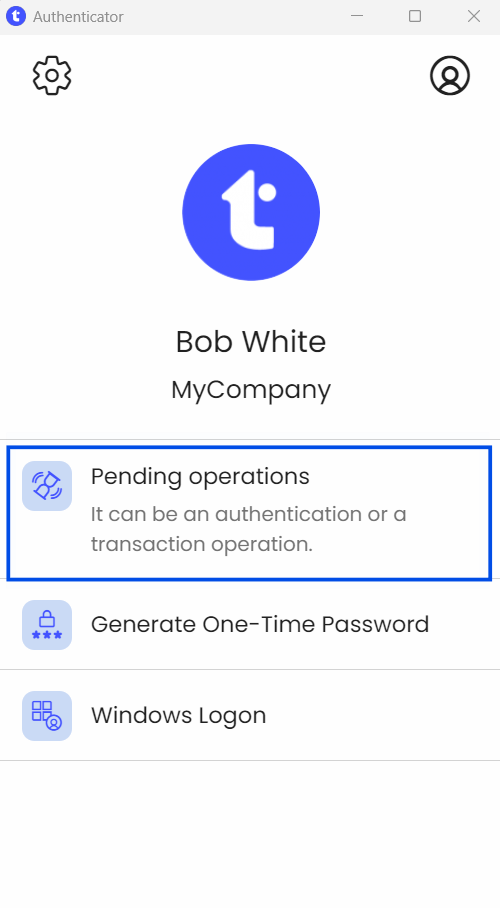
-
If there is more than on pending operations, select the relevant one from the list.
-
Approve or reject the operation.
Enter your PIN code if requested.
Generate a One-Time-Password (OTP)
Generate a One-Time-Password (OTP) in TrustBuilder Authenticator app. The generated OTP should be manually entered in the TrustBuilder MFA authentication page. You have 30 seconds to input the OTP. To generate an OTP, the user must provide the PIN code (except for services without PIN).
-
Go to “Generate One-Time Password”.
-
Enter your PIN if requested.
-
On the authentication page, enter the OTP and click on OK.
You have 30 seconds to input the OTP.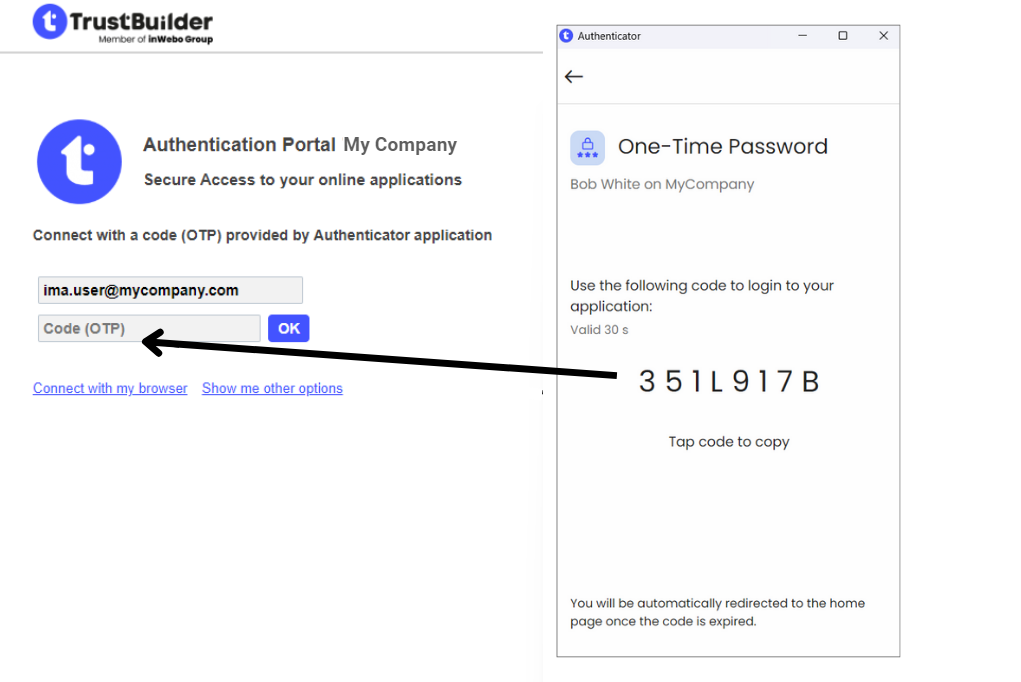
Windows Logon
For Windows sessions protected by TrustBuilder MFA, you can authenticate by:
-
Receiving a push notification,
-
Retrieving pending operations,
-
Generating a code if offline.
.png?cb=4468b643088bf3c630da095ebfad578c)
For more details, see the TrustBuilder User Experience.
Accept or Reject an authentication request
When receiving an authentication request, the app will ask 'Did you initiate this authentication?'.
There are two options:
-
Yes, it's me – Confirm your identity by entering your PIN (or any other enabled authentication factor) to proceed.
-
No – In this case, you can choose one of the following actions:
-
Ignore this authentication: the request remains active. It can still be approved from another device.
-
Reject this authentication: the request is canceled and cannot be approved anymore. This option is useful if you suspect the request is malicious.
-
Configuration
Managing accounts
Managing PIN
Managing trusted devices
App settings
Accessibility Features
TrustBuilder Authenticator 7th version is designed to be accessible for users with various disabilities, in line with WCAG 2.1 guidelines. Below are the key accessibility features available in the app:
-
Screen Reader compatibility
TrustBuilder Authenticator is compatible with VoiceOver (macOS) and Narrator (Windows). Users can navigate the app's menus, input fields, and authentication processes. Just turn on the screen reader on your device, and the app will provide voice instructions. -
Keyboard navigation
Users can navigate the app using keyboard shortcuts. Use the “Tab key” to move between elements and “Enter” to select. The app follows a logical tab order to ensure seamless navigation. -
Text Size and Contrast
TrustBuilder Authenticator app supports dynamic text scaling. Users can adjust the font size in their device settings and the app will automatically update to reflect the changes. The app also supports the high-contrast text mode, which changes the text to black or white to improve visibility against the background.