OAuth
OAuth 2.0 is an open standard for authorization. It allows your application to securely access protected resources, either on behalf of a user (with their explicit consent) or autonomously.
When integrating with TrustBuilder using OAuth 2.0, your application can request an Access Token from the Authorization Server. This token grants permission to access APIs or other protected resources, based on the user’s consent or the application’s own credentials.
OAuth does not provide information about the user’s identity: it is purely focused on authorization, not authentication.
OAuth enables you to control and manage access permissions to your application, ensuring that only authorized clients can access sensitive resources.
OAuth is commonly used in scenarios where resource access needs to be controlled:
Example
A backend service needs to call TrustBuilder APIs. It authenticates with the Authorization Server using its Client ID and Secret, receives an Access Token via the Client Credentials grant, and uses it to securely access the API.
Set up an OAuth-based integration
Login to the Admin Portal.
Go to Applications > Applications > + Set up app integration.
Select OAuth.
In General section, fill in the fields:
Parameter | Description |
|---|---|
Name | Give your application a clear and descriptive name. This name will appear in the applications list and on authentication pages. |
Description | (Optional) Add a short description for your application. |
Logo | Upload an image file. The logo will be visible in the applications list and on the authentication pages. |
Choose an Application Type.
It determines how your application communicates with the Authorization Server and whether it can securely store secrets.Regular Web App, for traditional web applications (e.g., HTML, CSS, JavaScript) accessed via browser. Choose this if your app runs on a secure server.
Uses Authorization Code flow.
Confidential Application can securely store a client secret.
Machine to machine, for applications that run without user interaction. Choose this if your application needs to securely access APIs and no user login or browser interaction is involved.
Uses the Client credentials flow.
Confidential Application can securely store a client secret.
Public Application, for Single Page Applications (SPA) and mobile apps, browser extensions. Choose this if your app runs in an environment where storing secrets securely is not possible.
Uses the Authorization Code flow with PKCE (Proof Key for Code Exchange).
PKCE is enabled by default, it prevents authorization code interception attacks. It can be edited.Public app cannot store a client secret.
Click on Next.
Fill in the mandatory fields:
Parameter | Description |
|---|---|
Subject Management | Select the user attribute that uniquely identifies the user. This value will be used as the
|
API & Scopes | Select which APIs (resource servers) your application can access, and the scopes (permissions) it is allowed to request.
|
Authentication method | (only for Regular app and Machine to machine) Choose how the application authenticates to the Authorization Server when exchanging the authorization code for tokens. This step, called client authentication, ensures that the request comes from a trusted application and not from a malicious source.
|
Redirect URIs | (only for Regular app and Public app) Specify one or more redirect URIs where users will be sent after successful authorization. These URIs will be whitelisted to receive authorization codes or access tokens. Make sure the URI(s) exactly match the values used by your application. |
Policies | Select the authorization policy that defines the access rules for this application. If not created click on Create a new authorization policy. More information |
Access Token | An access token is a signed JWT that allows an application to access protected resources on behalf of a user. Select the JWT signature algorithm used to sign the token:
|
Click on Submit.
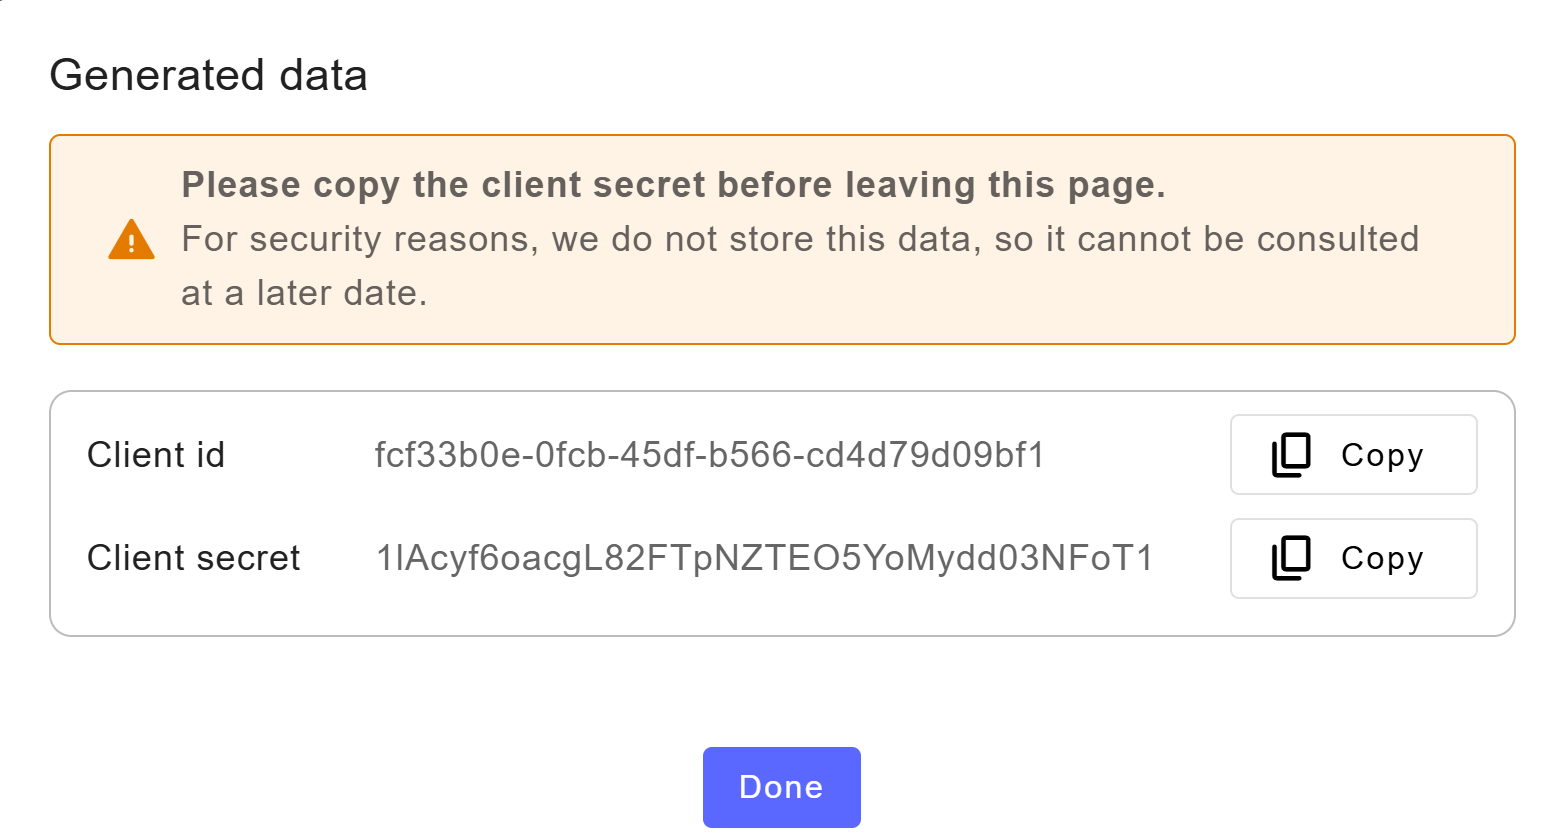
If you selected Regular Web app, copy the client secret from the pop-up. ⚠️ It will not be displayed again for security reasons.
To revoke and generate a new client secret, see Revoke client secret below.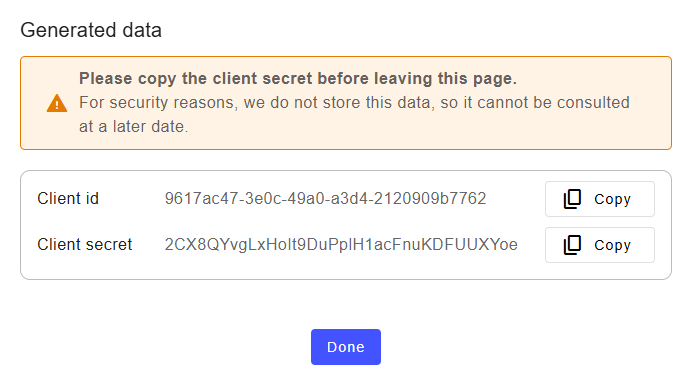
Click on Done.
The main configuration is complete.You can now configure your application in more detail.
Click Save before switching tabs to apply your changes.
Tab and parameter | Description |
|---|---|
SECURITY SETTINGS | |
Authorization Code Lifetime
| Set the validity period of the authorization code (in seconds). The authorization code is issued after the Resource Owner's authentication and is used by the application to request access tokens. Default: 60 seconds. |
Access Token Lifetime | Set the validity period of the access token (in seconds). The access token is a signed JWT allowing the app to access protected resources on behalf of the user. Default: 900 seconds. |
Certificate | Select the certificate that secures OIDC token exchanges with your application, ensuring integrity and confidentiality. |
Refresh Token | Set the validity period of the refresh token (in seconds). This token allows the application to obtain new access tokens without requiring the user to re-authenticate. Default: 86400 seconds (24 hours). Refresh tokens can also be disabled (enabled by default). |
Allowed Origins | Enter the URLs or domains authorized to initiate authentication requests to the Identity Provider. This helps protect against unauthorized interception or redirection attacks. |
APP SETTINGS | |
Consent Management | Define how user consent is handled regarding their personal data.
|
In Endpoints tab, you can copy the various endpoints:
OAuth Authorization: Endpoint to initiate the OAuth authorization process (user login and consent).
OAuth Token: Endpoint to exchange an authorization code for access and refresh tokens.
OAuth Introspection: Endpoint to validate and inspect the status and metadata of an access token.
OAuth Revocation: Endpoint to revoke access or refresh tokens, invalidating them.
OAuth JWKS (JSON Web Key Set): Endpoint providing the public keys used to verify JWT signatures issued by the server.
Well-Known URL: Metadata endpoint providing standard discovery information about the OAuth server configuration.
Revoke a client secret
At any time you can revoke a client secret. This means … A new client secret will be genereated and display.
Be careful when you revoke your client secret, you must change it in all applications and you will no longer be able to log in with it.
To revoke a client secret:
Navigate to Access Management > Applications.
Click on your application.
Go to Credentials tab.
Click on Revoke.

Click on Revoke to confirme the action.
It cannot be undone.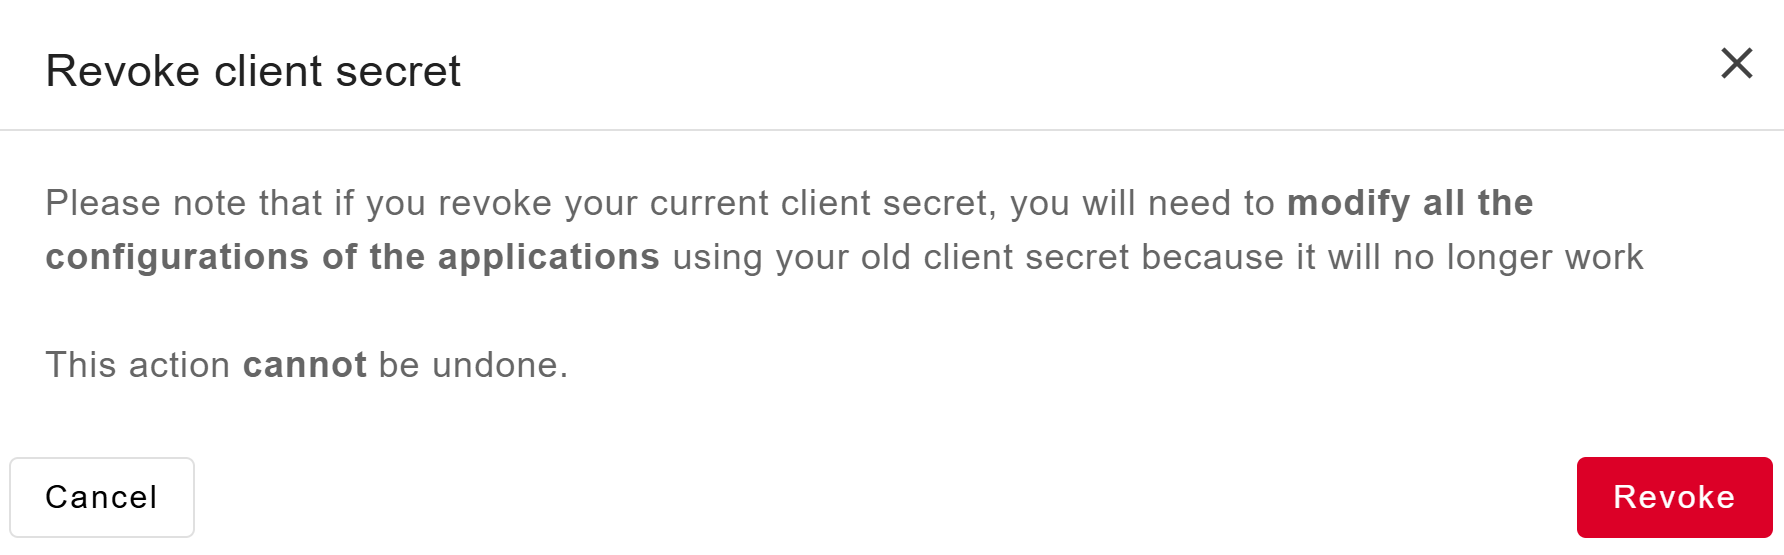
The client secret is successfully revoked. A new one has been generated. Copy it as it will not be shown again for security reasons.