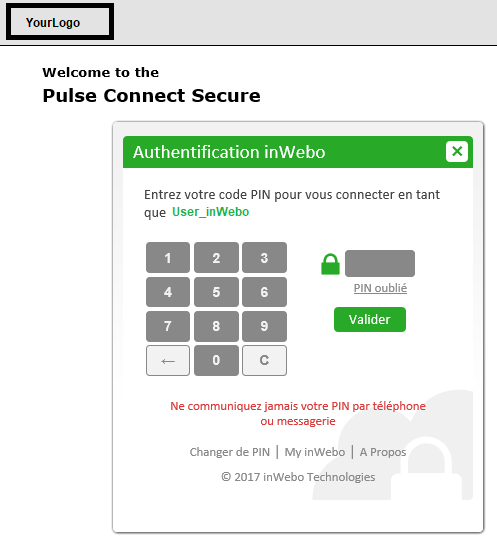
Pulse Secure Connect, custom inWebo Sign-in page with Virtual Authenticator
Creating your inWebo Radius Secure site
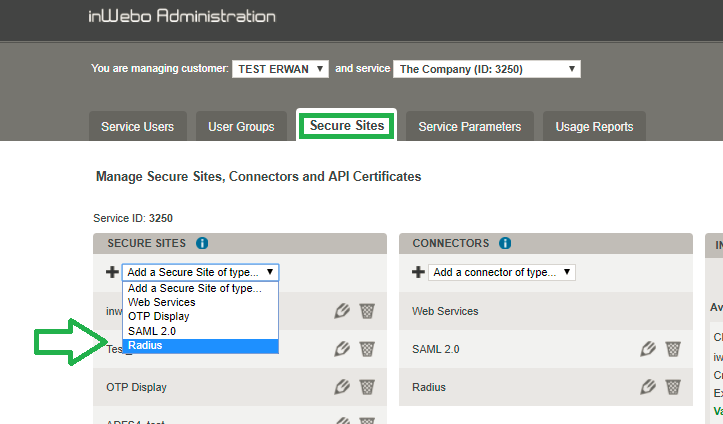
in the inWebo administration console, go to the secure site tab and create a new Radius Secure site
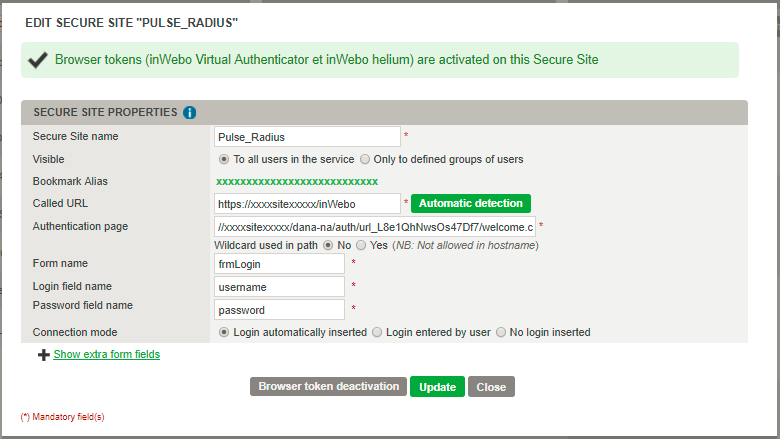
Fill the form with your site addresses:
Called URL is the bookmarked URL in https
The Authentication page will be given later when authenticating for the first time it will be displayed in the pulse address bar
Form name: frmLogin
Login field name: username
Password field name: password
Check "Login automatically inserted"
Click on "Update" then on "Browse token Activation"
Select the "Bookmark Alias" at the top of this form, for later use
Close this form
Download a new inWebo Certificate file and his passphrase
in the inWebo administration console, go to the secure site tab and create a certificate file with his passphrase and download it.
Downloading Pulse Sample page
in your Pulse Secure Connect administration console,
in the top menu, select Authentication > Signing In > Sign-in pages
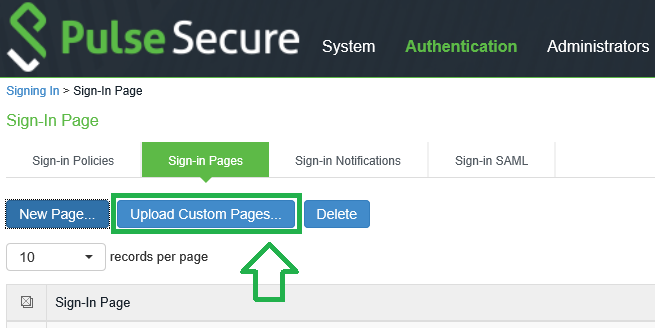
Select "Upload Custom Pages..."

In the Upload Custom Sign-In Pages, download the file Sample.zip
Unzip the file in a folder
Edit the file LoginPage.thtml

In this page :
Add the following lines int he <HEAD></HEAD> section :
</script>
<script type="text/javascript" src="https://ult-inwebo.com/va/client.js"></script>
<script type="text/javascript">
VA_jQuery(document).ready(function(){
    iwpopup("myContainer", "myStart", function() {
        iwstart("myStart", function(iw, data) {
            //Successful authentication
            if (data.action == "authentication" && data.code == "ok") {
                iw.insertFields(data.result);
            }
            //Virtual Authenticator is not activated
            if (data.type == "error" && data.code == "nok" && data.result.reason == "no_profile") {
                //We terminate the previous instance of Virtual Authenticator
                iwterminate();
                //We encapsulate the restart of Virtual Authenticator on action "activation" in a setTimeout
                setTimeout(function() {
                    iwstart("myStartActivate", function(iw, data) {
                        //handle successful activation here
                    });
                }, 0);
            }
        });
   });
});
</script>
Add the following lines int he <BODY></BODY> section :
Report the Bookmark Alias you created earlier in the inWebo Radius secure site
<div id="myContainer" style="position:relative; top: 40%; left: 20%; display:none;"></div>
<div id="myStart" data-action="authentication" data-container="myContainer" data-quiet-start="1" data-lang="auto" data-width="M" data-alias="****yourBookmarkAliasHere****"></div>
<div id="myStartActivate" data-action="activation" data-container="myContainer" data-quiet-start="1" data-lang="auto" data-width="M" data-alias="****yourBookmarkAliasHere****"></div>
Downloading inWebo PHP API Development Kit
Here > Resources downloads
Extract the content under your previously created Pulse secure Sample directory
/API
/resources
insert your inWebo certificate file in the API folder
Edit the file "/resources/settings.php"
Fill the first lines with your service ID and certificate informations
//inWebo Service ID (as displayed in the inWebo Administration Console)
$serviceId = XXXX; // Put your Service ID here

//inWebo API certificate
$certFile = "****your_certificate.crt"; // Specify here the name of your certificate file.
$certPassphrase = "*****your_passphrase*****"; // This is the passphrase of your certificate file
Creating a new .ZIP package
Once your modifications have been done, create a new .Zip package with this folder.
Upload your custom portal Zip package in Pulse connect Secure
in your Pulse Secure Connect administration console,
in the top menu, select Authentication > Signing In > Sign-in pages
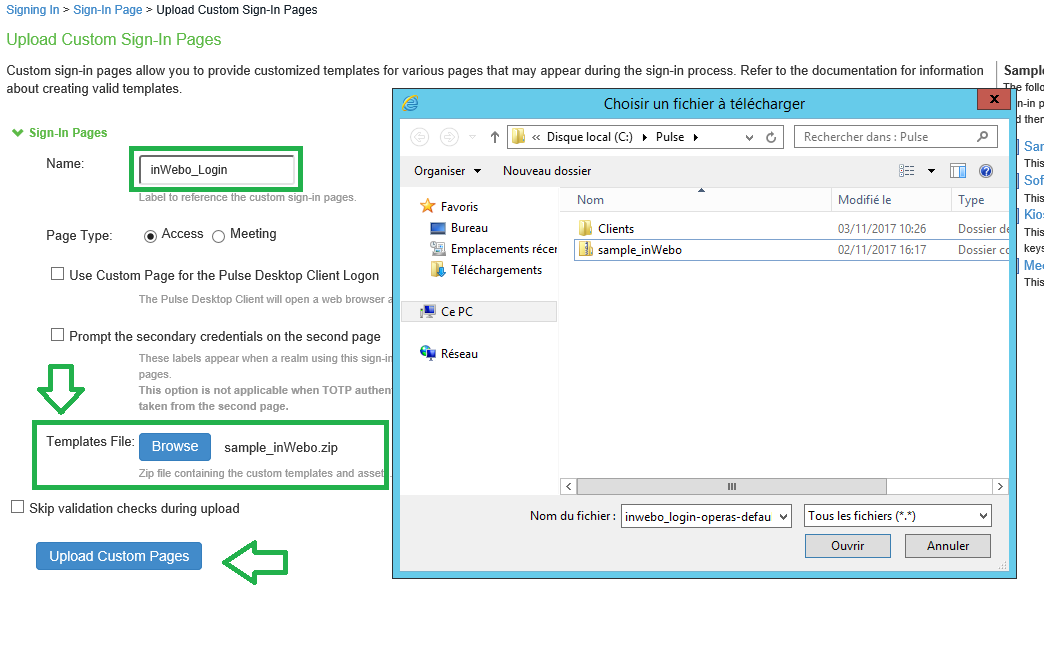
Fill the name of your custom Sign-in Pages
Upload the Zip package of your custom Sign-in Pages "Templates File:" with the "Browse" button
Click on "Upload Custom Pages"
Editing your custom Sign-in policy
in your Pulse Secure Connect administration console,
in the top menu, select Authentication > Signing In > Sign-in Policies
Edit your custom Sign-in Policy or create a new one
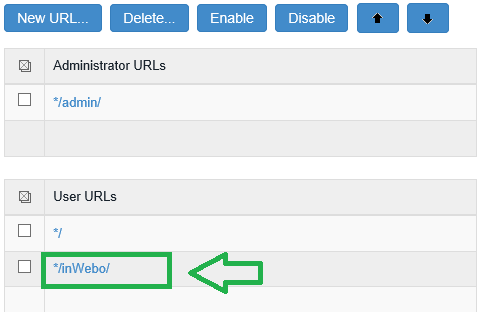
To edit a Custom policy click on the User URLs custom address
in the "Sign-in page:" select the custom Sign-in Pages you have uploaded
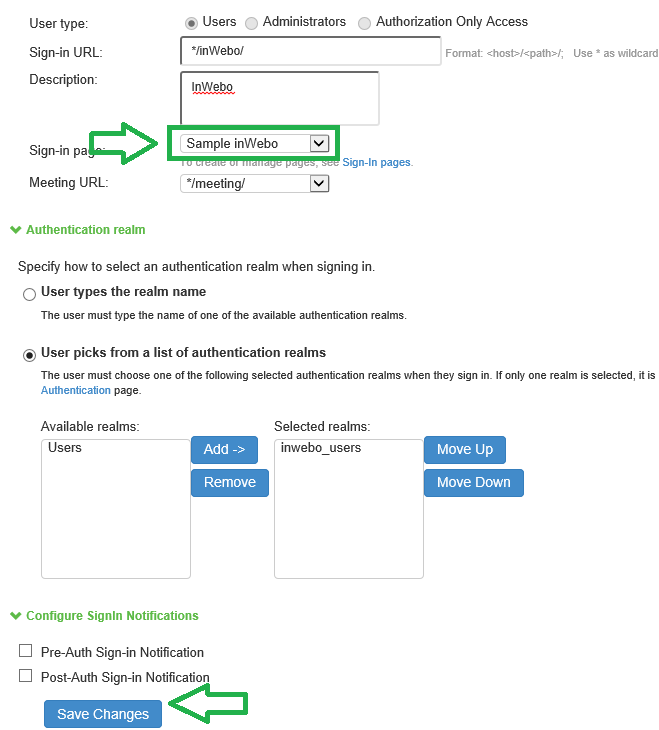
click on "Save Changes"
Modyfing PulseSecure logo in your Custom Sign-in Page
in your Pulse Secure Connect administration console,
in the top menu, select Authentication > Signing In > Sign-in Policies
Click on "Default Sign-In Page"

In the "Default Sign-In Page"

Scroll down to "Header appearance" section

Here you can change the logo and background color of all your Pulse Connect Secure / sign-in pages
Testing the new custom Sign-in Page
Logout from Pulse Secure Connect administration console,
Change your address to the new SIgn-in address
(https://******PulseSecure_Address***/inWebo here)
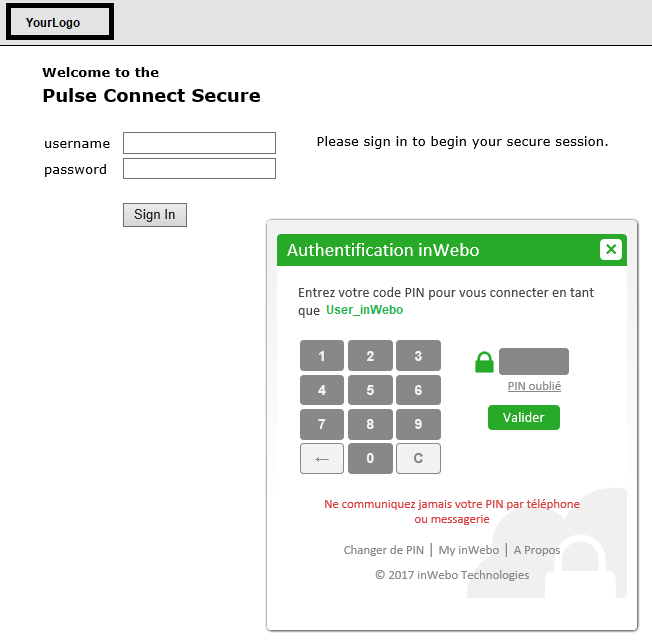
You can hide the Login Form in the LoginPage.thtml / id="table_LoginPage_6" (style="visibility:hidden" ...)
The form will be filled and posted automatically
