This documentation describes the process of integrating TrustBuilder MFA as the Identity Provider (IdP) for Commvault's Metallic solution using the SAML 2.0 protocol. This integration enables strong authentication via MFA for accessing Metallic services.
Prerequisites
Before starting, ensure you have the following:
-
An administrator account in TrustBuilder MFA with access to the admin console
-
An administrator account in Metallic with SAML configuration rights
-
The Metallic login URL
Step 1: Configuring TrustBuilder
Create a SAML connector
-
Login to TrustBuilder administration console.
-
Go to the Secure Sites tab.
-
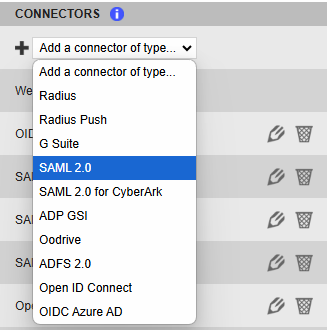
In the "connectors” section, click on Add a connector of type… and select SAML 2.0.
-
Name your connector (Metallic SAML).
-
Click on Add to create the connector.
The SAML connector on TrustBuilder side has been created. -
Configure SAML attribute mapping:
-
mail: User mail
-
displayName: Blank space-separated user first and last names
-
-
Click on Update to save the configuration.
-
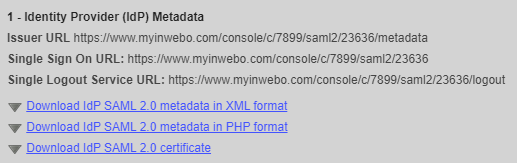
Download the TrustBuilder metadata in XML format. You will need it later in Metallic configuration.
Create a secure site
-
Go to the Secure Sites tab.
-
Click on “Add a Secure Site of type” and select the SAML connector name you configured related to your SAML connector.
-
In the opening window, set the Secure Site name of your choice and the Called URL to point to your Metallic.
-
The Called URL setting is only used to set a bookmark for the user on My account portal, it has no impact on the security.
-
-
Click on Add to save the configuration.
The secure site related to your SAML connector for Metallic, has been successfully created.
Leave the TrustBuilder MFA Admin console open. We will come back to it later.
Step 2: Configuring Metallic
-
Log in to Metallic as an administrator.
-
Navigate to Settings > Security > Identity Provider.
-
Select SAML Authentication and click Add Identity Provider.
-
Give a name to the application: TrustBuilder.
-
Upload the TrustBuilder IdP metadata XML file previously downloaded from TrustBuilder Admin console.
-
If not automatically filled, enter the Metallic URL:
https://<metallic_url>:443/Identity -
Configure attribute mapping and enable signed assertion validation.
-
Download the metadata Service Provider metadata file from Metallic.
Leave the Metallic configuration open. We will come back to it later.
Step 3: Providing Metallic SP metadata to TrustBuilder
-
Go back to the TrustBuilder MFA Admin console.
-
Edit the SAML connector you created.
-
Copy the content of Metallic metadata file and paste it into the TrustBuilder SAML connector.
-
Click on Update to save.
Step 4: Finalizing the setup
-
Go back to your SAML Metallic configuration.
-
Click Test Login and attempt authentication.
⚠️ This test is required to activate the configuration. -
Click Finish.
-
Navigate to Settings > Security > Identity Provider.
-
TrustBuilder should appear as an IdP.
-
Click on the TrustBuilder IdP and make sure it is enabled.
Step 5: Testing
-
Open a different browser and go to the Metallic login URL.
-
Enter your username and click Continue.
-
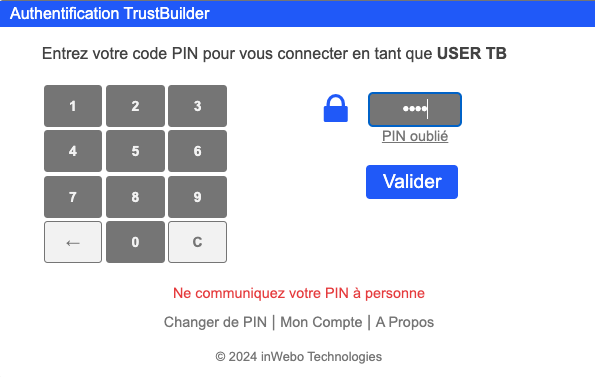
You will be redirected to TrustBuilder. After entering your PIN, the user is authenticated successfully.
-