Kemp Loadmaster - SAML integration
inWebo MFA can be enabled as an authentication layer combined with Kemp to verify users idendities before they access the application server protected.
The purpose of this guide is to explain how to use InWebo as a SAML 2.0 Identity Provider for your Kemp Loadmaster account.
inWebo SAML connector initial configuration
Create a new SAML connector in the inWebo Administration console
go to the "Secures Sites" tab,
select "Add a connector of type" SAML 2.0.
In your SAML connector properties :
click on “Download inWebo IdP SAML 2.0 metadata in XML format”
click on “Download inWebo IdP SAML 2.0 certificate”

Kemp Loadmaster initial configuration
Import the inWebo IdP certificate in Kemp Loadmaster
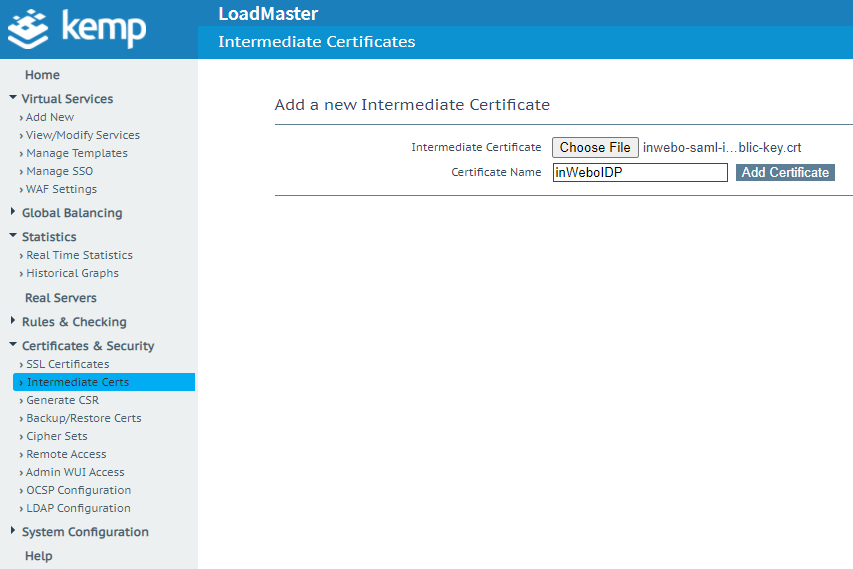
Navigate to Certificates & Security
Select “Intermediate Certs “
click on choose a file to select the inWebo IDP certificate exported previously.
Choose a convenient name and click on Add Certificate.

Create an SSO Domain with SAML authentication
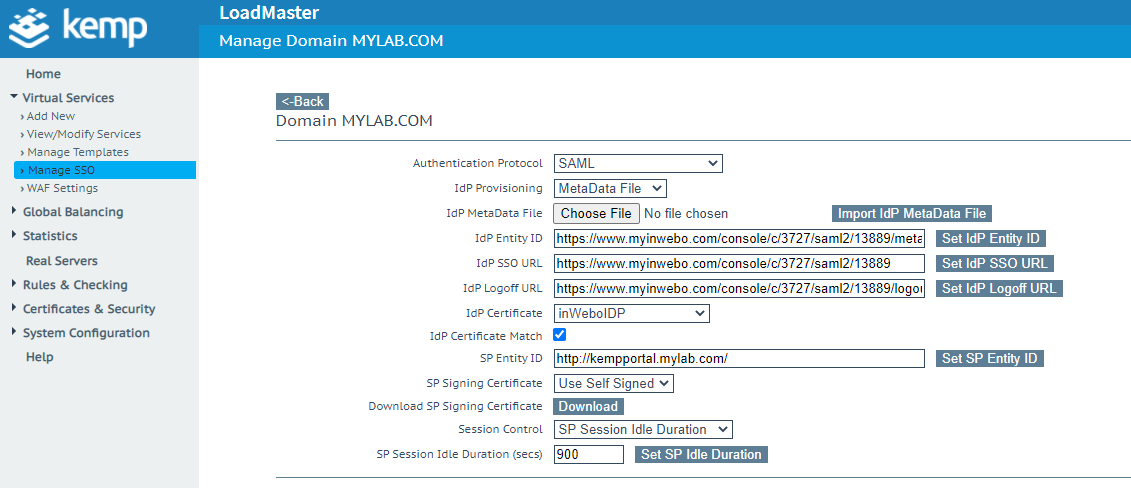
Go to Virtual Services>Manage SSO,
in section Client Side Single Sign On Configurations, provide the SSO configuration name
click the Add button

Configure the SSO
Choose SAML as the Authentication Protocol.
Select metadata File as IdP Provisioning.
Click the Choose File button to select the metadata file exported from the inWebo administration console and click on Import IdP metadata File.
Select the Idp Certificate you imported previously.
Configure the SP Entity ID and click on Set SP Entity ID.
Download the SP Signing Certificate by clicking the Download button.
The final configuration looks like the following.

Configure inWebo SAML connector with SP information
Prior to configuring the inWebo connector, you must convert the certificat downloaded from Kemp and build the metadata to match your environement. The inWebo connector will be updated with this information. The last step will be to create a Secure site linked to the inWebo SAML connector.
Convert the original Kemp certificate
Use the following command to convert the previously downloaded certificate.
openssl x509 -inform DER -in KEMP_SAML_Signing.cer -out KEMP_SAML_Signing.crt
Build and upload the SP Metadata
You need to create your own XML file with the SP information provided by Kemp. To do so you will have to modify within the XML file example below the EntityID, the location and the certificate to match your environment.
Make sure to configure
entityID : use your SP Entity ID (http://kempportal.mylab.com/ in this example)
Location (2 times) : use your SP Entity ID (http://kempportal.mylab.com/ in this example)
X509Certificate : open the .crt file you generated previously and copy paste the certificate
Edit the SAML connector in the inWebo administration console and copy paste the XML in section 2.
Leave section 3 and 4 with default values. You can also change the NameID format/value and attributes depending to match the requirements of the application protected by the Kemp loadmaster.
Click on Update to save your modifications.
Add a secure site for your SP
in Secure site column of the secure site tab of the inWebo Administration console
click on Add a Secure Site of type…
select the SAML connector name you configured. Configure the Secure site to point to the application protected by the Kemp virtual service (http://kempportal.mylab.com/ in this example).

Activate the user authentication in Kemp Loadmaster
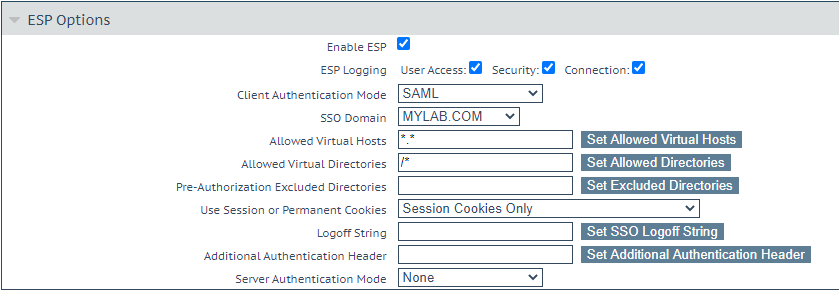
inWebo authentication must be enabled at the Virtual Service level using the ESP feature.
create or modify a Virtual Service by navigating to Virtual Services>View/Modify Services.
in the ESP section, enable ESP if not already enabled.
select SAML as Client Authentication Mode
select the SSO Domain you just created.
make sure the Allowed Virtual Hosts and Allowed Virtual Directories match your environment.

Test authentication
Once the previous steps are done, users will be redirected to inWebo to authenticate before being able to access the application protected by kemp.
Here is an example with an inWebo browser token
