SECURING YOUR ADMINISTRATOR ACCESS
Administrator accounts are the most important accounts because they provide access to the administration console. Access to the administration console should never be lost! To protect against this, TrustBuilder strongly advises the following:
-
Use Helium backup (applicable to all types of users)
-
Enroll at least 2 devices (applicable to all types of users)
-
Create at least a second administrator account
-
Generate an API certificate and keep it carefully in a secure place
In order to preserve their access, administrators will receive alert emails: 30 days, 2 weeks and 1 week prior the expiration of one of their tools.
For more information: Securing your Administrator access
Administrator access is enabled when setting up your service (Trial or Enterprise).
You can access the administration console at: https://www.myinwebo.com/console/logon
To log in, you must activate your device or web browser and have administrator privileges. Only users with administration rights can access this console.
Console Overview
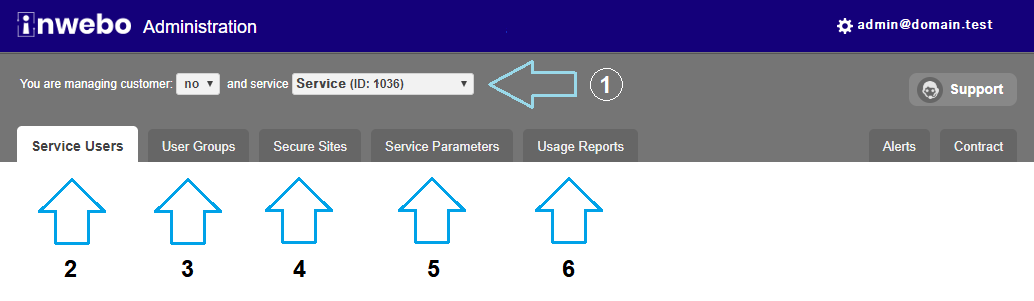
-
Select the service to manage
-
Manage users in the Service Users tab
-
Manage groups and policies in User Groups
-
Configure connectors in Secure Sites
-
Adjust service settings in Service Parameters
-
View reports in Usage Reports
Service Parameters
|
Parameter |
Description |
|---|---|
Authenticator & Virtual Authenticator
|
|
|
Authentication mode |
Defines whether users must enter a PIN to generate an OTP with Authenticator and Virtual Authenticator.
|
Authenticator (mobile / desktop)
|
|
|
Activated |
|
|
Activation on mobile allowed |
This parameter is about blocking the activation. No impact on activation page, no impact on authentications. |
|
Activation on desktop allowed |
This parameter is about blocking the activation. No impact on activation page, no impact on authentications. |
|
Maximum number of devices |
Limits the maximum number of smartphones a user can register. (0 for unlimited) You must define a strict restriction on the number of devices allowed for a standard user for standard users (users who are not members of a group). Note that a group membership with a "security policy" will override this default restriction. |
|
Tools automatically blocked after |
Limits the maximum number of days a device may remain inactive before being blocked. (0 for unlimited) |
|
Tools automatically deleted after |
Limits the maximum number of days a device may remain inactive before being deleted. (0 for unlimited) |
|
Authentication with biometrics allowed |
|
|
Authentication with biometrics only |
This setting cannot be changed. To be compliant with the GDPR (General Data Protection Regulation), the user should have the choice to use biometrics or not. |
|
OTP format |
This setting allows you to set the offline OTPs format. The online OTPs format is always 8 characters. You can choose the offline format based on what your authentication interface supports.
Choose OTP length according to the security level required, meaning the probability of finding the correct OTP by luck or brute force: the longer the OTP, the safer it is. |
|
Allow online OTPs |
In this setting, if Online OTP cannot be generated, then Offline OTPs are generated as a backup for an occasional use case. For mostly offline use case, you should set the full Offline mode. |
|
Enable OTP in full Offline mode |
The "full offline mode" is used when TrustBuilder MFA is needed to open a network connection.
Enabling the OTP in full Offline mode does not mean that all users will always be offline. You can enable full offline mode for always offline users while allowing online OTPs for others users. After generating an OTP, users should wait 50 seconds to generate a new OTP. Error cases
In the following scenarios (in full offline mode):
the next OTP will be rejected. The user will have to generate another OTP: this one will be validated. |
|
Selfcare access |
The Selfcare function is accessible to users that have a pin. In a service without pin, Selfcare will be accessible to administrators only. |
|
Audit access |
|
|
Allow QR scan authentication method |
In some cases, users may be unable to scan the QR code. For example, this can occur when the QR code is displayed on the same device as the camera. To address this, we provide alternative authentication methods displayed as links below the QR code:
|
Virtual Authenticator (browser)
|
|
|
Activated |
Enables or disables authentication using the Virtual Authenticator (browser-based). |
|
Maximum number of devices |
Limits the number of browsers that can access the service using Virtual Authenticator.
|
|
Tools automatically blocked after |
Number of days of inactivity before a browser is blocked.
|
|
Tools automatically deleted after |
Number of days of inactivity before a browser is deleted.
|
|
Upload a custom CSS |
Allows customization of the Virtual Authenticator UI using a CSS or TXT file. |
|
Authentication with notifications allowed |
If you activate this option, your users will be able to authenticate with Virtual Authenticator via mobile notifications. |
|
Authentication with notifications only |
If you activate this option, your users will be able to authenticate with Virtual Authenticator but ONLY via mobile notifications. |
SCIM
|
|
|
Send activation email on creation |
If this option is activated, and if the account has a valid email address, an activation email will be sent when the account is created via SCIM. |
GENERAL SETTINGS
|
|
Transaction sealing
|
If you have requested the transaction sealing option from TrustBuilder.
|
Windows Logon
|
Enables or disables Trustbuilder Windows Logon feature - More information |
Other settings
|
Activate a new device per email If you activate this option, your users will be able activate new devices, by generating new activation codes they will receive on their email address. |
|
Email PIN/password recovery If you activate this option, your users will be able to directly receive recovery codes on their email address to reset their PIN/password. |
|
|
Send an email to users when they activate a device If you activate this option, your users will receive an email each time they activate a new device |
|
|
User login policy
|
|
|
Maximum number of devices of all types You can define here the maximum number of authentication devices of all types a service user will be able to activate. |
|
|
IP Filtering
|
|
Groups, Roles and Security Policies
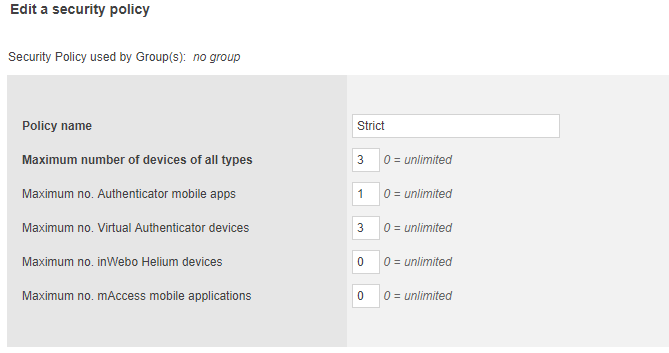
Creating a security policy for a group
From the User Groups tab, click Manage Security Policies (above the Service ID).
This page allows you to create or edit security policies applied to groups.
You can choose to make a policy more or less restrictive than the default security settings.
Once configured, save the policy and apply it to a group.
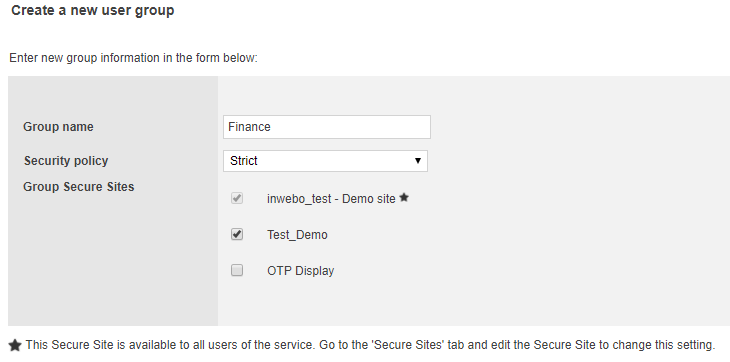
Managing groups
In the User Groups tab, you can view all groups created for the service and create, edit or delete them.
When creating a group, you must define:
-
The group name
-
The security policy to apply
-
The secure sites accessible to the group
Secure sites displayed in grey are available to all users of the service.
You can select the sites that will be visible to users of this group.
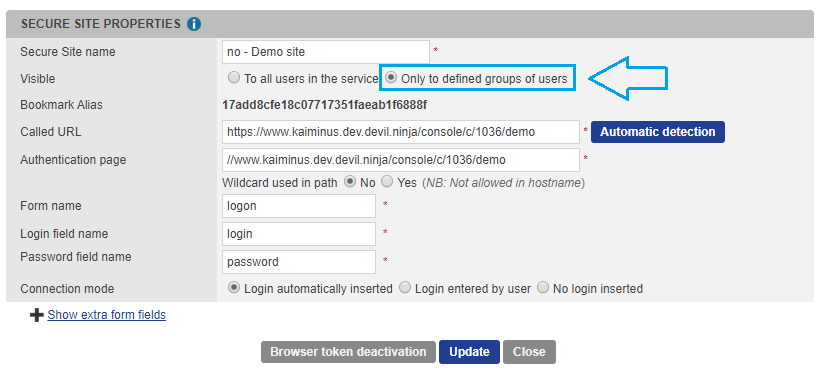
Restricting secure sites to a group
To restrict the visibility of a Secure site only to a specific group, edit the secure site in the Secure Sites tab and enable Give access only to defined groups of users then select the authorized groups.
Synchronizing with IWDS
If you use IWDS, you must create the same number of groups in the Administration Console as LDAP groups to synchronize.
Each group must then be associated with an LDAP group or organizational unit in the IWDS console.

*LDAP group mapping tab in IWDS
Viewing users in a group
When editing a group, the View all group users button redirects you to the Service Users tab with users filtered by the selected group.
This allows you to view only group members and perform targeted actions.
Roles and group administration
Defining Roles
When clicking on the "Service Users" tab, you'll see the "Manage User Roles" button above the Service ID
You can "Add a new role" or Edit existing roles.
Creating a new role
To define a new role, you select (check box) the features and tabs available for this role, at your convenience.
When creating a new role it's recommended to create a new user and to test the access / restrictions with another activated browser to see the result of your restrictions.
When you modify an existing role it is advised to Log out - Log in to ensure the role has been correctly updated.
Group administration
If you want to assign a role to a restricted group:
-
You should create a "Group Administrator" role, with the following attributes:
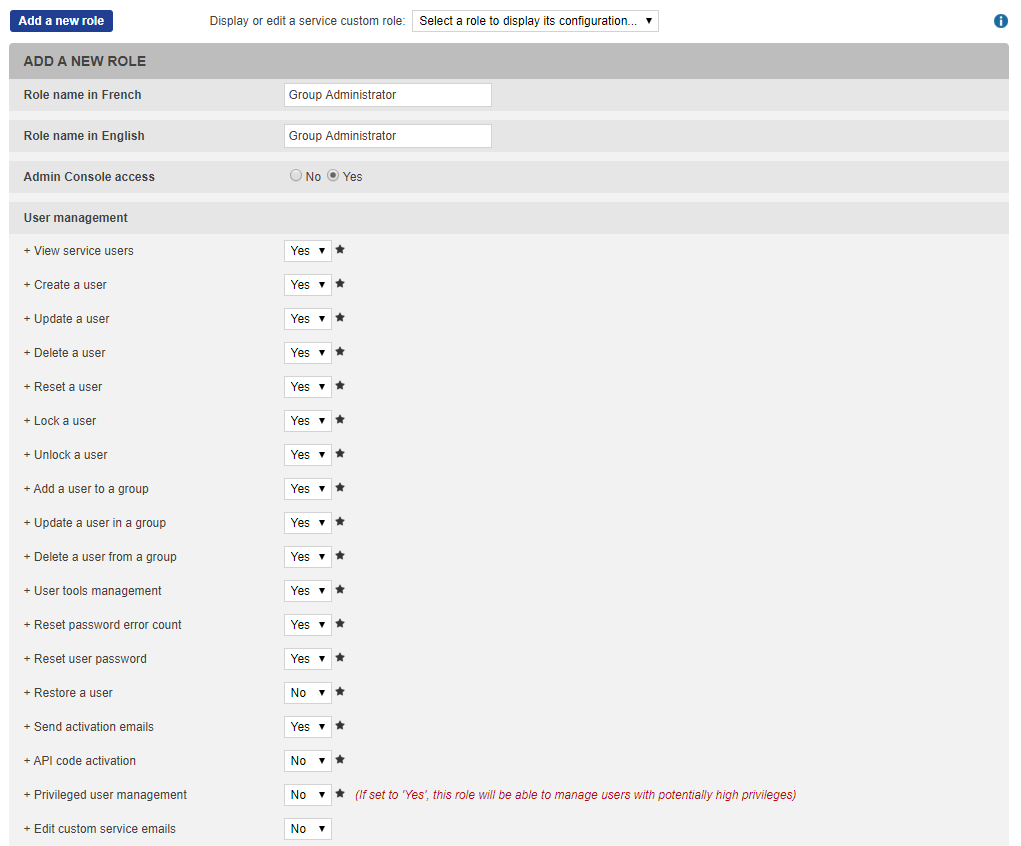
-
You select "User" role as User service role parameter
-
You select the group you want to manage at the bottom of the profile
-
You select the newly created "Group Administrator" role for this group
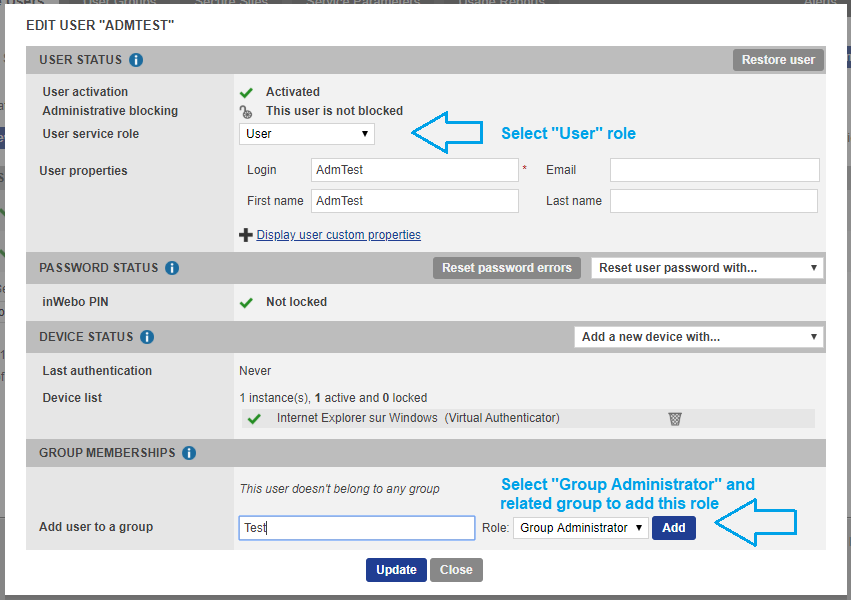
You'll notice that there is no standard Administrator role available for a group, so you should assign the user the Group Administrator role created previously.
Users Management
Adding a new User
-
Click Add a New User.
-
Enter the Login (mandatory).
-
Optional fields:
-
First Name and Last Name
Allowed special characters:' . - _ ! # ^ ~()[] -
Email to send an activation email directly to the user.
-
Login 2 to define an alternative login.
-
-
Language of the user interface (default: English).
-
Select Send activation email to send the activation code by email.
If not selected, you can retrieve the Activation Code later and provide it to the user through a secure channel. -
Assign a Service Role (default: User).
-
Add the user to Groups with the appropriate role if needed.
-
Click Save.

The user is successfully created.
User Details
Click on the pencil icon to see user details.
This page displays all information related to the user account.
|
Field |
Description |
|---|---|
USER STATUS
|
|
|
User activation |
This icon shows the status of a user activation:
|
|
Administrative blocking |
Indicates whether the user is blocked or not. A blocked user can no longer authenticate. You can still unblock the user. |
|
User service role |
The user role defines the user access level to this administration interface:
|
|
User properties |
You can define user properties here and assign values to them.
|
|
Restore user |
Click to restore a user and generates a new activation code. |
PASSWORD STATUS
|
|
|
PIN / Password |
Indicates whether the user credentials are locked or not. |
|
Reset password errors |
Clears password-related error counters. |
|
Reset user password |
Triggers a password reset process with:
|
DEVICE STATUS
|
|
|
Last authentication |
Date and time of the last successful authentication. |
|
Device list |
Lists all enrolled authentication devices. For each device, the following information are available:
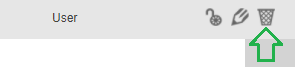
Click the trash icon to remove an existing device from the user account. |
|
Add a new device |
Allows enrolling a new authentication device for the user. |
GROUP MEMBERSHIPS
|
|
|
Group NAME |
Displays all groups the user belongs to with their role. |
|
Add user to group |
Add the user to one or more groups with a specific role. |
Unlocking a user
After 3 failed login attempts, the user account is locked.
To unlock the account, you can use one of the following options, depending on the situation:
-
Unlock code (valid for 30 minutes) to reset the password.
-
Unlock link by email, allowing the user to generate an unlock code.
-
Immediate unlock link to share directly with the user.

If all user devices have been deleted, the account will not appear as locked. In this case, perform a User Restore:
-
The user is deleted and recreated with the same profile.
-
A new Activation Code is generated and displayed at the top of the Service User tab.
-
This activation code unlocks the account.

When prompted for an unlock code, the user can use this activation code to unlock the account and activate a new device at the same time.
Deleting a user
Use the trash icon next to a user to delete individually.
For multiple users, select them and choose Delete Selected Users from Service.
Check roles and activity before deleting, especially for Administrators.
Searching & Filtering Users
Go to the User tab and click Filter Users. A menu will appear to search and filter your user list.
-
Search by login name:
-
If the login contains a backslash (
\), enter it as double backslash (\\).
Example: To findtest\user, entertest\\user. -
The underscore
_acts as a wildcard for any character.
Example: To findtest\user, you can filter withtest_user.
-
-
Filter by group: Select one or more groups to display users in those groups.
-
Filter by status: Choose from Activated, Pending Activation, or Not Activated.
-
Filter by activity: Display users with no activity for a specified number of days.
Example: Filter users inactive for 60 days and select them for deletion.
⚠️ This filter may include Administrator accounts. Always verify user roles before deleting accounts.
Accessing Reports and Troubleshooting
Accessing Reports
In the "Usage Reports" tab, you have access to the following Reports:
-
Authentications
-
User provisioning
-
User activation
-
Service Parameter Updates
These reports are available through the combo box at the top of the page
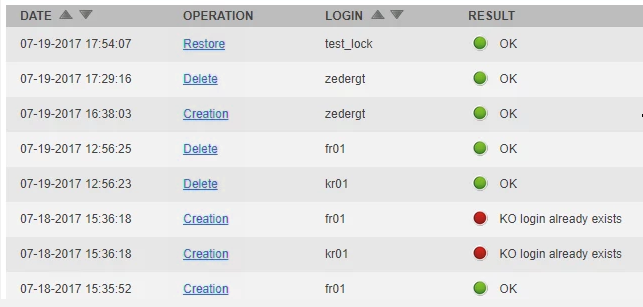
Troubleshooting user provisioning, activation and deletion
The "User provisioning" reports display all operations performed on users such as their creation, activation and update for the service in question along with error messages.
Troubleshooting device and user access
If a user locks a device or an authentication tool, they must not clear or delete their web browser data.
Doing so would remove the local information required to identify the device, making access recovery much more difficult without another activated device.
From the user profile, the administrator can identify:
-
that the user PIN code is locked
-
which devices or authentication tools are affected
This information helps determine the appropriate recovery actions.
Email templates
By default, new customers do not have access to the Customize Email Templates button. Contact TrustBuilder Support to enable it.
Customizing email Templates
Go to Service Users > Customize Email templates to access to all the service email templates which will be sent to your users (in French or English).

You can customize the following email templates: 1st activation email, Confirmation email, Add new device email, Unlock device email.
Under the text block, you will find a list of variables you can use to compose your email and to access user data.
-
_SERVICE_ displays the name of the service for which the email is sent (can be inserted into the subject and the body)
-
The following variables can be inserted into the body only:
-
_LINK_ displays a link opening a generic activation page allowing the user to choose between a mobile or browser activation
-
_LINK:BROWSER_ displays a link opening a browser activation page (Virtual Authenticator or Helium according to your service settings)
-
_LINK:MOBILE_ displays a link opening a mobile activation page (TrustBuilder Authenticator or mAccess)
-
_CODE_:
-
For “Add new device email” and “1st activation email“ → allows to retrieve the 3-week long code generated. A call to TrustBuilder API (loginGetCodeFromLink) is required to convert it into a final activation code
-
For “Unlock device email” → displays the unlock code
-
-
_FIRSTNAME_ displays the user's first name
-
_LASTNAME_ displays the user's last name
-
_LOGIN_ displays the user's login name
-
-
Link to download page: https://www.myinwebo.com/enroll/?code=_CODE_
link to redirect users to a webpage that displays download links for TrustBuilder Authenticator app. It also displays the activation code (and QR code for mobile activation) to be used after Authenticator installation.
Example:
Hello _FIRSTNAME_ _LASTNAME_,

An account has been created for you on _SERVICE_ secured by TrustBuilder authentication service.
Your login is _LOGIN_.

Click on the link below to activate a first trusted device:
For browser activation: _LINK:BROWSER_
For TrustBuilder Authenticator application: https://www.myinwebo.com/enroll/?code=_CODE_

TrustBuilder team
Adding deeplinks in email templates
To enhance user experience, you can also insert deeplinks to redirect users straight to the activation screen of TrustBuilder Authenticator app. You may use one of the links below depending on your use case.
-
Activation (mobile app only): https://near.myinwebo.com/enrole/activate?code=_CODE_
redirects users straight to the activation screen of TrustBuilder Authenticator app, with the activation code already filled-in. This deeplink is only reachable when users click the deeplink from a mobile device where TrustBuilder Authenticator is already installed. -
Activation (desktop app): inwebo://enrole/activate?code=_CODE_
redirects users straight to the activation screen of TrustBuilder Authenticator app, with the activation code already filled-in.
⚠️ In some email clients, this deeplink may not be clickable. The solution is to copy/paste it in a browser. We recommend including this information in the email template.
Example:
Hello _FIRSTNAME_,

To add a trusted device and safely sign in to _SERVICE_ click on the link below.

For mobile application: https://near.myinwebo.com/enrole/activate?code=_CODE_
For desktop application: inwebo://enrole/activate?code=_CODE_ (if not clickable copy and paste the link into your browser)

To install Authenticator on your device go to this page from your device https://www.myinwebo.com/enroll/?code=_CODE_

TrustBuilder team