This guide explains how to configure a SAML 2.0 integration between Google Workspace (acting as a SAML Service Provider) and TrustBuilder MFA (acting as the Identity Provider).
Prerequisites
-
Google Workspace admin access
-
TrustBuilder MFA admin access
Step 1: Configure TrustBuilder MFA connector
Configure a connector to set TrustBuilder MFA as the IdP:
-
Login to your TrustBuilder admin console.
-
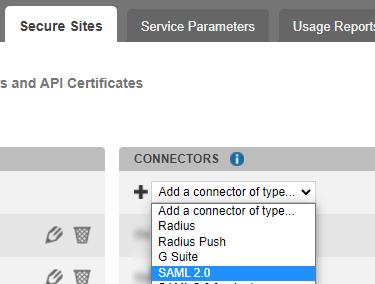
Navigate to the Secure Sites tab.
-
Under Connectors, click on Add Connector and select SAML 2.0.
-
Name the connector and click Add to create it.
-
Click on ”Download the Idp SAML 2.0 certificate” to save TrustBuilder certificate. You will need it later in Google configuration.
-
Keep this connector window open. You will need to copy/paste the Issuer URL, Single Sign On URL and Single Logout Service URL for later use.
Step 2: Configure Google Workspace as the Service Provider (SP)
-
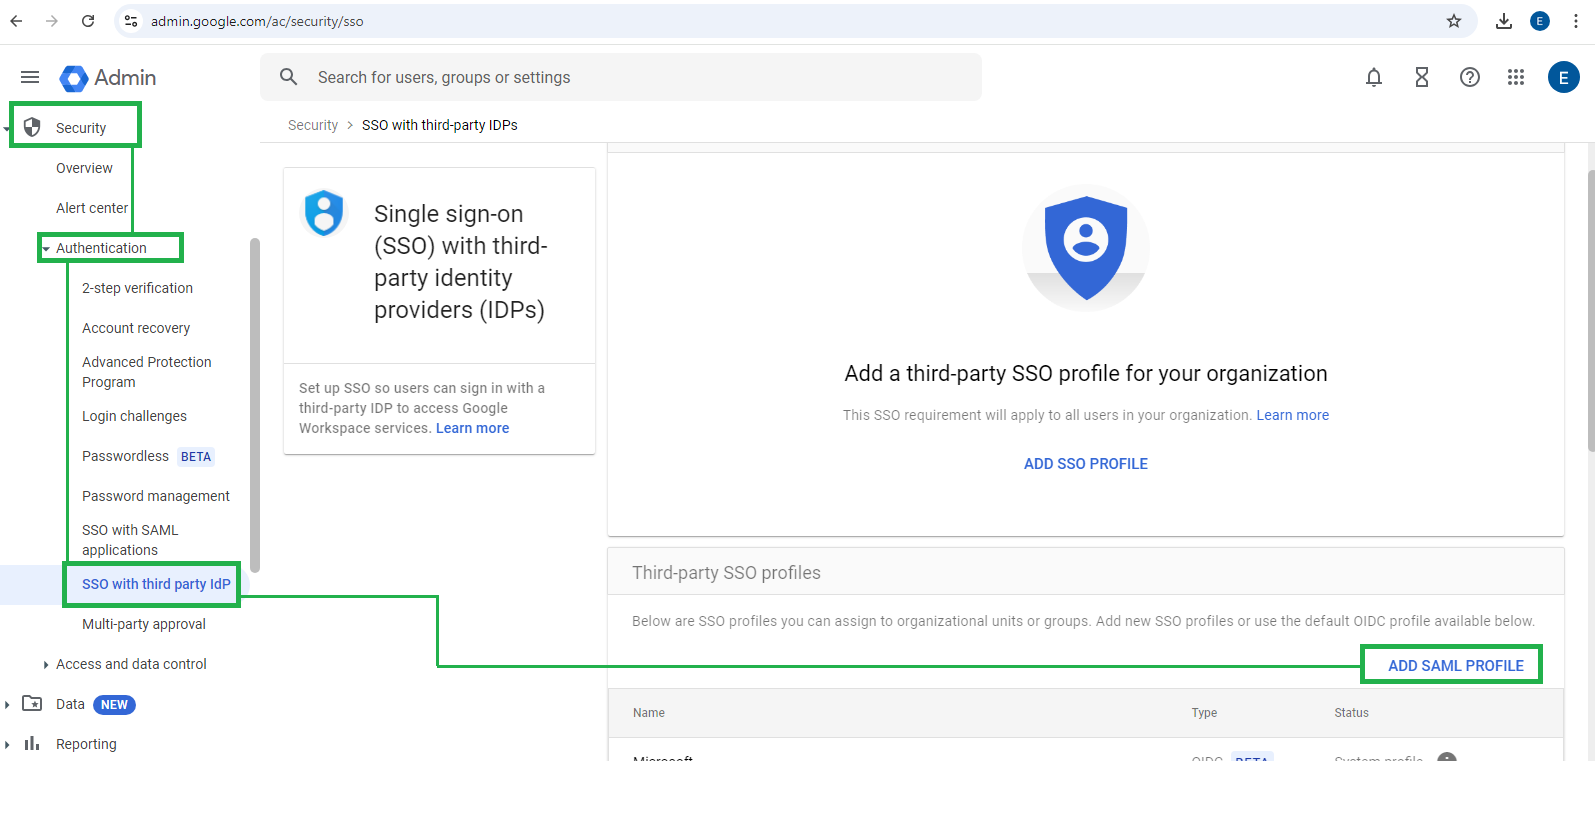
Login to your Google Workspace admin console.
-
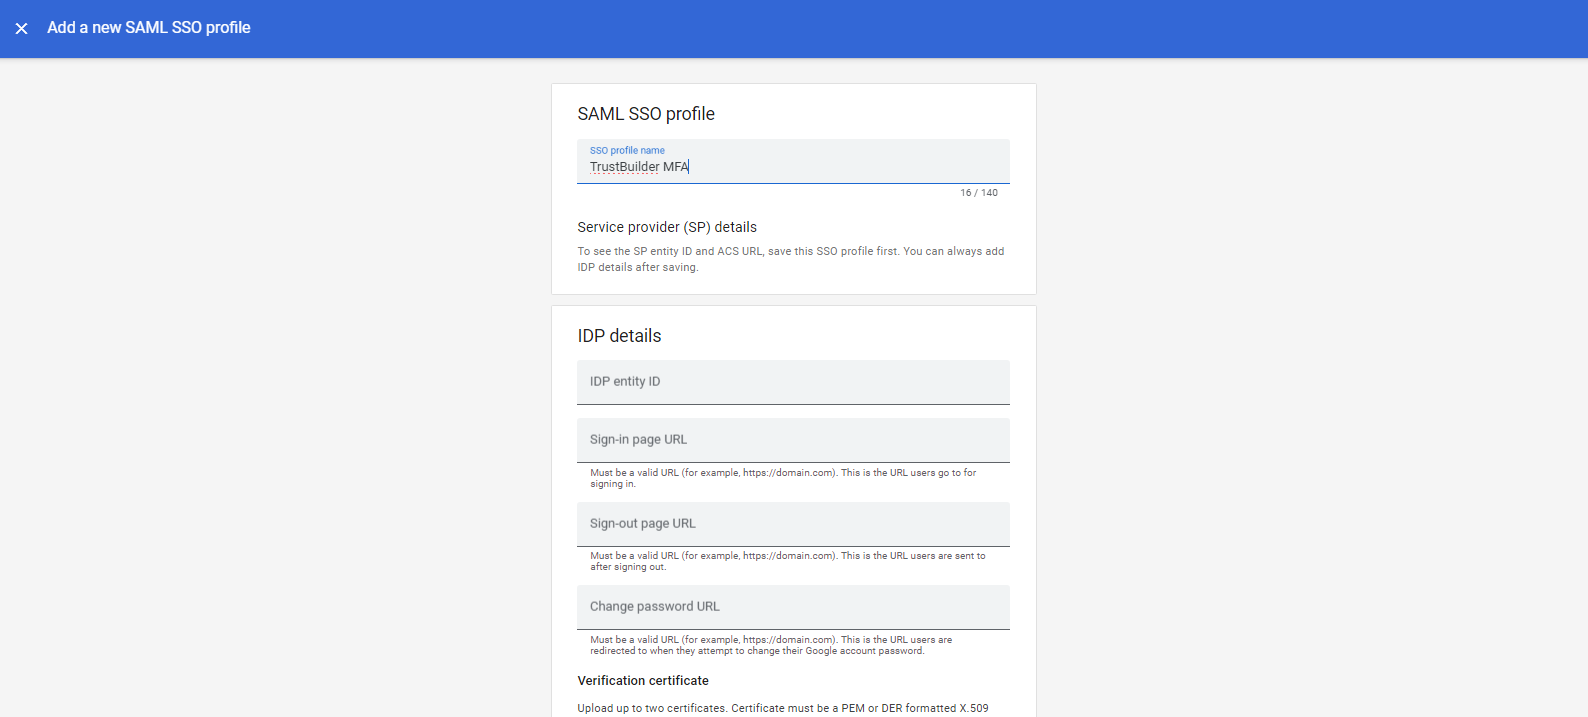
Navigate to Security > Authentication > SSO with third-party IdP > Add SAML Profile.
-
In the IDP Details section, fill in the information from TrustBuilder connector:
-
IDP Entity ID: copy/paste the Issuer URL from TrustBuilder MFA - see Step1. 6
-
Sign-in page URL: copy/paste the SSO URL from TrustBuilder MFA - see Step1. 6
-
Sign-out page URL: copy/paste the Single Logout URL from TrustBuilder MFA - see Step1. 6
-
-
Upload the TrustBuilder IdP certificate that you previously downloaded.
Step 3: Retrieve Google Workspace (SP) metadata
To allow Google Workspace and TrustBuilder to communicate, you should generate the SAML metadata for Google Workspace (the SP) and provide them to TrustBuilder (the IdP).
Google does not automatically provide a metadata XML file, so you must create one manually.
-
From the Google Workspace admin console, copy the following details for later use:
-
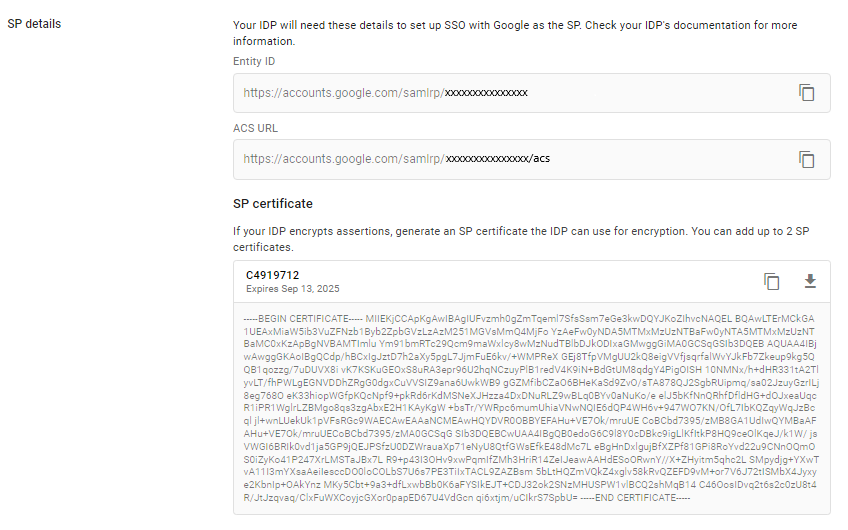
Entity ID:
https://accounts.google.com/samlrp/XXXXXXXXXXXX -
ACS URL:
https://accounts.google.com/samlrp/XXXXXXXXXXXX/acs -
Generate a certificate and copy it.
-
-
Download the following XML file example to match your environment. → Download the SP metadata sample file.
-
Modify the SP metadata sample XML file. Make sur to replace the placeholders with the appropriate Google Workspace values:
-
entityID: use Google Entity ID URL -
Location(2 times): use Google ACS URL -
X509Certificate: copy and paste the SP certificate from Google
-
-
Save the changes.
<md:EntityDescriptor xmlns:md="urn:oasis:names:tc:SAML:2.0:metadata" entityID="https://accounts.google.com/samlrp/XXXXXXXXXXXX">
  <md:SPSSODescriptor AuthnRequestsSigned="true" WantAssertionsSigned="true" protocolSupportEnumeration="urn:oasis:names:tc:SAML:2.0:protocol">
    <md:KeyDescriptor use="signing">
      <ds:KeyInfo xmlns:ds="http://www.w3.org/2000/09/xmldsig#">
        <ds:X509Data>
          <ds:X509Certificate>YOUR_GOOGLE_CERTIFICATE</ds:X509Certificate>
        </ds:X509Data>
      </ds:KeyInfo>
    </md:KeyDescriptor>
    <md:SingleLogoutService Binding="urn:oasis:names:tc:SAML:2.0:bindings:HTTP-POST" Location="https://accounts.google.com/samlrp/XXXXXXXXXXXX/acs"/>
    <md:AssertionConsumerService Binding="urn:oasis:names:tc:SAML:2.0:bindings:HTTP-POST" Location="https://accounts.google.com/samlrp/XXXXXXXXXXXX/acs" index="0"/>
  </md:SPSSODescriptor>
</md:EntityDescriptor>
Step 5: Finalize TrustBuilder connector
-
From the TrustBuilder admin console, open the previously created SAML 2.0 connector.
-
Paste the Google Workspace metadata into the required field and Update the connector.
-
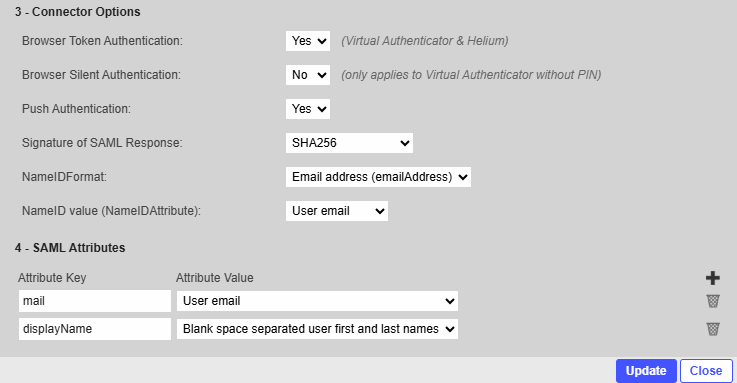
Configure the Connector options:
-
Browser token authentication: set according to your needs
-
Browser Silent Authentication: set according to your needs
-
Push Authentication: set according to your needs
-
Signature of SAML Response: set according to your needs
-
NameID Format: Email address
-
NameID Value: User email
-
-
Configure the SAML Attributes:
-
Attribute Key: mail
-
Attribute Value: User email
-
-
Click on Update to save the connector.
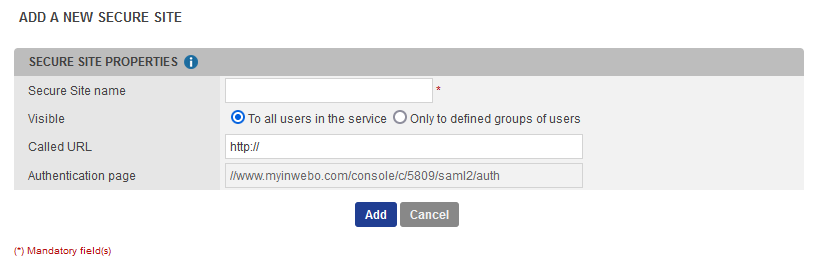
Step 6: Create a secure site
In TrustBuilder MFA admin console:
-
Go to the Secure Sites tab.
-
Click on Add a secure site of type… and select the SAML connector name you previously configured.
-
Set the Called URL to point to your the Internet address (https://accounts.google.com/).
The Called URL setting is only used to set a bookmark for the user on their My Account portal (myinwebo), it has no impact on the security.
-
Click on Add to create the secure site.
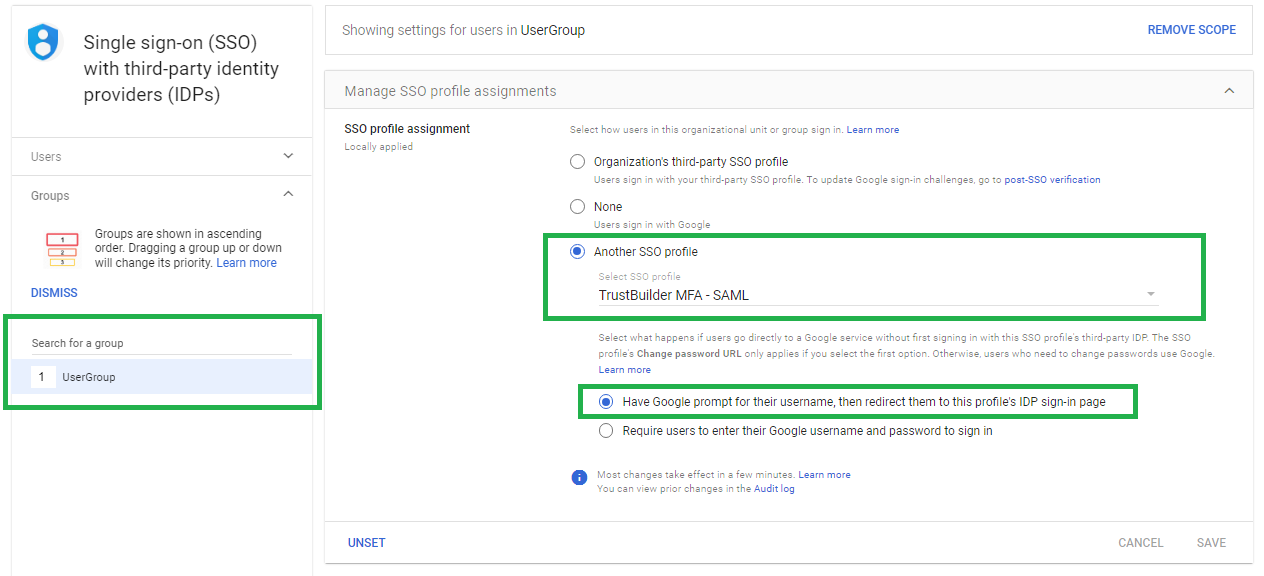
Step 7: Assign TrustBuilder MFA to a user group or organization in Google Workspace
-
From the Google Workspace admin console, navigate to SSO with third-party IdP > Manage SSO Profile > Manage.

-
Select the user group or organization you want to assign TrustBuilder MFA to.
-
Assign the TrustBuilder SSO profile to the selected group and the desired behavior.
Step 8: Test the Integration
-
Create a user in the TrustBuilder admin console with the same email as in Google Workspace.
-
Go to a Google service like Gmail or Google Sign-in page.
Make sure no Google account is currently logged in. We recommend not using an incognito window. -
Enter the user's email address and click on Next.
-
You should be redirected to the TrustBuilder authentication page for authentication.
-
Complete the authentication using TrustBuilder MFA.
-
After successful authentication, the user will be logged in to their Google Workspace account.