Working with Workflows
Overview
The TrustBuilder workflow is the process that parses a request. It is constructed from a number of activity nodes and scripts.
It defines the following activities that the process uses:
interpreting a request sent to an endpoint
which Adapters (LDAP, HTTP, JDBC...)
creation of calls to Adapters with data taken from the request
responses from Adapters
creation of a response that is returned to the calling endpoint and ultimately to the client
The scripting engine uses a combination of an XML file and scripts. Both of these are created with the TrustBuilder Administrator.
A TrustBuilder workflow will generally interrogate the incoming request for a request type to determine the route through the workflow.
The request type for the XML and SOAP end points is delivered in the request as part of the message.
The request type for the HTML end point is delivered as an HTTP header, form field or URL parameter.
On completion of the workflow an XML response element is created that is returned to the end point and subsequently to the calling client.
Workflows can be saved in two modes: normal and draft. A draft workflow will not be validated upon save, thus incomplete workflows can be saved for later, and will not be included in the config file, and so not exported with a full config export. To save a draft workflow use the Save Draft button in the workflow console or check the draft workflow check box when it is created. To save a normal workflow click the Save button in the workflow console or un-check the draft workflow check box when it is created.
Creating a New Workflow
A new workflow is created from the config console please refer to the configs chapter for details regarding creation, import and upload of workflows.
Workflow Console
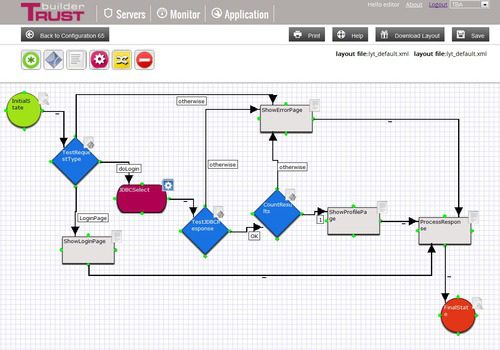
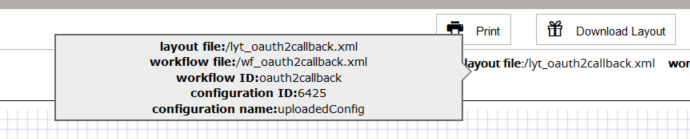
Details
The details of the workflow, relative files, configuration etc. are displayed in the top right of the workflow screen. To display the complete details mouse over the text.

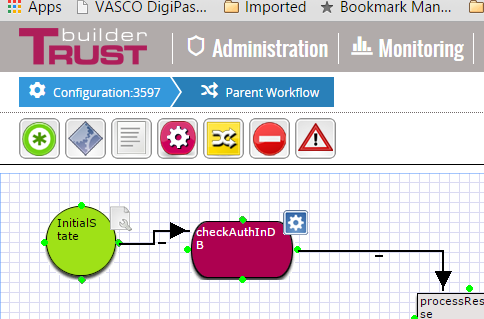
Toolbar
When a workflow is presented to you, the following bar appears in the upper left corner of the screen

Icon | Description |
|---|---|
 | This icon represents the Initial State Activity. It represents the Request made by the client. Only one per workflow is allowed. |
 | This icon represents a Decision Activity. The request is examined and, based on the content, routed through the system. |
 | In some cases it might be required to perform some data processing on the request. e.g. extract, decode, concatenate, and so on, information. This is represented by the Script Activity. |
 | Adapters allow TrustBuilder to connect to external sources like directory servers, DB servers, applications servers,etc. This icon represents a Adapter Activity. |
 | In order to reduce the complexity of workflows, it is possible to group common functionality into sub-workflows. Sub-workflow Activity is represented by this icon. |
 | If there are any configured components this activity will be present and useable. It allows for the referencing of a component from the workflow. |
 | This icon represents the Final State Activity. When TrustBuilder has processed the request, it will return a response. Only one per workflow is allowed. |
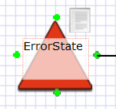
 | This icon represents an Error State. Only one error state is allowed per workflow. Normally the error state will connect directly to a Final State activity. If an exception is thrown during execution of the workflow the Error State activity will be called. |
Actions
Above the activity and details toolbar are a number of action buttons

Action | Description |
|---|---|
Configuration:1234 | Clicking this button will return to the configuration page. |
Clicking this button will print the workflow. | |
Download Layout | Export this workflow. This button will only be available if the configuration that this workflow belongs to is related to a server. |
Export | Download the layout file of this workflow. |
Save Draft | Clicking this button will save a draft version of the workflow. The workflow will **not** be validated or exported. |
Save | Clicking this button will save the workflow to file. |
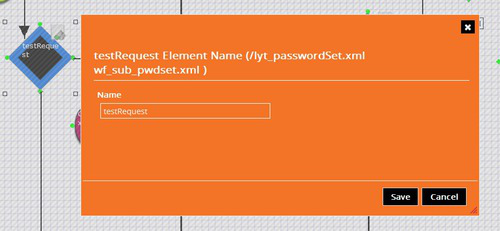
Setting an activity name
Each workflow activity must have a unique name to identify it by. If the name is not unique within this workflow saving the workflow will fail.
The default name can be changed by double-clicking the element (The element which is selected will be black). Once the name is change either click save or cancel.
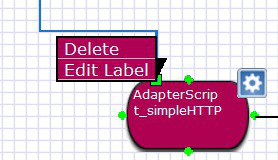
The name change form can also be accessed by right clicking the activity can clicking Edit Name from the menu that is displayed.
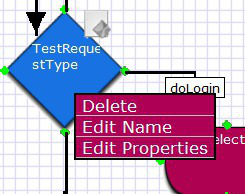
Deleting an activity
To delete an activity select it and hit the delete key or right click the activity node and select delete from the menu.
Changing activity properties

Clicking once on the property icon on the top right corner of an activity will open a property window.
This window can also be accessed by right clicking the activity and selecting Edit Properties from the menu The options in this window are different for each activity. You will use this for:
Specifying script-files and script functions associated with your activity
Specifying adapters to use (in case of Adapter Activity)
Specifying workflows to use (in case of Sub Workflow Activity)
Specifying Input and/or output properties that will be used to store certain values.
Activity Reference
Initial State Activity
The Initial State Activity is the beginning of the workflow. It is the connection between the request and the workflow. Only one Initial State Activity is allowed in a workflow.
Properties:
Input Property: The variable inside the workItem that will hold the request.


Script Activity
The Script Activity is an element that executes a script. e.g. changing the input property or retrieving values from within the input property.
Properties:
Script function: A select box with all the functions inside the script file. The selected function will be executed when the workflow engine fires the Script Activity
Script File: The reference to a script file that contains functions for all the different Activities. See Script Files Paragraph


Condition Activity
The Condition Activity is a special Script Activity. It can do everything as a script activity can but it has a returning parameter (set by the scripting language). That can select different paths inside the workflow. This return parameter is the label of the connection between activities. See Condition Activity Scripting.
Properties:
Script function: A select box with all the functions inside the script file. This function will be executed when the workflow engine fires the Script Activity
Script File: The reference to a script file that contains functions for all the different Activities. See Script Files Paragraph


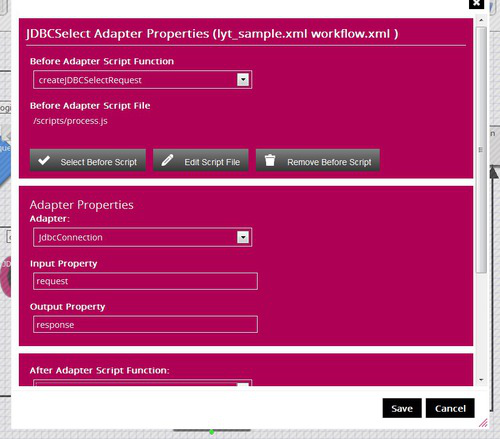
Adapter Activity
The Adapter Activity is responsible of executing the Adapters, that create the connections to the back-end.
Properties:
Adapter Properties
Adapter: A select box with all the adapters available in the configuration. These adapters must be configured in the configuration. See the Adapter Guide chapter for more information.
Input Property: This box contains a reference (variable name) to the variable that will hold the request to the adapter
Output Property: This box contains a reference (variable name) to the variable that will hold the response of the adapter.
Before Adapter Script
Script function: A select box with all the functions inside the script file. The selected function will be executed before the workflow engine fires the Adapter
Script File: The reference to a script file that contains functions for all the different Activities. See Script Files Paragraph
After Adapter Script
Script function: A select box with all the functions inside the script file. The selected function will be executed after the workflow engine fires the Adapter
Script File: The reference to a script file that contains functions for all the different Activities. See Script Files Paragraph

Since version 7.0 of TrustBuilder an adapter activity can have more than one exit connection the same as a conditional activity. The exits will be evaluated the same as for the conditionaly activity. If there are to be more than one exit the TB Core demands that one is named default. When editing a connection from an adapter activity there is a button specifically for this Set to Default

Workflow Activity
The Workflow Activity allows the calling of other workflows with a controlled request and response. In this case the properties that will be used in the InitialState Activity and the FinalState Activity in the child workflow are set by the parent workflow. When the child workflow is completed the parent workflow goes on the next configured activity.
Properties:
Workflow Activity Properties
Workflow: A select box with all the workflows available in the configuration. These workflow must be configured in the configuration. See our Workflow Guide chapter for more information.
Input Property: This box contains a reference (variable name) to the variable that will hold the request to the workflow
Output Property: This box contains a reference (variable name) to the variable that will hold the response of the workflow.
Before Workflow Script
Script function: A select box with all the functions inside the script file. The selected function will be executed before the workflow engine fires the Child Workflow
Script File: The reference to a script file that contains functions for all the different Activities. See Script Files Paragraph
After Workflow Script
Script function: A select box with all the functions inside the script file. The selected function will be executed after the workflow engine fires the Child Workflow
Script File: The reference to a script file that contains functions for all the different Activities. See Script Files Paragraph


Since version 7.0 of TrustBuilder a sub-workflow activity can have more than one exit connection the same as a conditional activity. The exit connections will be evaluated the same as for the conditional activity. If there are to be more than one exit the TB Core demands that one is named default. When editing a connection from a sub-workflow activity there is a button specifically for this Set to Default
The workflow that is specified by a sub-workflow activity can be opened directly. Right click on the sub-workflow activity and select Open from the context menu. This will open the sub-workflow in the workflow console.

Since version 8.0 of TrustBuilder the workflow of a sub-workflow activity can be opened directly by right clicking the activity node and selecting open.
Once the sub-workflow is open the parent workflow is detailed in the top bread crumb trail. Clicking the parent bread crumb will return the console to the parent workflow.
Component Activity
The Component Activity allows the calling of components with a controlled request and response.
Properties:
Component Activity Properties
Component: A select box with all the configured components available in the configuration. These components must be configured in the configuration.
Input Property: This box contains a reference (variable name) to the variable that will hold the request to the component.
Output Property: This box contains a reference (variable name) to the variable that will hold the response of the component.
Before Component Script
Script function: A select box with all the functions inside the script file. The selected function will be executed before the workflow engine fires the component.
Script File: The reference to a script file that contains functions for all the different Activities. See Script Files Paragraph
After Component Script
Script function: A select box with all the functions inside the script file. The selected function will be executed after the workflow engine fires the component
Script File: The reference to a script file that contains functions for all the different Activities. See Script Files Paragraph


Final State Activity
The Final State Activity is the last step of a workflow. It defines which variable will be used as output (response) to the incoming request. Only one Final State activity is allowed per workflow.
Properties:
Ouput Property: The variable inside the workItem that will hold the response.


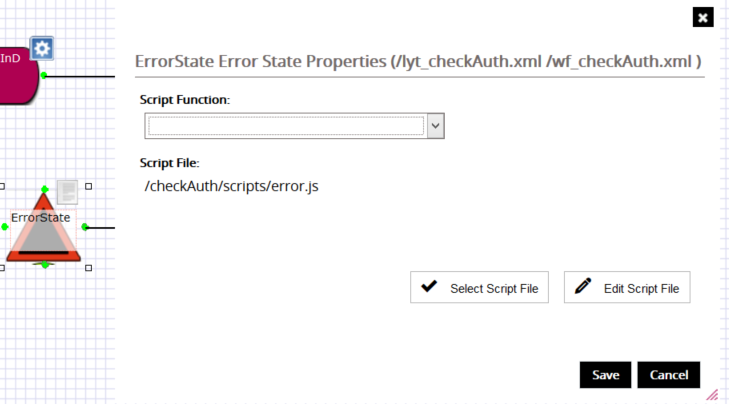
Error State Activity
The Error State Activity is called if the workflow throws an exception that can then be handled by a script to send a readable response. There is no incoming connection for the Error State activity. The out-going connection would normally lead to the Final State activity. Only one Error State activity is allowed per workflow.
Properties:
Script function: A select box with all the functions inside the script file. The selected function will be executed when the workflow engine fires the Error State Activity
Script File: The reference to a script file that contains functions for all the different Activities. See Script Files Paragraph
Connections
Each activity is connected by an arrowed connector.
To make a connection between activity nodes drag one of the green circles surrounding the source activity over to the target activity.
There are certain points around the target activity that will accept a connection, where a dragged line can be dropped.
When a connection is dragged over these points a blue circle appears that is where a connection can be dropped.

Once a connection is made it can be labelled or deleted by right clicking the connection and selecting from the relevant menu.
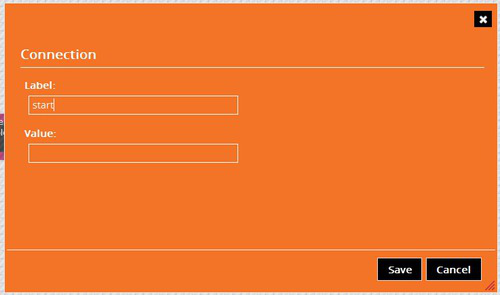
The label and value only effect the workflow if the source activity is a conditional or adapter activity. In those cases the variable returned from the script or after script will be used to determine the route of the workflow.
The value is not required. If the value is not defined then the label will be used. If there is a label and a value then the label is used for display and the value is used to determine the route of the workflow.
Saving a Workflow
Overview
A workflow can be saved in two modes: normal and draft. A draft workflow is not validated on save, allowing for incomplete workflows to be created, and are not included in the config on export. A normal workflow can only be saved if it is valid and is exported with the config. If a workflow is saved as a draft the row in the config workflow screen is highlighted orange.
To save a draft workflow click the Save Draft button in the top right corner of the workflow console.
To save a normal workflow click the Save button in the top right corner of the workflow console.

Then the save workflow dialog appears:
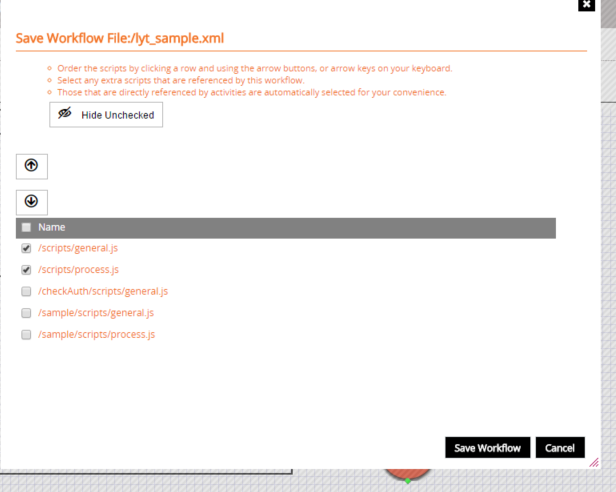
To save the workflow click the Save Workflow button. On saving the workflow will be validated against the schema, if there are any issues they will be displayed and the save will fail.
The scripts that are referenced by activities in the workflow will already be selected. If there are scripts that are referenced from within a script then these need to be selected also.
For instance if script process.js is referenced by an adapter activity then it will already be selected. If there is a function in the process.js script that calls another function in common.js but common.js is not referenced by and activity then the common.js script will need to be selected manually. Next time the workflow is loaded the extra selected scripts will be selected by default on save.
The order that the scripts are referenced can also be changed by using the arrow keys beside the scripts (or on your keyboard). To change the order of a script:
Click a script row
Move the script up or down using the arrows on your keyboard or by clicking the arrows to the side of the script list
To make ordering simpler you can hide all the non-selected scripts. These are scripts that will not be referenced by the worklow.
The order of the scripts matters because if there are two functions with the same name in different scripts the last one loaded by the TrustBuilder engine will be the one used the first one will be ignored. This can be helpful when using scripts over multiple workflows giving the option to overwrite functions.
Scripts in Workflows
Overview
Most of the activities (Condition Activity, Script Activity, Adapter Activity, Workflow Activity, Component Activity and Error State Activity) have a script function that is run when the workflow engine processes the Activity.
These scripts can be edited on the filesystem, using an editor of your choice, or using the script editor delivered with the TrustBuilder Administrator (TBA).
Scripts can be managed and edited directly from within the workflow console by selecting any Edit Script button from an activity property window. This has the advantage of relating functions and activities directly.
Managing Script Files
All the script functions are in a script file. The script files are stored in the scripts directory within the TBA directory structure related to one configuration.
To select a script file to use in an activity, you click the Select Script File button in a property window of an activity that supports scripting.
The button is named differently in the different activities, but does the same thing.
For Script Activity and Condition Activity the button is called Select Script File
For Adapter Activity and Workflow Activity these buttons are Select Before Script for the Before section of these activities and Select After Script for the After section.

Create New Script
Within this section you can create new script files. The script file name box can contain a path and a filename + extension. e.g /scripts/testFile.js
New scripts can also be created from the configuration screen in the script table.
Scripts are created relative to where the configuration file (config.xml) is store. Which will be relative to the root of TB_HOME once exported to a TB Server
Select an Existing Script File
All scripts available to this workflow, within this configuration package, are listed here including any that have just been created. Scripts can be used over different workflow allowing for code re-use where one script may contain common functions.
When you select a script to use (by selecting the radio button) the window closes and the script file is entered inside the property window of the activity. Afterwards you can select a function or create a new function from within the property window of the activity.
Scripts cannot be shared over different configurations. This is a change from previous versions.
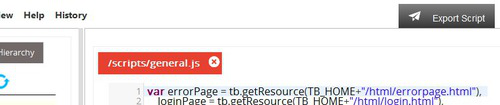
Editing a Script
From within the property dialogue of an activity that supports scripting you can select Edit script file. This will open up a new window which is the TBA script editor.
Please refer to the page Editing Scripts chapter.
Exporting Script Files
Script files can be exported to the TrustBuilder core from a number of locations:
Directly from the top of the script editor
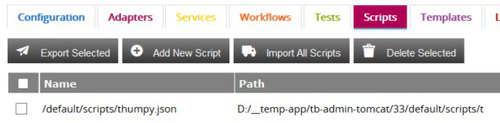
When clicking the Export All button in the configuration screen
Checking the box beside scripts in the script tab of the configuration screen then clicking the Export Selected button.
Scripting
Language
TrustBuilder currently supports only JavaScript as scripting language.
Scripting References
JavaScript
The javascript engine in TrustBuilder is Rhino. For more information about Rhino click here:
Creating an Activity Script function
Some TrustBuilder Activities support Scripting. These script functions need to follow certain rules.
Javascript
function functionName(workItem){}
The line must start with function (there can be spaces before the function), this is the Javascript method to define a function
There must be a space between the 'function' and the functionName
functionName should describe the function or activity, this will be shown in the function select box of the GUI. function names are limited to [a-z][A-Z][0-9]
After the closing parenthesis ) there must be an opening brace { without any spaces.
The function must end with a }
function logHelloWorld(workItem){
    // Here come the script logic
    log("Hello World"); //This will write a hello world in the log of trustbuilder
}
TrustBuilder built-in objects and functions
workItem
workItem is the request variable that is used by TrustBuilder to store several values through the various steps in the workflow for that current request. The adapters also use the workItem to get the request variable (input property) and to set the response variable with the result.
workItem "Objects" Icon
workItem supports the "dot" notation and is not limited to one sort of variables. for > example:
var object = {name: "John Doe",
    email: "john.doe@acme.com",
    phones: {business: "+1 123 33221",
    private: "+1 321 44332"}
};
workItem.object = object
workItem can support any object within the scripting language.
Example
We have a workflow with 4 activities:
InitialState Activity (input property is set on input)
Script Activity (script function is scriptFunc1)
Script Activity (script function is scriptFunc2)
FinalState Activity (output property is set on output)
function scriptFunc1(workItem){
    var inputDoc = workItem.input;
    workItem.doc = inputDoc;
}

function scriptFunc2(workItem){
    workItem.output = workItem.doc;
}
When you send the following XML to the XML Endpoint of TrustBuilder, you should receive the exact same output as that which you put in.
<Body>
  <Value>Hello World</Value>
</Body>
log(message,component,level)
function logHelloWorld(workItem){
    // Here come the script logic
    log("Hello World", "logHelloWorld", info); //This will write a hello world in the log of trustbuilder with an INFO level.
}
Adapter API
The API for the different adapters is explained in the scripting api chapter.
Editing Modes Basic and Advanced
Overview
There are two editing modes in TrustBuilder Administrator basic and advanced. Everything described in this chapter is when the advanced mode is applied. To set advanced mode ensure that the authenticated use has the TBAGAdvanced role. If this role is missing then the user is using basic mode. In the context of editing a workflow the basic mode provides a wizard to guide the user through the steps required to create an adapter activity node.
Basic Mode Adapters
In basic mode when an adapter activity is dropped onto the workflow a wizard like form is opened.
The first step is to select an adapter from a list of adapters that exist in this configuration.
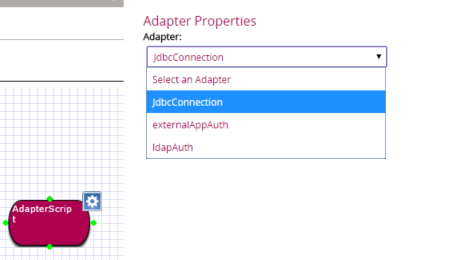
Once the adapter is selected all the APIs for that adapter are listed. In this instance a database/jdbc adapter has been selected so the APIs related to a database querires. Here a select query will be created with the jdbcSelectRequest API.

Once the desired API has been selected an example is displayed and input fields for each API argument are rendered. These will be different for each API apart from the following which will be available for all APIs.
Input Field | Description | Required |
|---|---|---|
variables | Write Javascript here to define variables that can be used in the API arguments. | no |
request variable | Used to assign the API call that is generated to a variable for reference later | no |
response | Javascript that is run after the API call has been made. The after adapter script. | no |
All input fields have in-line help beside the input label that describes the purpose of the API argument if documentation is available.

Variables
The variables input for the API is for setting up variables that can be used by the API when it is executed. For instance retreiving user details from an incoming request that can be used in a query:
var request = workItem.request;
var username = ''+request.parameter('username');
var password = ''+request.parameter('password');
var profile = parseInt(request.parameter('profile'),10);
This can then be used in an API argument. For instance used in a jdbcSelectRequest API call, which accepts two arguments sqlStatement and sqlArguments.
sqlStatement select * from users u where username = ? and pass = ? and u.profile = p.id
sqlArguments username,password,profile
In the context of the form this would look like this:

Request Variable
Define a name to give to the API call so that it can be referenced later in another script or activity.
Response
This script is run once the API call has been executed. Typically maybe to process the results of the query.
var resultSet = workItem.response.getRows();
log("resultSet:"+resultSet, "process.js");
var id = resultSet[0][0];
var username = resultSet[0][1];
var password = resultSet[0][2];
var gender = resultSet[0][3];
var birthday = resultSet[0][4];
var profile = resultSet[0][10];
var marialStatus = resultSet[0][6];
var firstName = resultSet[0][7];
var middleName = resultSet[0][8];
var lastName = resultSet[0][9];