Workflows
Workflows
Using subworkflows
Since Trustbuilder 5.0 subworkflows are available. These are activity steps that call other workflows to do part of their work. Doing this allows for workflow/code reuse if some work needs to be done more than once.
In order to call a subworkflow and return a result from it, you have 2 options:
Use the request / response mechanism of the workflow [default]
Use the workItem as a means to pass around objects to/from the parent to the child workflow
The first option
is generally the cleanest, but requires more thought as the response needs to be wrapped by 'tb.simpleResponse' which is ok if you only need one response. So the input parameter of the child workflow needs to be wrapped by for example
"myinput = tb.simpleRequest(x509cert)"in the childworkflow the value (x509cert in this example) can be retrieved by workItem.input.value
After the childworkflow is finished the result should be wrapped in a simpleReponse to the parent workflow like
"tb.simpleResponse('validation ok')"this way the parent can see the result of the child workflow by getting the value in
"subworkflowresult = workItem.suboutput.value" // returns 'validation ok'The second
is more convoluted in the way that parent and child can see each other's attributes, which results in a workItem that contain items from both workflow making debugging more difficult.
In order to use this option the attribute 'reuseWorkItem' should be set on the 'WorkflowActivity' node inside your parent workflow. However the request/response mechanism is still required in order to call the subworkflow, but for this the simpleRequest/simpleResponse may be given any arguments which are discarded lateron.
This option should only be used if both workflows are tightly integrated (ie. need variable from one another to function)
Using Session disposalflows
When using sessions, the disposalflow is available. Use cases can be cleaning up datastores or audit logging notifying a user his session has timed-out. This is a cleanup job, this means its running every 30 minutes for all old sessions.
To use the disposal flow add it to your trustbuilder.properties
disposalFlow={{workflowID}} When the job is running the session info is passed along as Request Parameter since the session doesn't exist anymore in your application server. So the tb.getSession() function won't work here.
Testing your workflow
Testing in the TrustBuilder Administrator
Tests can be created and run within the TrustBuilder Administrator (TBA). This eases the creation and writing of script to simple form base.
It has the added value that workflows and scripts can be tested locally in TBA before they are exported to a running TB Server.
For each workflow within TBA a test can be created on the Tests tab of the relevant configuration by clicking the Create Test File button.

Once a test is created it can be run by clicking the relevant Run Test button.

Results of the tests are then displayed and the complete log output from the Engine when the test was run:
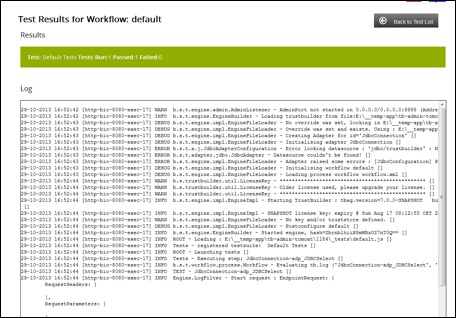
For more information working with workflow tests in TBA refer to the working with configurations > test tab chapter.
Testing from the Command Line
The Trustbuilder tools contain a script tbTest.sh that allows you to run TrustBuilder with predefined requests and verify that the responses are still correct. You can do this either in complete isolation from the network services (ldap / databases) or partial isolation (just the ldap). The advantage is that you can test both positive and negative outcomes in your workflow without impacting other systems.
In order to be able to test a certain workflow, create a test folder with a javascript file with the id of the workflow you want to test. (eg. myworkflow.js)
Now first thing to do is actually describe your tests: eg.
describe("TrustBuilder Sample Test suite", function() {
    it("Default request", function() {
        var incoming = test.httpRequest({});
        var out = test.handle(incoming);
        expect(out.status).toBe(200);
        expect(out.body).toMatch(/.\*\<div align="center" class="titleText"\>simple login page\<\\/div\>.\*/m);
    });
    it("Login request request without profile", function() {
        var incoming = test.httpRequest({
            RequestType: 'doLogin',
            username: 'onlyInTestUser',
            password: 'onlyInTestPwd',
            profile: '0'
        });
        var out = test.handle(incoming);
        expect(out.status).toBe(200);
        expect(out.body).toMatch(/.\*\<title\>SecurIT - TrustBuilder Demo\<\\/title\>.\*/m);
    });
});
In order to mock certain adapters (eg. the JDBCSelect activity in the sample workflow) you merely create a function named after the id of the Activity, and return the object for use later in the workflow
function JDBCSelect(workItem){
    if(workItem)
      return {
        status:0,
        substatus:0,
        message: '',
        rc: 'OK',
        size: 1,
        getRows: function(workItem){
            return [
                [1,'myUsername','myPassword','M','10/02/1976',0,'S','K.','A.','S.']
            ]
        }
    };
}
Subworkflows can be mocked as well with the same logic. By creating a function with as name the id of the workflow activity, the subworkflow is overridden.
A common question is how can I change the outcome of a mock function (adapter or workflow). One way of doing it is define a variable on top of your testfile (beit var ungoingTest; ). This variable is available during testing as the test file is evaluated in the workflow also (but only during testing) By using the function evalInWorkflow('ungoingTest = "positiveTest"') you can use this variable to switch between responses.
To get you started this template below should be of help.
Template
Test File Template
/*
 * Workflow Name: <Name>
 * Workflow Description: <Description>
 */

/*
 * Mock Adapters
 */
function adapterFunction\_adapterId() {
    return {
        status: 0,
        substatus: 0,
        rc: 0
     };
}

/*
 * Mock Subworkflows
 */
function subworkflowActivity() {
   return '';
}

/*
 * Requests
 */
describe("<Description of the Suite>", function() {
    it("<Test Name>", function() {
    /*
     * evalInWorkflow:
     * If you want to change a certain variable in your workflow scripts.
     *
     * Example:
     * evalInWorfklow('status = 1');
     */

    /*
     * Object to be used in tests
     *
     * Objects params, cookies, headers:
     * { key: value }
     *
     * Body:
     * "String"
     */
    var params = null,
        headers = null,
        cookies = null,
        body = null;
        var incoming = test.httpRequest(params,headers, cookies, body);
        // test.handle will execute the test and put the output into the out variable
        var out = test.handle(incoming,null);

    /*
     * Evaluating your test:
     * expect(var).toBe(variable): output needs to be an exact match (f.e httpstatus = 200)
     * expect(var).toMatch(regexp): output needs to match a regexp.
     *
     * Example:
     * expect(out.status).toBe(statusToMatch);
     * expect(out.body).toMatch(regexpToMatch);
     */
    });
});
Pre-defined Workflows
OAuth
The OAuth adapter introduced in Trustbuilder 6.0 allows to use Trustbuilder as an OAuth client to a Service Provider like Google or Facebook.
A typical use case could be to allow users to login/register with Google/Facebook to access a service provided by you. An advantage of this approach is that your users no longer have a username/password they need to remember to use your service. In order to enroll the user to your service callback are available to get access to the user's information. This depends of course on how you have configured the Service Provider and if the person trying to login is agreeing to the fact that you obtain the rights to access that information.
As already mentioned the current version of the adapter is tested against Google and Facebook, but others should be trivial to setup.
This reference flow should give you an idea on how to use Trustbuilder with Google as service provider. The flow is pretty straightforward:
a. User tries to access a protected resource b. Trustbuilder notices that the user wasn't yet authenticated so redirect him to the service provider c. The User logs in with the service provider d. The service provider asks the user if he's ok to grant your application the pre-defined info e. A callback is made to Trustbuilder with a temporary token allowing access to the users info
OCSP-Responder
Trustbuilder has next to the 'normal' endpoints a special endpoint that allows to validate ocsp requests through a workflow. Setup is pretty straightforward but has a couple of caveats. This howto should help you set one up.
Step 1: obtain a OCSPSigning enabled certificate
Step 2: Configure Trustbuilder
Step 3: Test your newly created ocsp endpoint
Step 1: obtain a OCSPSigning enabled certificate
First step is to have a valid vertificate with the extended keyusage of OCSPSigning enabled.
For testing purposed you can create a self-signed certificate via openssl
First we create the openssl config file (openssl.cnf)
HOME = \$ENV::HOME
RANDFILE= \$ENV::HOME/.rnd

[ ca ]
default\_ca = CA\_default # The default ca section

[ CA_default ]
dir                   = ./CA # Where everything is kept
certs                 = $dir/certs # Where the issued certs are kept

crl_dir               = $dir/crl # Where the issued crl are kept

database              = $dir/index.txt # database index file.

new_certs_dir         = $dir/newcerts # default place for new certs.

certificate           = $dir/cacert.pem # The CA certificate

serial                = $dir/serial # The current serial number

crlnumber             = $dir/crlnumber # the current crl number

# must be commented out to leave a V1 CRL

crl                   = $dir/crl.pem # The current CRL

private_key           = $dir/private/cakey.pem # The private key

RANDFILE              = $dir/private/.rand # private random number file

x509_extensions       = usr_cert # The extentions to add to the cert

name_opt              = ca_default # Subject Name options
cert_opt              = ca_default # Certificate field options
default_days = 365 # how long to certify for
default_crl_days = 30 # how long before next CRL
default_md = sha1 # which md to use.
preserve = no # keep passed DN ordering
policy = policy_match

# For the CA policy

[ policy_match ]
countryName = match
stateOrProvinceName = optional
organizationName = match
organizationalUnitName = optional
commonName = supplied
emailAddress = optional

[ req ]
default_bits = 1024
default_keyfile = privkey.pem
distinguished_name = req_distinguished_name
prompt = yes
string_mask = nombstr

[ req_distinguished_name ]
countryName= Country Name (2 letter code)
countryName_default= BE
localityName= Locality Name (eg, city)
localityName_default=Gent
0.organizationName= Organization Name (eg, company)
0.organizationName_default= SecurIT Bvba.
commonName= Common Name (eg, YOUR name)
commonName_max= 64
emailAddress= Email Address
emailAddress_max= 64

[ usr_cert ]
nsComment = "TrustFactor Generated Certificate"
subjectKeyIdentifier=hash
authorityKeyIdentifier=keyid,issuer
basicConstraints = CA:FALSE
keyUsage = nonRepudiation, digitalSignature, keyEncipherment
extendedKeyUsage = OCSPSigning

[ v3_ca ]
subjectKeyIdentifier=hash
authorityKeyIdentifier=keyid:always,issuer:always
basicConstraints = CA:true
in the same folder we now create the root certificate the key, the certificate and the p12 containing both.
mkdir -p CA/newcerts
touch CA/index.txt
echo "00" \>\> CA/serial
export OPENSSL\_CONF=./openssl.cnf
openssl req -new -x509 -keyout ./CA/private/cakey.pem -out
./CA/cacert.pem -days 3650 -passin pass:securit -passout pass:securit

# -- asks you questions regarding country / org name / email --
# the common name should be something like 'My root CA'

export HOST=localhost
openssl genrsa -out \$HOST.key 1024
openssl req -new -key \$HOST.key -out \$HOST.csr

# -- asks you questions regarding country / org name / email --
# the common name should be something like your host name (eg. localhost)
# finally sign your certificate

openssl ca -in \$HOST.csr -out \$HOST.cer
# password is securit

openssl pkcs12 -export -in \$HOST.cer -inkey \$HOST.key -out \$HOST.p12

#remember the password
Ok, now we've got a valid key and self-signed certificate in the p12 container.
Now we need to configure trustbuilder to use this keystore for it's ocsp endpoint
Step 2: Configure Trustbuilder
Go to your TB_HOME and create a trustbuilder.properties (if not already there)
Add the following properties
ocspResponderKeystoreType=pkcs12
ocspResponderKeystorePassword=<password>
ocspResponderKeystoreFile=<keystore>.p12
ocspResponderKeystoreAlias=trustbuilder
ocspResponderKeystoreAliasPassword=<password>
ok, now restart the trustbuilder application (or engine through the gui) and you should be set to go.
Step 3: Test your newly created ocsp endpoint
openssl ocsp -issuer root.cer -nonce -CAfile root.cer -url "http://127.0.0.1:8080/tb/ocsp" -serial "0x1"The basic workflow does a pretty trivial thing ( it checks whether the serial is odd or even to say if it's a valid request). But this should allow you to create more complex workflows.
Validation Server
Prerequisites
CRL2DB
in context of application server
as standalone
read more in the CRL2DB chapter
Validation Server
Warning
This how-to explains one of the more advanced functions in TrustBuilder.
You should have knowledge and be familiar of the various options, scripts and functions within TrustBuilder before going on with the setup of the validation server.
The validation server workflows and scripts can be downloaded as a separate download on the TrustBuilder download website.
The certificate validation flow requires a base64-encoded certificate as input.
Optionally the request can also contain a validation policy and/or a response template.
The validation policy determines "how" the certificate is validated, i.e. which actions are done in which order.
The response template determines which information is sent back in the response (e.g. only status, certificate details, ...).
When no policy and/or template are sent in the request, the default ones are used.
The validation entails:
checking the signature on the certificate is correct and comes from a trusted certification authority (CA)
making sure the certificate is not expired
making sure the certificate is not revoked
(optionally) do the same checks for the CA certificates in de certificate chain (except the self-signed CA certificate)
By default the certificate validation flow only validates the received certificate. There's an optional configuration setting (validateChain), which activates the complete certificate chain being validated (except the self-signed CA certificate).
The validation policy determines how the certificate is getting validated. Configuration settings determining the validation policy are:
Name | Description |
useStore | validate the certificate against the local CRLStore or not possible values: true, false |
goodMaxAge | Time in seconds the CRLStore is trusted as being up-to-date when the certificate was not found (valid certificate) |
onholdMaxAge | Time in seconds the CRLStore is trusted as being up-to-date when the certificate was found en revoked with reason onHold |
useOCSP | validate the certificate by sending an OCSP request to the CA's OCSP responder possible values: true, false |
firstCheck | Which check should be done first: ocsp or the CRLStore ? |
crlFallback | When the OCSP request fails (for instance server down), do we fallback on the validation result of the local CRLStore (providing the CRL information in the store is still valid)? |
ValidateChain | Validate the received certificate only or also the signer certificates (self-signed CA certificate excluded)? |
All the trusted CA's should be stored in a JKS truststore.
Process :
A request is received to validate a certificate. This request should contain a base-64 encoded certificate and optionally a validation policy and a response template.
The first step is to validate the signature on the received certificate. Is it a valid signature by a trusted CA?
Which CA's are trusted depends on the CA's stored in the truststore.
If the signature is valid, the certificate is decoded and checked if it has not expired.
Now the validation policy will determine which the next step in the validation process will be. Will we check against the crlStore first or do a OCSP check first?
If the firstCheck is the CRLStore, check if the store should be used or not?
CRLStore check:
Check if the crlstore contains the CRL information for the certificate signer
Check if the certificate is found in the CRL information
If the certificate is not found, see if the crlstore is considered up-to-date according to the goodMaxAge policy setting
If the certificate is found with revocation reason onHold, see if the crlstore is considered up-to-date according to the onHoldMaxAge policy setting
If the certificate is found with any other revocation reason (other then onHold) the certificate is revoked, no matter how old the CRL information
If needed, now do the OCSP step. First check if OCSP is allowed or not, according to the validation policy.
OCSP check:
If a certificate status is returned, this will become the status in the response
If there was a connection problem or no certificate status was received, check if we should fallback on the crlstore status independed of the CRL information age
Fallback:
A fallback can be done on the local CRL information if no up-to-date certificate status can be determined. The CRL information should however should only be trusted for as long a the CRL is valid.
Note
We have had experience with CA's who are supposed to publish new CRL's every three hours, but due to some internal failure do not publish a new CRL for 36 hours. If the crlstore is trusted for example for 12 hours, the certificate validation will fail after 12 hours. The CRL information in the store is however valid for 1 week. By allowing the fallback, the certificate validation can continue. If you should allow fallback or not; depends on the sensitivity of the data that gets protected by the certificate that is to be validated.
If the policy says an OCSP check has to be done first, the previous steps are done in reverse order: first OCSP, then crlstore, and then fallback.
Now the certificate is validated, check if the rest of the certificate chain has to be validated or not.
Note
The validation policy for the user certificates and the CA certificates can be different within one PKI. If we take the Belgian eID for example, the end-user certificate can be checked using CRL's or OCSP, but the citizen CA certificates can only be checked using CRL's. It should thus be possible to use/set different policies for both certificates.
If the certificate chain should be validated, run through the same process for each certificate in the chain, until a self-signed CA certificate is found. The self-signed certificate is not checked. If this certificate is in the truststore ,it is considered valid and trusted.
Jdbc Adapter
In order for the jdbc adapter to work, a datasource must be created in your application server. The Howto section contains samples of reference application servers to get you started.
Creating the database
Information
This example is for a PostgreSQL database. Other databases are possible but will have other syntaxes but the flow of creation shouldn't change.
To create a new user, switch to the postgresql user (normally postgres) and start the console with psql
su - postgres
psql
Create the database, user, password and give him rights to the database.
create user validationuser;
alter user validationuser with password 'yourpwd';
create database sit\_crlstore;
alter role validationuser login;
grant all on database sit\_crlstore to validationuser;
Import the ddl schema for the validation server into the database. This schema is included in the trustbuilder-tools download package.
psql sit_crlstore < /somepath_to_tbtools/validation.ddl Status codes
Validation code
When a certificate is validated or revoked, this field contains what path has been followed to come to this answer. The node 'validation_description' can be used for this also.
In order to read this field correct, split it up.
Status
0x0000000**0** -> The status of the validationrequest Status | Code |
Good | 0 |
Error | 1 |
Revoked | 2 |
OnHold | 3 |
Unknown | 4 |
Expired | 5 |
Component
0x000000**0**0 -> Where in the validation flow the decision was made Component | flag |
Request | 1 |
Certificate | 2 |
Policy | 3 |
PubDate | 4 |
Store | 5 |
Ocsp | 6 |
First check
0x00000**0**00 -> What was checked first First Check | flag |
Store | 1 |
Ocsp | 2 |
Outdated
0x0000**0**000 -> Is the store outdated according to policy Yes 1 No 0
Crlfallback
0x00000000 -> Was crlfallback used and is the data still valid? Even though the policy might indicate the store is outdated, if the policy contains the crlFallBack flag than the check is done to the store if the current time is still valid according to the crl policy (ie. between
Yes, but not valid | 1 |
Yes, and valid | 2 |
No | 0 |
Example
Validation code = 0x00000152 The certificate is revoked (2), this information was found in in the store (5) and the store was the first location to validate the certificate against (1)
Validation code = 0x00021153 The certificate was put on hold (3), this information was found in the store (5), the store was checked first (1), however the store was outdated (1), but crlfallback was used and the information in the store was still valid (2).
Crl2db Viewer
The Crl2db has a utility to view the crls in the database. When you browse to your appliance with the crl2db/viewer url you get a page with the content of the database.
For example : http://yourapplication/crl2db/viewer

CRL2DB
Purpose
The crl2db scheduler is part of the Validation Server, delivered by default with TrustBuilder.
This module supports the retrieval of CRLs (Certificate Revocation Lists) and Delta-CRLs from a configurable set of CAs (Certification Authorities) and stores them in a local database cache. This allows TrustBuilder to validate certificates based on local, automatically updated, CRL replicas. This in combination with the ocsp endpoint allows trustbuilder to have a proxy ocsp within the organisation.
This process can either be run inside the application server (in which case it needs a datasource) or standalone in which case the database is refered to by a properties file.
Installation
In an application server
In the trustbuilder distribution you can find under the lib folder the file trustbuilder-crl2db.war. This can be deployed in the application server of choice provided a datasource is available (default = jdbc/trustbuilder). This datasource should point to a database that is pre-loaded with the scripts provided under the crl2db folder in the same distribution. Depending on the database you're using, a separate file is provided.
In order to configure a datasource in your application you can refer to the howto section which contains a couple of reference application servers.
Standalone
On the trustbuilder download site a file is available crl2db-standalone.(zip/tgz). Unpack this to a location of your choice, in the bin directory you can find a launch script which starts the download
Configuration
Both versions are configured in the same way, by a crl2db.properties file located in your TB_HOME
This should contain at least the following properties
#Datasource to use (application server)
#datasource.jndi=jdbc/trustbuilder

#Datasource to use (standalone)
#datasource.classname=oracle.jdbc.driver.OracleDriver
#datasource.url=jdbc:oracle:thin:@mydatabase:1521:XE
#datasource.user=crluser
#datasource.password=crlpwd

#If this parameter is set, all onholds are skipped
skip.onhold=true

#The folder where all crls are being downloaded, if not set defaults to java.io.tmpdir
#download.folder=/tmp

#Use the head method to check if new CRL's are available
use.head.for.updates=true

#how long to keep downloaded crls (before downloading they are deleted)
#retention.minutes=120

#Time interval between checks (only used when internal.schedule = true
internal.scheduler.interval.min=30

#disabled=true
Time based and Event based OTP
Both time and Event based One-Time passwords are based on a secret stored within TrustBuilder. This workflow is provided as reference in which the OTP is actually used as the credential. Normal implementations use this in combination with a regular username / password combination to obtain 2-factor authentication.
This workflow has 3 main flows:
Default
If no parameters are passed the default behaviour is to ask for username + OTP
Authenticate flow
If the user passes a username + a OTP, the OTP is being validated against the username
Registration flow
If you don't have a profile you can obtain one via the registration flow
Note: in order to use this workflow it's best to use an app like 'Google authenticator' available on different smartphones which allows you to scan the QR code shown at the end of the registration flow. Depending on the type of OTP chosen you will either see the password changed every 30 seconds or every time you use it to login.
Creating your first workflow
Requirements
A working installation of Trustbuilder and Trustbuilder Administration GUI
Setting the Trustbuilder Administrator path
The first time you start the administration gui, it will prompt after the login display for the location of the trustbuilder administrator base directory.
In our example we set this to : /opt/securit/tba
Make sure this folder exists on your system.

From now on the GUI will use this folder to store its working files, these files later on can be exported by the GUI to the trustbuilder installation.
Your Trustbuilder GUI will now go the the main screen after login :
Create a TrustBuilder Server
Lets create a new TB Server, from the home location click on the New Server button:

Set the name of the TB Server, leave the host and port as defaults and enter a secret (any string will do for now).
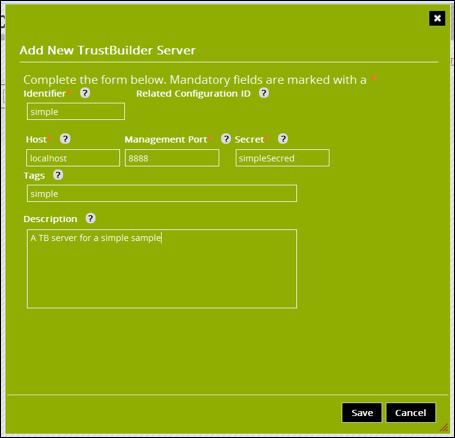
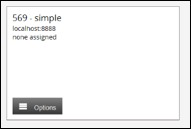
Click the Save button. The new TB Server will now be displayed as a box in the middle of the home screen.
This TB Server is not related to any configuration thus it is coloured white and displayes none assigned.
Creating a Configuration
Each Trustbuilder Server is running one (1) instance of a configuration.
Configurations and TB Servers are not bound within the TrustBuilder Administrator. One configuration can be related to more than one TB Server.
But one TB Server can only be related to one configuration. The relationship is Configuration 0 or more TB Servers.
Click on the New Configuration button to open the configuration form.
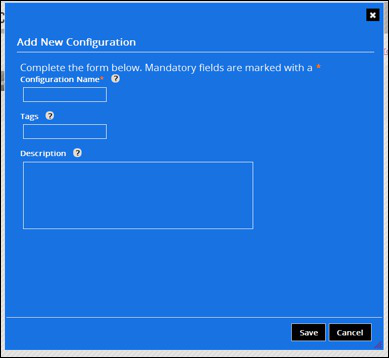
Form Field | Description | Is Required? |
Configuration Name | An identifier for the configuration | yes |
Tags | This is a comma delimited list of tags that can be used to filter the view of TB Servers. Used only by TBA | No |
Once the form has been completed click the Save button. A configuration box will now be visible on the left hand side of the home screen.
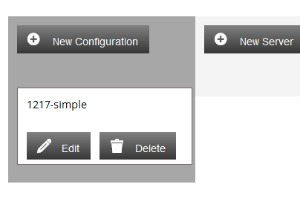
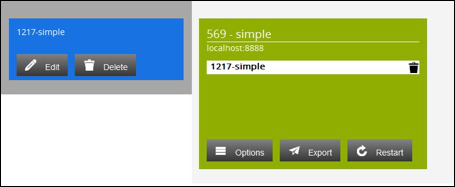
Relating the TB Server and the configuration
Currently the configuration is not related to any TB Server so this configuration has no export capabilities.
To relate the configuration to the TB Server drag and drop the configuration box onto the TB Sever box.
The configuration will now be coloured blue and the TB Server coloured green carrying the name of the configuration.
Export and Restart buttons are now available in the TB Server box showing that export and import capabilities are now enabled for that configuration.
Editing your configuration
To edit the configuration click the Edit button on the newly created configuration box.
Your license must be valid, ask a license key from your Trustbuilder Sales contact. Without a valid license Trustbuilder Server will not work, this will also be reported in the logging.
We are going to create a very simple workflow with the HTTP adapter calling the version page of Trustbuilder. We display the outcome on an HTML page to the user.
Creating the HTTP Adapter
First we create the HTTP Adapter , click in the adapter section on the : Add New Adapter button and select the HTTP Adapter from the Dropdown box.

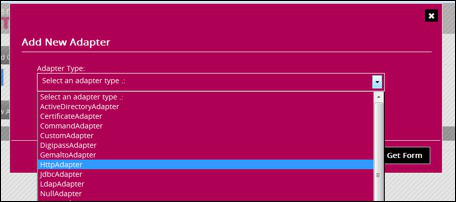
Fill in a unique name for the adapter, in our example we use : simplehttp
Leave the loadbalancing settings as is , these settings are only needed when working with more servers in the adapter.
Key | Value | Explanation |
AdapterUniqueId | simplehttp | A unique name for your adapter |
Host | localhost | The local trustbuilder will be used |
Port | 8080 | Listening port of your application server |
SecurityProtocol | NONE | No SSL needed |
TrustRemote | false | No SSL needed |
Transport Protocol | V_1_1 | Transport HTTP/1.1 |
After setting al the parameters click on the Submit Form and Create Adapter button:
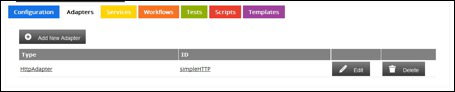
The adapter is now visible in your configuration.
Creating the workflow
Click on Add New Workflow,
Fill in the name of the configuration
Key | Value | Explanation |
Workflow ID | helloworld | Workflow name used by the engine, this name must be used to call this workflow |
Workflow File Name | helloworld | The filename of the workflow xml file |
Layout File Name | helloworld | The filename used by the administration GUI to store the graphical presentation |
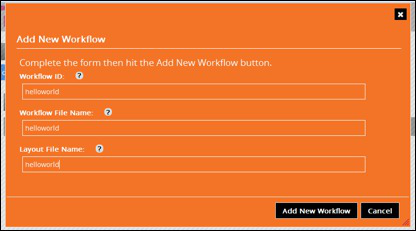
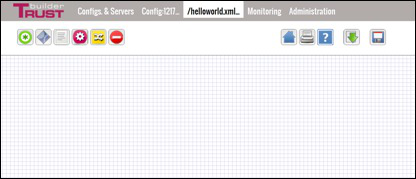
Click on : Add New Workflow , this will take you to the Administrator workflow console. From here we will create the new workflow by placing symbols and connecting them to each other.
Before start drawing a quick explanation on the differtent symbols. A short description of the symbols is also displayed when hovering over them with your mouse.
Initial State | This is the begin point of your flow, each request to your workflow will be starting here | |
Condition | A condition handles with a script your workflow and can have different outcomes to follow in your flow | |
Script | A basic script | |
Adapter | You can call an adapter , each adapter has an before and after script available to handle your adapter requests | |
Subworkflow | You can call another workflow from within a workflow. This way you can create helper functions that can be called from differtent places | |
Final State | This is the outcome of the flow that will be returned to the client. |
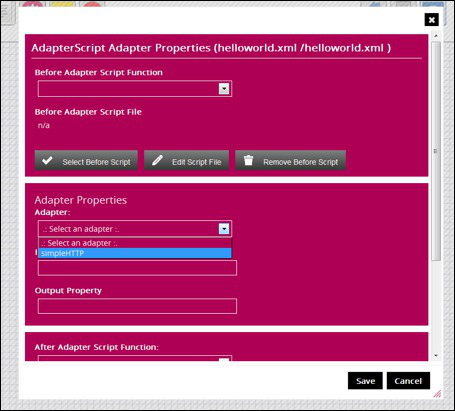
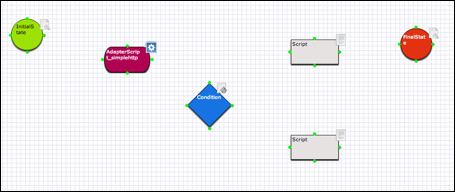
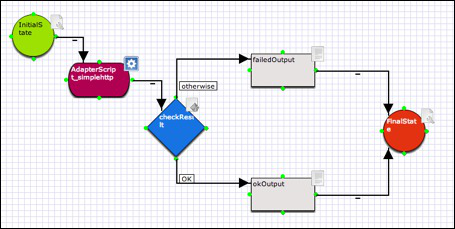
Drag and drop the initial state button on your workspace. Next we do the same with the Adapter button, this is only button popping up a dialog box to select the simplehttp adapter you created earlier.
For now click save and add a condition button, 2 scripts buttons and the Final State.
This workflow can be made more effective with less components but this How-to is intended to get a better understanding of the unlimited capabilities Trustbuilder has.
You should get something like :
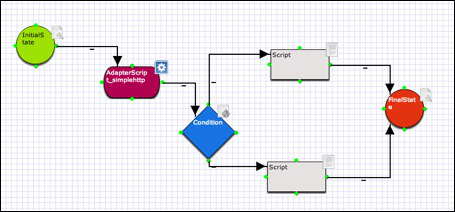
Now lets connect the boxes so the engine knows which way to go. The green cirkels at the building blocks are outgoing, you can click and drag a line to the next building block.
A dark cirkel will be visible when you are able to connect to the building block. This points are in between the green cirkels.
The inital state goes to the adapter.
The adapter goes to the condition box
The condition box has 2 outcomes to the 2 Scripts functions
The script connects to the output box.
This will look like :
Now we have a basic representation , lets go on by naming the building blocks. Each building block has to have a unique name to be identified by the engine.
This is also checked by the designer if you click save.
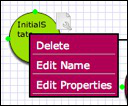
To edit the properties click on the settings button or right-click on the building block and select edit properties. For the Initial State set the Input Property to : input
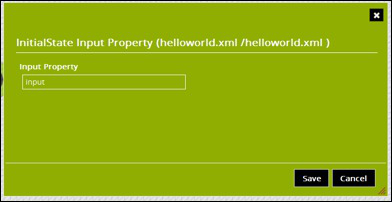
Click Save to close the dialog.
Now do the same for the Final State building blocks and have it set to : output
Next edit the name property of the condition and the 2 scripts.
Building Block | Name |
Condition | CheckResult |
Script 1 (upper) | failedOutput |
Script 2 (upper) | okOutput |
For the condition we have multiple outputs, since the engine has to know where to go in the workflow we can label the lines.
Right-ciick on the line from the condition to the okOutput Script and select Edit Label.
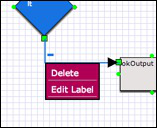
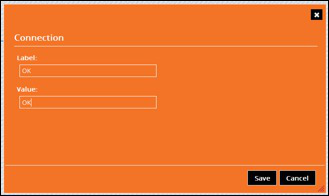
Set both Label and Value to OK and click Save.
Now edit the label for the other line from the condition to the failedOutput script. In the dialog box , select : Set to Otherwise
The Otherwise value is a selection which is handy in a scenario where the condition is expecting 1 or more outcomes, but none of them succeed. In that case the condition will fallback to the otherwise routing in the workflow.
This can also come in handy for error handling and so on.
Otherwise
Best practice with conditions is to always have an otherwise connection which can go to a script to handle unknown or unexpected conditions.
At this moment your workflow has to look like this :
Lets add some scripts now, click on the properties icon of the adapter building block. . This will bring up the dialog box for the adapter.
Set the Input property to httpInput and the output property httpOutput.

Before you can edit a script you must first select one. Click on the Select Before Script.
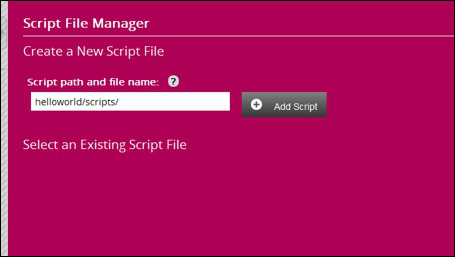
You can select existing scripts you made before or create a new script.
Since this is the first configuration no scripts exists at this moment.
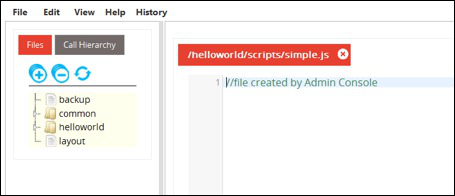
We now create a script named : helloworld/scripts/simple.js and press Add Script
The created filename is now available in Select an Existing Script File.
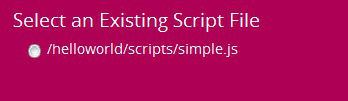
Select this file , this will return you to the adapter properties dialog with the script selected as before script File.
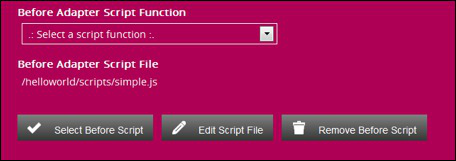
Select the Edit Script File button to start editing your script.
A new window will be opened for the Script editor.
The Script Editor
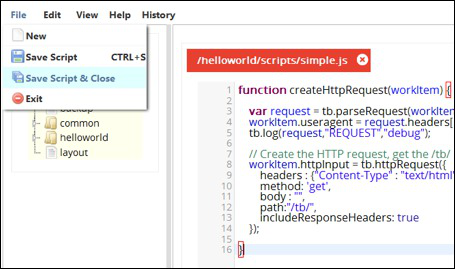
In the before Adapter Script we are going to create a request for the HTTP adapter. All your scripts are javascript functions. The engine uses the workItem variable to put all its info.
This way we can use a function called be function someName(workItem) that have all the information in it.
simpleHttp Adapter Scripts
The Initial State building block has the input name set to input. The engine now starts the workflow by putting al request information in workItem.input
We now create a script that prepares the http request.
createHttpRequest function
function createHttpRequest(workItem) {
    var request = tb.parseRequest(workItem.input);        // Parse and put the input request into this variable
    workItem.useragent = request.headers["user-agent"];   // Place the user agent in the workItem
    tb.log(request,"REQUEST","debug");                    // Log the useragent in the log file at debug level

    // Create the HTTP request, get the /tb/ page
    workItem.httpInput = tb.httpRequest({
        headers : {"Content-Type" : "text/html"},
        method: 'get',
        body : "",
        path:"/tb/",
        includeResponseHeaders: true
    });
}
Then click save and close. This will return you to the adapter dialog properties. You can now select the function you created from the Script function dropdown . Click Save to save the adapter functions.
checkResult condition
Now go the condition properties, click on select Script File and select the same script again. Click Edit Script File. This action will take you again to the script editor.
Here we make a script that handles the response of the HTTP adapter. We look at the status of the adapter to test if the request was successful.
Open the proper
handleHttpResponse function
function handleHttpResponse(workItem) {
        var response = workItem.httpOutput;                    // Put the adapter response in the response variable
        tb.log(response,"HTTP RESPONSE","debug");              // Log the response to debug log level

        workItem.body = response.getResponseBody();            // Put the response body in the workflow
        workItem.httpOutput.close();                           // Close the HTTP Adapter to avoid memory leaks

        tb.log(workItem.body,"BODY",'debug');                  // Log the body to the debug level
        tb.log(response.status,"STATUS","debug");              // Log the status of the adapter

        return response.status ? 'Error' : 'OK';               // Set the condition value, if value != 0 then goto error
}
The return here provides the first return value (Error) if the value is not 0. If the value is 0 we return OK.
This is used by the Trustbuilder engine, when the return value is OK, it will try to find the line with the label 'OK'. We created this earlier. Since there is no line Error the engine will follow the otherwise line.
This way you can do different actions depending on the outcome of an adapter.
okOutput script
Add a function for the OkScript the same way :
generateOkOutput function
function generateOkOutput(workItem) {
        // Creating a simple html body
        var body = '<html><head><meta charset="utf-8"><title>Trustbuilder Simple Workflow</title></head><body>' +
                   '<h2>Congratulations</h2><p>Trustbuilder version : $version </p><p>User-Agent : $agent </p></body>';

        var output = tb.templater(body, {
            "version" : workItem.body,
            "agent" : workItem.useragent }
        );           // Example of the templater function
        workItem.output = tb.generateResponse(output, null, null, 200);
}
Here we put a small html body , this can also be an external template. We have 2 variables in the body we are filling in with the tb.templater function.
This way you can keep your code clean whilst having some big templates.
Then we generate the response to workItem.output which is needed in the Final State building block.
failedOutput script
The same way we make the failed script but without a template
generateFailedOutput function
function generateFailedOutput(workItem) {
        // Set the output if the request has failed
        workItem.output = tb.generateResponse("Something went wrong",null, null, 200);
}
All done.
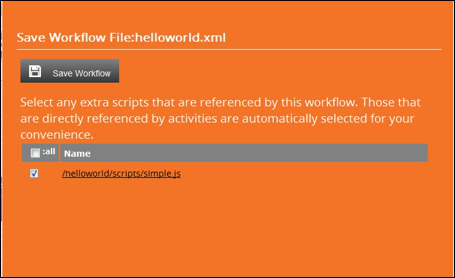
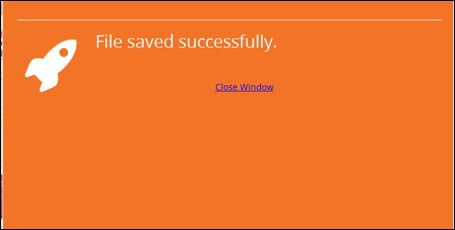
When we have created scripts for each building blocks its time to save your workflow.
Check the linked script files, for now this is quite simple but you have to reference all needed scripts in the workflow. Click Save to save the workflow.
Now you can click on the Trustbuilder logo in the upper left corner to go the home screen.
Exporting your workflow
Click the Export button on the TB Server
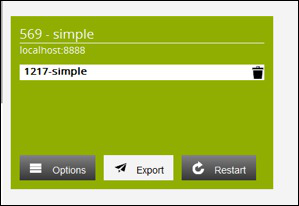
If everything went fine a green box appears a couple of seconds with a success message..
Press the Restart button, in case no configuration existed in front of this workflow the engine can be stopped and your application server has to be restarted.
Running your workflow
After a Trustbuilder Server restart the engine will load the config we have created.
When the engine is starting it will do a short check on your configuration, loading all the files, checking the javascript files for errors and so on.

This is visible in the log file :
logfile
14:51:25.098 [localhost-startStop-1] INFO  b.s.t.s.utils.TrustBuilderListener - TB_HOME set to /opt/securit/tb, using config.xml
14:51:25.109 [localhost-startStop-1] INFO  b.s.t.engine.EngineBuilder - Loading trustbuilder from file:/opt/securit/tb/config.xml
14:51:25.160 [localhost-startStop-1] DEBUG b.s.t.engine.impl.EngineFileLoader - No Bouncy Castle provider; adding programmatically.
14:51:26.012 [localhost-startStop-1] DEBUG b.s.t.engine.impl.EngineFileLoader - Creating Adapter for id='simplehttp'
14:51:26.024 [localhost-startStop-1] DEBUG b.s.t.engine.impl.EngineFileLoader - Initialising adapter simplehttp
14:51:26.148 [localhost-startStop-1] DEBUG b.s.t.engine.impl.EngineFileLoader - Initialising workflow helloworld
14:51:26.155 [localhost-startStop-1] DEBUG b.s.t.engine.impl.EngineFileLoader - Loading process workflow /helloworld.xml
14:51:27.395 [localhost-startStop-1] INFO  b.s.t.engine.impl.EngineImpl - Starting TrustBuilder : 6.0.0-SNAPSHOT   build:1607 / 2013-02-01_17-01-03
14:51:27.399 [localhost-startStop-1] INFO  b.s.t.engine.impl.EngineImpl - SNAPSHOT license key: expiry @ Thu Mar 01 15:32:34 UTC 2012
14:51:27.408 [localhost-startStop-1] WARN  b.s.t.engine.impl.EngineFileLoader - No key and/or truststore defined.
14:51:27.413 [localhost-startStop-1] DEBUG b.s.t.engine.impl.EngineFileLoader - Postconfigure simplehttp
14:51:27.413 [localhost-startStop-1] DEBUG b.s.t.engine.impl.EngineFileLoader - Postconfigure helloworld
14:51:27.422 [localhost-startStop-1] DEBUG b.s.t.engine.EngineBuilder - Enabled JMX
14:51:27.427 [localhost-startStop-1] DEBUG b.s.t.engine.EngineBuilder - Enabled statistics
14:51:27.428 [localhost-startStop-1] DEBUG b.s.t.engine.EngineBuilder - Enabled auditing
14:51:27.428 [localhost-startStop-1] INFO  b.s.t.engine.EngineBuilder - Engine configuration hash : SDv9nyF5k/MDdUeUpJfV3A==
Open your webbrowser and try to call the workflow. http://yourip:8080/tb/html/helloworld
If all is working fine you should see a white page with the information we supplied in the scripts.
The logfile
When you look at your logfile you will see that we have logged some helping functions to the debug level. Check if your application server is set to a log level of debug or lower to see this messages.
Lets have a quick look at this :
14:51:30.724 [http-bio-8080-exec-1] DEBUG b.s.t.w.process.ScriptProcessor - Start workflow "helloworld"
14:51:30.737 [http-bio-8080-exec-1] DEBUG Engine.ScriptLogger - [ USER AGENT ] Mozilla/5.0 (Macintosh; Intel Mac OS X 10_8_2) AppleWebKit/537.22 (KHTML, like Gecko) Chrome/25.0.1364.160 Safari/537.22
14:51:30.747 [http-bio-8080-exec-1] DEBUG b.s.t.adapter.http.HttpServerApache - Calling GET http://localhost:8080/tb/version HTTP/1.1
The engine is starting the helloworld workflow when the request is made. We have also logged the user agent you are doing the request from.
The last line is the Apache Http Adapter getting the /tb/version with a HTTP/1.1 request as configured.
14:51:30.877 [http-bio-8080-exec-1] DEBUG Engine.ScriptLogger - [ HTTPRESPONSE ] HttpResponse (
        status = 0, substatus = 200
        server = HTTP Server
        headers (
                Server = Apache-Coyote/1.1
                Transfer-Encoding = chunked
                Date = Tue, 19 Mar 2013 14:51:30 GMT
        )
        contentType =
        body =
)
We have logged the response of the adapter. You can see the status is 0 , with a normal substatus of 200. The body is empty here since its not yet in.
4:51:30.883 [http-bio-8080-exec-1] DEBUG Engine.ScriptLogger - [ BODY ] 6.0.0-SNAPSHOT   build:1607 / 2013-02-01\_17-01-03
14:51:30.884 [http-bio-8080-exec-1] DEBUG Engine.ScriptLogger - [ STATUS] 0
14:51:30.889 [http-bio-8080-exec-1] DEBUG b.s.t.w.process.ScriptProcessor - End workflow "helloworld"
We also log the reponse body and the status of the adapter.
After this the workflow is done and the output generated and sent back to the browser.
14:51:30.890 [http-bio-8080-exec-1] INFO Engine.Audit - Path : [InitialState, AdapterScript\_simplehttp, checkResult, okOutput,FinalState]If Auditing is enabled in your configuration you can see the different steps the workflow has followed from InitialState to FinalState.