Defining custom attributes
A User attribute represents an atomic piece of information or a composed set of information about a user. TrustBuilder maintains user attributes in the single user profile of a person.
The Authorization Engine and Policies is based on attributes to influence given decisions.
The value of the User attributes can be provided by different providers:
TrustBuilder repository Attributes: the value is in the TrustBuilder repository.
Virtual Attributes: The value is fetched from an external repository (for example a CRM Database) and can be used during administration and authentication.
Federated Attributes: Attributes are received during authentication from the Authentication Mechanism (Identity Provider) and are cached in the session for the duration of the session.
In this documentation, we focus on attributes provided by the TrustBuilder repository.
A User attribute consists of different elements:
identifiers (name and display name)
a value in a specific format (data format)
one or more properties (properties)
A user attribute is always included in a category / attribute set.
User attributes - Data format | |
|---|---|
Name | Description |
ENUMERATION | Displays an additional panel where the limited list of values should be provided. Accepts only these pre-defined values. |
NUMERIC | The value is a numerical value. |
TEXT | Accepts any value and converts it into strings. |
Accepts email values and maintains their verification status. | |
HASH | The value is hashed upon storage and is thus rendered unreadable. For every user a different (unique) salt hash is applied. |
SEARCHABLE_HASH | The value is hashed upon storage and is thus rendered unreadable. Uses the same salt hash for every user. This makes it possible to search for hashed values. |
SMS | Attribute used specifically for SMS communication (eg. to send a One-Time Password) |
JSON | The value of the attribute is in a JSON format |
User attribute Properties | |
|---|---|
Name | Description |
Single Value | There can only be one value for this Attribute type for any user |
Required | A value for this attribute is mandatory (indicated by asterisks). |
Read Only | The attribute has Read Only permission. It cannot be updated from the Self Service Portal. It can be updated from the Admin Portal. |
Hidden | The attribute and its value will not be visible in Self-service Portal. |
Override | The value of the attribute in the TrustBuilder repository (if a value exists) takes priority over a value returned by an IDP for that attribute. |
System | The system attributes are defined and configured when the application is first launched. A system attribute cannot be deleted. |
Unique |
|
Derived | Derived attributes are linked to a workflow by a workflow ID property which is specified in the principal attribute definition screen. The value of the attribute is obtained by executing the specified workflow. The selected workflow will be executed for all schemes when no schemes are selected in the configuration. The result of the workflow is expected in the following JavaScript structure:
CODE
Where the values assigned to each attr_name has to be an array (even if it only contains one value) As an example, the following workflow script produces a value for the attribute Full Name by concatenating the First Name and Last Name attribute values of the principal.
JS
Please note that the names of custom attributes must be lowercase and without underscores, hence the name of the custom attribute in this example is The workflow function is given an object as parameter, called workItem in this example, that contains the principal object (accessed via workItem.input.value) and where the output of the workflow must also be stored, in workItem.output. As shown in the example above, the output object can be created using tb.simpleResponse and passing as parameter a JavaScript object with the correct structure. Finally, since the returned values have to be in JSON format, the |
Approval policy | Displays an additional panel where statements should be added. Configure the statements to define who is allowed to approve the change requests. |
The attributes can be managed:
using the TrustBuilder admin portal
using TrustBuilder Admin API (See Developer guide)
Create a custom user attribute
To create a custom attribute from TrustBuilder admin portal:
Go to Directory > Attributes > Attribute Definitions
Click on + Add a new User Attribute
Select or enter a category / attribute set under which the attribute will be saved. The category/attribute set should already exist.
Enter:
a name → the unique name or identifier given to the attribute - It should be unique in the selected category
a display name → the name shown in the attributes list
a description (optional) → a general description of the attribute - It is shown in the attributes list
Select a Data format used for the attribute
Select one or more Scopes (see Manage Scopes)
Select one or more Properties for the attribute
Edit a user attribute
To edit a User attribute from the admin portal:
Go to Directory > Attributes > Attribute Definitions
Click on the edit button for the relevant User attribute.
Edit the parameters. The data format cannot be edited.
Click on Save and Close.
The User attribute is successfully updated.
Delete a user attribute
To delete a User attribute from the admin portal:
Go to Directory > Attributes > Attribute Definitions
Click on Delete for the relevant User attributes.
In the pop-up, click on Yes to confirm the action.
The User attribute is successfully deleted.
The following User attributes cannot be deleted:
A user attribute that is system generated
A user attribute assigned to a user
Add custom attributes to a user profile definition
To add one or more custom attribute to a user profile definition from the admin portal:
Go to Directory > User profile Definitions
Select the custom attribute(s) to be added in the user profile definition.
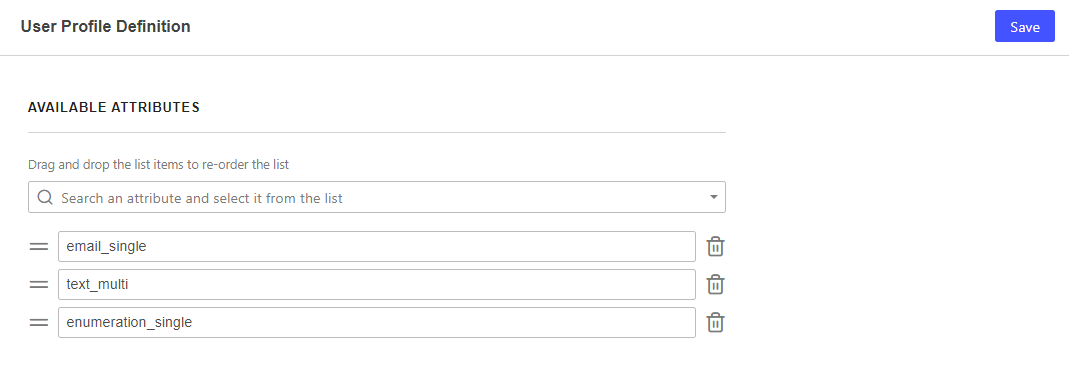
Re-order the list if needed.
Click on Save.
The custom attribute should now appear if you edit a user profile, depending on the attribute properties.