The SDK is available on demand. Please contact your TrustBuilder's point of contact.
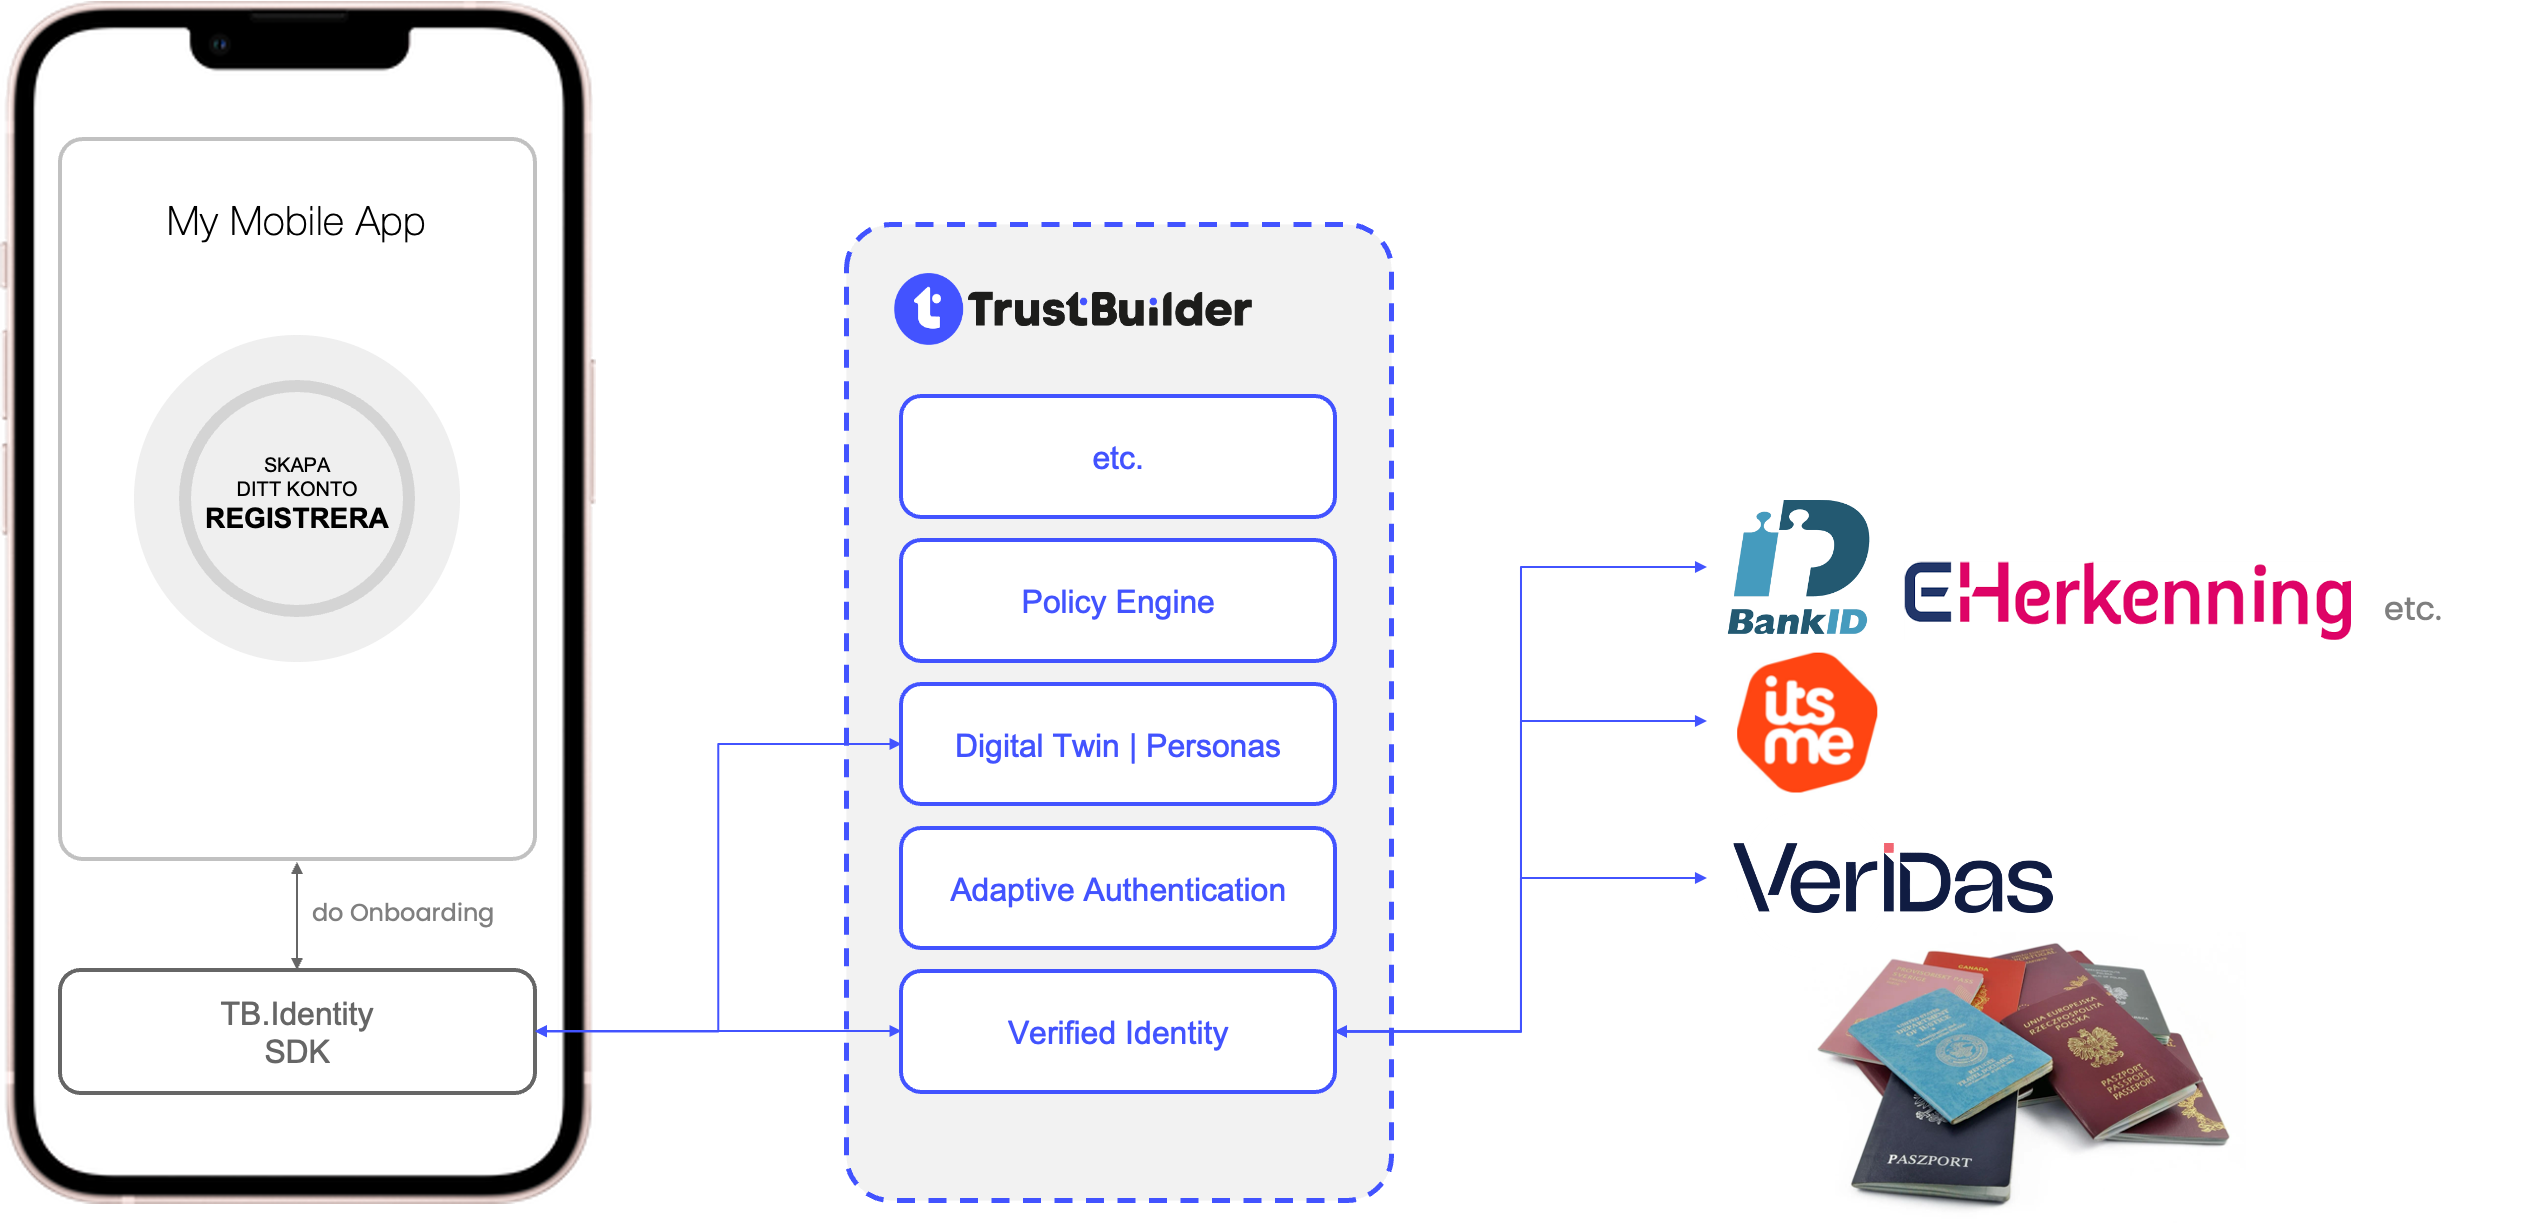
The TrustBuilder ID SDK allows you to develop a mobile app that runs natively on a device. Native mobile applications can use native or browser-based login flows.
In a hosted login flow, the user is shown a web browser and redirected to the TrustBuilder hosted login page for sign up or log in. For example: an iOS application opens a SafariViewController or an Android application opens a Custom Chrome Tab.
With a native login flow, the user signs up or enters their password directly into the app. Note, however, that when using external IDPs, an iOS app may still open a SafariViewController and an Android app may still open a Custom Chrome Tab for the interaction with external IDPs.
Regardless of which option you choose, TrustBuilder supports either.
TrustBuilder ID SDK is a mobile SDK for communicating using OAuth 2.0 and OpenID Connect. It maps the raw protocol flows and adds convenience methods to assist with common tasks like performing an action with fresh tokens and to obtain user profile information.

Best practices
The TrustBuilder ID SDK wraps following functionality:
-
Secure protocol handling
-
Secure token lifecycle
-
Secure user profile access
-
Persona-driven policies
-
Handle session obligations
-
Handle onboarding obligations
-
Blacklist checking
Phishing/security concerns: an unauthorized party could decompile or intercept traffic to/from your application to get the Client ID and authentication URL. With this information the unauthorized party could create a rogue application, upload it to an application store, and use it to phish for usernames, passwords, and Access Tokens.
An authorization request is dispatched to the TrustBuilder.IO AuthorizationService instance, and the response will be dispatched to the activity of your choice, expressed via an Intent. The TrustBuilder ID SDK supports the PKCE extension to OAuth which was created to secure authorization codes in public clients when custom URI scheme redirects are used. The TrustBuilder ID SDK encapsulates the authorization state of the user and communicates with the TrustBuilder.IO platform.
Token requests, such as obtaining a new access token using a refresh token, follow a similar pattern and are dispatched to TrustBuilder.IO, and a token response instance is returned via a callback. Responses update the authorization state in order to track and persist changes. Once in an authorized state, access tokens can be automatically refreshed as necessary before performing actions that require valid tokens.
The TrustBuilder ID SDK follows best practice set out in RFC 8252 - OAuth 2.0 for Native Apps, authorization requests from native apps should only be made through external user-agents, primarily the user's browser. For this reason, WebView is explicitly not supported for security reasons.RFC 8252 OAuth 2.0 for Native Apps. Using a web browser for OAuth and OIDC is not only a security imperative but also a user experience advantage. By leveraging trusted browser environments and educating users on the benefits, we can ensure a seamless and secure authentication process.
-
RFC 8252 Guidelines as defined by IETF
-
OAuth 2.0 and Native Apps: OAuth 2.0 authorization requests from native apps should only be made through external user-agents, primarily the user's browser. This is a security best practice as outlined in RFC 8252.
-
Prohibition of Embedded User-Agents: Native apps must not use embedded user-agents for authorization requests. Embedded user-agents can compromise security by allowing access to the user's full authentication credentials.
-
Google's Stance on WebView
-
Google has explicitly discouraged the use of WebViews for OAuth 2.0 requests, citing security and usability concerns. This position is detailed in their support article.
-
-
System Browser as a Secure Alternative
-
The use of a system browser is the more secure and trusted method for authorization flows. Platforms like iOS and Android have developed APIs that allow apps to launch a system browser within the app context, maintaining security without compromising the user experience. Google has implemented a secure browser policy to reinforce this practice.
-
-
Platform standard implementation
-
iOS and Android: Both platforms provide specific ways to initiate authorization in a browser (e.g., iOS's SFSafariViewController/SFAuthenticationSession and Android's Custom Tab feature), ensuring a seamless and secure experience.
-
Google's OAuth Policies: Google's OAuth policies emphasize the use of browsers over embedded webviews, aligning with security best practices. (https://developers.google.com/identity/protocols/oauth2/policies#browsers )
-
-
User Experience Considerations
-
Trust and Familiarity: Users generally trust their browser environment. Features like address verification in browsers enhance trust compared to embedded webviews.
-
Platform Standards and Security: The embedded browser is a platform standard for both iOS and Android. Prioritizing security, users can benefit from the familiar interface of their system browser.
-
Educating Users: Instead of compromising security, educating users through an onboarding flow can enhance their understanding and acceptance of browser-based authentication.
-
Cancellation handling: Because having alternative flows when the user intentionally closes could be desired, we allow checking on that specific flow.
-
1. Configure TrustBuilder
To use TrustBuilder services, you need to have an application set up in the TrustBuilder Dashboard. The TrustBuilder application is where you will configure authentication in your project.
1.2 Configure your application
Use the Admin Portal to configure a new TrustBuilder application or select an existing application that represents the project you want to integrate with. Every application in TrustBuilder is assigned an alphanumeric, unique client ID that your application code will use to call TrustBuilder APIs through the SDK.
1.3 Configure callback URLs
A callback URL is the application URL that TrustBuilder will direct your users to once they have authenticated. If you do not set this value, TrustBuilder will not return users to your application after they log in.
1.4 Configure logout URLs
A logout URL is the application URL TrustBuilder will redirect your users to once they log out. If you do not set this value, users will not be able to log out from your application and will receive an error.
2. Install the TrustBuilder ID SDK
2.1 Integration
Using the .xcframework
In order to use the framework you need to link it in your project. To link it into the demo project, do the following steps:
-
Go to the `General` tab of **target** of your application.
-
Click on `+` in the `Frameworks, Libraries and Embedded Content` section.
-
Click on `Add other...` and afterwards `Add files...` and select the .xcframework file from the output folder
-
You should finally end with the framework being under the `Frameworks, Libraries and Embedded Content` section. You can then start importing the framework.
Installing pods
Install cocoa pods in the project and add the following lines in the Podfile for SSZipArchive dependencies.
target 'your target' do
  use_frameworks!
  pod 'SSZipArchive', '2.4.3'
end
2.2 Creating the TBLoginService
In order to use any logic related to the TBLoginService, ensure that you have created an instance of the TBLoginService by simply constructing it using the public constructor:
let tbLoginService = TBLoginService(tenantUrl: "<your tenant url>",
                                    authorizationEndpoint: URL(string: "<your authorization endpoint>")!,
                                    tokenEndpoint: URL(string: "<your token endpoint>")!,
                                    clientId: "<your client id>",
                                    clientSecret: "<your client secret>",
                                    redirectURI: URL(string: "<your configured redirect url>")!,
                                    scopes: ["openid", ...],
                                    tokenRefreshThreshold: 5 * 60 // 5 minutes)
Of course, ensure that the URL creation didn't return a nil value.
This instance will allow you to access all of the behaviour that is facilitated in this SDK.
Behind the scenes, we will also retrieve a fresh access token automatically when trying to retrieve information from the UserInfo API.
-
tenantUrl
The tenantUrl will be the baseUrl of your Trustbuilder tenant. The correct endpoints are automatically called by the SDK. An example of a tenantUrl can beyourcompany.trustbuilder.io -
clientId
OAuth 2.0 Client Identifier valid at the Authorization Server. -
clientSecret
The client's secret that is related to the given clientId.
-
redirectURI
Redirection URI to which the response will be sent. This URI MUST exactly match one of the Redirection URI values for the Client pre-registered at the TrustBuilder portal under the correct Service Provider(simple string comparison)
In our example we use com.trustbuilder.identitydemo://login-callback -
scopes
The list of scopes for which the authentication process will take place.
-
tokenRefreshThreshold
The
tokenRefreshThresholdwill be used during the check whether a token is still valid or not. This way it's possible to already refresh a token a bit before it's actually expired. This must be compatible with the Access Token TTL configured in the TrustBuilder portal.
2.3 Creating the TBOnboardingService
In order to use any logic related to the TBOnboardingService, ensure that you have created an instance of the TBOnboardingService by simply constructing it using the public constructor:
onboardingService = TBOnboardingService(tenantUrl: Constants.tenantUrl,
                                        documentIds: Constants.belgianDocumentIds,
                                        documentConfiguration: nil,
                                        selfieConfiguration: nil)
-
tenantUrl
The uri used for the validation. This is your TrustBuilder domain
An example of a tenantUrl endpoint can beyourcompany.trustbuilder.io -
documentIds
The document ID's to search for. The complete list can be found at: https://docs.veridas.com/document-sdk/android/v4.18/documents/ -
documentConfiguration
Configuration of the UI of the document scanner. A default is available in the demo app.
An overview of the configurable parameters can be found here: https://docs.veridas.com/document-sdk/android/v4.18/configuration/ -
selfieConfiguration
Configuration of the UI of the selfie scanner. A default is available in the demo app.
An overview of the configurable parameters can be found here: https://docs.veridas.com/sap-sdk/android/v3.12/configuration/
2.4 AppDelegate
Because the Trustbuilder SDK needs to hold a session to listen to callbacks from the redirect, a specific method handleOpenedURL needs to be called from the following method in your AppDelegate: https://developer.apple.com/documentation/uikit/uiapplicationdelegate/1623112-application .
An example implementation of how you correctly pass the information to the TrustBuilder can be found below:
func application(_ app: UIApplication, open url: URL, options: [UIApplication.OpenURLOptionsKey : Any] = [:]) -> Bool {
    return TBAppDelegateHandler.instance.handleOpenedURL(url)
}
2.5 Signing in with 3rd party authenticators
In order to sign in using a 3rd party authenticator that will open an external application for eg. BankID, Itsme... some additional setup needs to be done.
Because of the flow, these 3rd party authenticators need to navigate back to your application. This is done by deep linking, specifically by using URL Schemes.
To set this up in your application, you must dd the identifier that you use in the configured redirectURI and was confirmed with Trustbuilder. In our example we use com.trustbuilder.identitydemo://login-callback as a redirectURI, meaning that com.trustbuilder.identitydemo as our identifier.
The setup was already done in the info.plist file in the example app under the CFBundleURLTypes.
3. TBLoginService - Hosted Login
The authentication flow via the browser can be triggered using the authenticateWithBrowser method on your instance of TBLoginService.
On iOS you will also need to pass in the UIViewController that will be used as the presenting ViewController.
The SDK returns either a successful result when we were able to authenticate the user, or a specific Error when we were not.
This could be due to different reasons eg.: User cancellation, Invalid client secret, ...
Usage
tbLoginService.authenticateWithBrowser(viewController: self) { result in
    switch result {
    case .success(_):
        debugPrint("The result was successful, the user is signed in.")
    case .failure(let error):
        debugPrint("The error we got was: \(error)")
    }
}
3.2 Accessing the token
When later in your application you want to access the token to authorize your api calls with, you can simply use getAndRefreshTokenWhenNecessary on that same TBLoginService instance.
You are technically not required to use that same instance, but you can create a new one with the same configuration.
This method will check whether the token is at least valid for the time in the given threshold when the instance TBLoginService was created.
When that is not the case, it will try to refresh the access token and return the refreshed one.
Usage
tbLoginService.getTokenAndRefreshWhenNeeded { result in
    switch result {
    case .success(let token):
        debugPrint("The fresh token is \(token)")
    case .failure(let error):
        debugPrint("The error we got was: \(error)")
    }
}
3.3 User canceled flow
It is possible to check whether the user has intentionally cancelled the flow.
This can be done by checking whether the error object in the .failure result is a TBError.userCancellation.
4. TBLoginService - Native Login
The authentication flow that can be more customized from a UI perspective, contains 2 major steps. Both of these steps can be triggered on your instance of TBLoginService .
4.1 Get Identity Providers
The first step is to retrieve all the identity providers that can be used to authenticate the user. This can be done using the getAllowedIDPs method on the instance of TBLoginService.
That method will return a list of TBIdentityProvider. That list can be used to present the different sign-in options to the user.
Usage
tbLoginService.getAllowedIDPs { result in
    switch result {
    case .success(let idps):
        debugPrint("The result was successful")
        // show the results to the user
    case .failure(let error):
        debugPrint("The error we got was: \(error)")
    }
}
4.2 Authenticate
When the user has selected the identity provider, the authentication flow can then be triggered by using the authenticateWith method on the instance of TBLoginService .
On iOS you will also need to pass in the UIViewController that will be used as the presenting ViewController.
The SDK returns either a successful result when we were able to authenticate the user, or a specific Error when we were not.
This could be due to different reasons eg.: User cancellation, Invalid client secret, ...
Usage
self.tbLoginService.authenticateWith(idp, viewController: self) { result in
    switch result {
    case .success(_):
        debugPrint("The result was successful")
        self.isSignedIn = true
    case .failure(let error):
        debugPrint("The error we got was: \(error)")
        self.isSignedIn = false
    }
}
4.3 Accessing the token
When later in your application you want to access the token to authorize your api calls with, you can simply use getAndRefreshTokenWhenNecessary on that same TBLoginService instance.
You are technically not required to use that same instance, but you can create a new one with the same configuration.
This method will check whether the token is at least valid for the time in the given threshold when the instance TBLoginService was created.
When that is not the case, it will try to refresh the access token and return the refreshed one.
Usage
tbLoginService.getTokenAndRefreshWhenNeeded { result in
    switch result {
    case .success(let token):
        debugPrint("The fresh token is \(token)")
    case .failure(let error):
        debugPrint("The error we got was: \(error)")
    }
}
4.4 User canceled flow
It is possible to check whether the user has intentionally cancelled the flow.
This can be done by checking whether the error object in the .failure result is a TBError.userCancellation.
5. TBLoginService - UserInfo
The information that can be retrieved from can also be accessed from the same TBLoginService instance.
5.1 Get user details
In order to retrieve the details for the currently signed in User, the method getCurrentUser(completion: @escaping (Result<TBUser, Error>) -> Void) -> Void can be used on the same instance of TBLoginService.
This method will retrieve the information about the current user and return it in the form of a TBUser.
The current user can be defined as the user where TB.Identity currently holds a session for.
Usage
tbService.getCurrentUser() { result in
    switch result {
    case .success(let data):
        debugPrint("The result was successful")
    case .failure(let error):
        debugPrint("The error we got was: \(error)")
    }
}
5.2 Patch User Details
In order to update some attributes of the user, the retrieved TBUser instance can simply be updated and sent to the SDK with the patchUser(_ user: TBUser, completion: @escaping (Result<TBUser, Error>) -> Void) -> Void method on the same TBLoginService instance.
Usage
user.familyName = "<updated familyName"

self.tbService.patchUser(user){ result in
    switch result {
    case .success(_):
        debugPrint("The result was successful")
    case .failure(let error):
        debugPrint("The error we got was: \(error)")
    }
}
6. TBLoginService - Personas
6.1 Get list of personas
In order to retrieve the list of personas for the current signed in user. You can use the getListOfPersonas(completion: @escaping (Result<[TBPersona], Error>) -> Void) method on the instance of TBLoginService.
Behind the scenes, we will automatically use the information of the currently signed in user to retrieve the personas that the user can select.
Usage
tbLoginService.fetchPersonasForCurrentUser { result in
    switch result {
    case .success(let personas):
        debugPrint("The result was successful for personas")
    case .failure(let error):
        debugPrint("The error we got was: \(error)")
    }
}
6.2 Select persona
In order to retrieve a single persona based on a given personaId you can use the selectPersona(_ persona: TBPersona, completion: @escaping (Result<TBPersonaInformation, Error>) -> Void) method on the same instance of TBLoginService. Based on the currently signed in user and the given persona, the detail information of that persona will be retrieved.
When there is no user signed in we will return a .failure Result with a TBError.notSignedIn error.
Usage
tbLoginService.selectPersona(persona) { result in
    switch result {
    case .success(let persona):
        debugPrint("The result was successful for persona")
    case .failure(let error):
        debugPrint("The error we got was: \(error)")
    }
}
6.3 Update persona attributes
In order to update the attributes of a specific persona, you can use updatePersonaAttributes(of persona: TBPersona, completion: @escaping (Result<TBPersonaInformation, Error>) -> Void).
This method expects the originally retrieved instance of TBPersonaInformation from selectPersona with the updated attributes. We need this original instance to correctly update the information. Hence there is also no public constructor available of TBPersonaInformation.
Usage
private func patchAttributes(for persona: TBPersonaInformation) {
    persona.attributes.editableAttributes.forEach {
        // You can edit the values of an existing attribute
        $0.values = ["TRUE"]
    }

    // Here we delete every attribute besides the first attribute.
    persona.attributes.editableAttributes = [persona.attributes.editableAttributes.first!]

    tbService.patchPersonaAttributes(for: persona) { result in
        switch result {
        case .success(_):
            debugPrint("The result was successfully patched for persona")
        case .failure(let error):
            debugPrint("The error we got was: \(error)")
        }
    }
}
7. Response Handling
Every call returns a Result value with the following specifications: https://developer.apple.com/documentation/swift/result.
When the result is a .failure we will store a specific Error.
Some errors are defined by TrustBuilder. This list can be found below.
-
TBError
-
TBError.notSignedIn: Will be returned when we do not have information about any signed in user. -
TBError.incorrectTokenInformation: Will be returned when we could not retrieve the user information from the stored token. -
TBError.couldNotCreateURL: Will be returned when we could not create the correct url with the given url information and the retrieved user information from the access token. -
TBError.objectWithoutEtag: Will be returned when the send parameter to patch a given item does not contain an ETag. Without this we cannot update the given object.
-
-
TBNetworkError
-
TBNetworkError.invalidResponse: Will be returned when we could not retrieve the response from the network call. -
TBNetworkError.couldNotEncodeToJSON: Will be returned when we could not encode the given to valid JSON. -
TBNetworkError.invalidStatusCode: Will be returned when we have an invalid response, in case of validation errors, these will also be parsed into aTBValidationErrorobject. -
TBNetworkError.currentResourceOutdated: Will be returned when trying to patch an object that has already been updated between retrieval and the update.
-
8. TBOnBoardingService
In order to use the onboarding service, we need to have access to the camera of the device.
Ensure to add the NSCameraUsageDescription permission in your info.plist file.
8.1 Start Document Onboarding
This method will execute the following flow:
-
Start a validation session
-
Start the document scanner to scan documents and upload said documents
-
Start the selfie scanner and upload said selfie
-
Request and return the validation result.
The result will contain a
-
Validation ID
-
Indication whether the verification was successful.
Requirements:
In order to start the onboarding flow you need a bearer token of an authenticated user with the correct claims.
You also need to pass in a UIViewController so the scanners can be started. In our usage block self is the UIViewController .
You can use your instance of onboardingService to start this flow.
Usage
onboardingService.startOnboarding(with: "ACCESS TOKEN", and: self) { [self] result in
    onboardButton.isLoading = false
    switch result {
    case .success(let result):
        debugPrint("The onboarding was executed with validation: \(result.verified)")
    case .failure(let error):
        debugPrint("The onboarding was unsuccessful, the error we got was: \(error)")
    }
}
8.2 Session expired
Behind the scenes we will start a validation session that will only be valid for a certain amount of time. If the end-user takes to long to complete the flow, there might be an unsuccessful response with a TBError.sessionExpired error.