Export and Download
Much of the the export functionality is provided with buttons that are local to the elements to be exported; beside a script, in the script editor and in the workflow console for instance. There are some main buttons such as Export Configuration that apply to a broader scope.
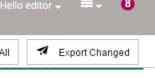
Another option for export is the Export Changed console which lists changes to files so that recent changes can be easily exported regardless of type.
Export and Import buttons are only shown if a configuration is related to at least one TB Server and the authenticated user has the TBAGExporter role.
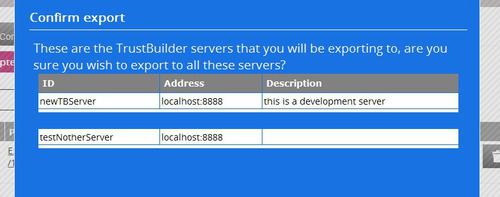
A list of all TB servers that a configuration is related to, and thus will be exported to, will be displayed before export.
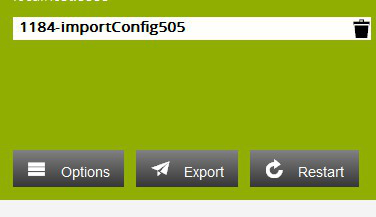
With export there is also the option to export and restart. Export will just export the file and not reload it into the currently running engine.
Export Changed console
To access the export changed click the Export Changed button in the top right of in the configuration console. This button is only available if the configuration is related to at least one TB server.
The Export Changed console shows changes to all files since the last export or the changes were last cleared. There are two sections that display the same data in different formats. Changed Files displays a list of the changed files in a table the File Tree shows the changed files as they are stored in the file system.
Changed Files
The Changed Files tab shows a list of all the files that have changed since the last export or the list was last reset. This can be good to use if the type of file to be exported is known, or just the most recent changes are wanted. Every column can be sorted by clicking on the column header so that changes can be located by type of file, date, name, path etc. The column that is currently sorted is highlighted with a pink line and the arrow shows the sort direction.

Here the table is sorted by updated date descending.
There is also a filter for each row. Click below the table header to reveal the table input fields. To filter a specific column type in the input field and the table data will be filtered.
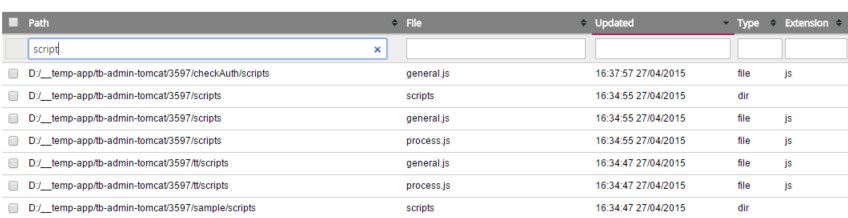
Here the table is filtered on Path by script.
To clear the filter either delete the text or click the X to the right side of the filter input field.
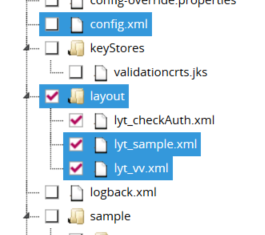
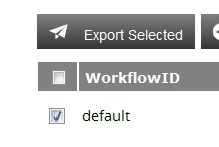
To export files from the Changed Files tab check the check boxes to the left of each row. If a directory is checked then all the files within that directory will automatically be checked. Also if a directory is un-checked then all the files within that directory are also un-checked. To select all files check the box that is found in the table header. Once files have been selected click the Export Selected Files button. The override properties form will then be displayed if applicable.
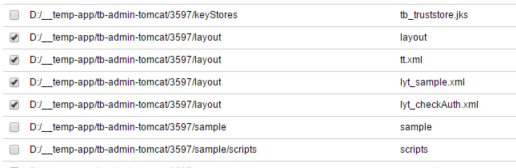
Here the layout directory has been selected and all files within that directory.

Here a single file has been selected in the layout directory.
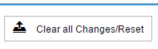
Clicking the Clear all Changes/Reset will clear the change list so that there are no changed files. Changes to files will restart.
Change File Tree
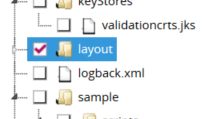
The File Tree tab displays all the files within the configuration directory and highlights those that have been changed with either blue or orange (blue represents an edit and orange an add action). Files are selected for export by checking the check boxes to the left of each directory or file. If a directory is checked or un-checked all the files within that directory are checked or un-checked. Directories can be collapsed using the arrows to the left of each directory node.
Here the layout directory has been selected and all the files therein.
Here the layout directory is closed
Once files have been selected click the Export Selected Files button. The override properties form will then be displayed if applicable.
Clicking the Clear all Changes/Reset will clear the change list so that there are no changed files. Changes to files will restart.
Export Configurations
A complete configuration can be exported by clicking the Export Complete Configuration button at the top of the configuration screen.
This will export the config.xml, all workflow, all workflow layout files, all workflow tests, all scripts and all templates that exist within this configuration.
The export will be made to all the TB servers. A list is first shown of the servers that will be exported to.
If there is a TB server that the configuration should not be exported to then return to the Configs & Servers screen and break the relationship between the two.
A complete configuration can also be exported by individual TB Server from the Config & Servers page. If a TB Server is related to a configuration there will be Export and Restart buttons available at the bottom of the TB Server box.
Click the Export button to export the complete configuration just to that server.
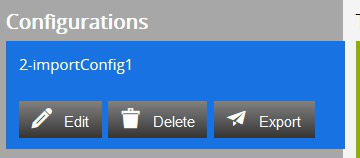
Configurations can also be exported to all servers from the servers screen. If a configuration is related to one or more servers then an Export button will show on the configuration block. Click this button to open the standard export screen.
Additional options:
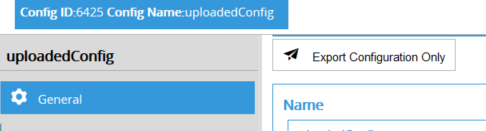
Export Only Configuration File: There is an option to just export the configuration file. For instance if only the license has been updated. For this use the Export Configuration Only button found on the configuration tab. This will not export workflows, scripts, templates, properties etc. just the config.xml file.
Note that an error may occur if only the configuration is exported and it refers to a new workflow that has not yet been exported.
Cleaning TB_HOME on Export: When exporting the complete configuration from the configuration page using the Export All button there is the option on the export screen to clean TBHOME. What this will do is to delete the contents of TBHOME before exporting the new files.

Downloads:
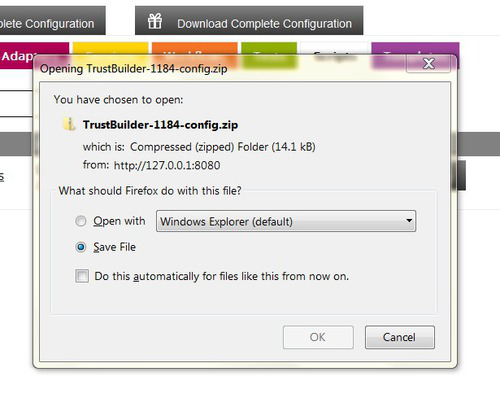
There are two ways that a complete configuration can be downloaded both intended for different purposes. Download to Share is intended to share files between different TrustBuilder Administrators (TBA) Download for Export is intended to be used to manually export to a TB_HOME via external means. Both these options result in a zip file.

When using Download to Share override properties and ignored,
When using Download for Export override properties as specified and populated.
Click either download button (the Download for Export is only available if this configuration is relate to one or more servers) at the top of the configuration screen then save the zip file which is named TB-[NameOfConfig]-[yyymmdd]-[hhmmss].zip
Export Workflows
Single workflows can be exported from the workflow tab on the configuration page.
Check the box beside each workflow that is to be exported, then click the Export Selected button.
The file can just be exported by clicking the OK Export button or the Ok Export and Restart button can be used to export and reload the workflow.
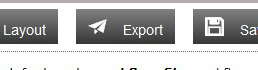
Workflows can also be exported from within the workflow console. Click the Export button (folder with up arrow) on the top right of the workflow editing screen. The TB Servers will be listed as usual.
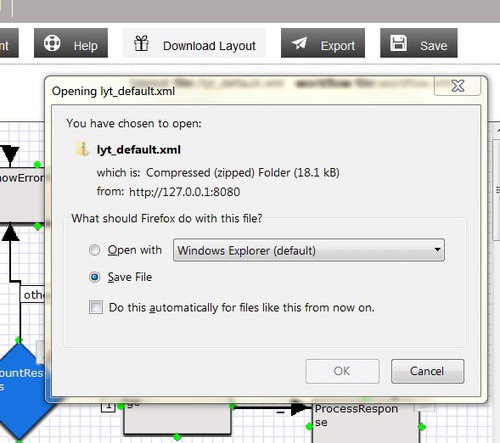
Download: Layout files can be downloaded directly from within the workflow console by clicking the download button (file with down arrow). This will start a download dialogue for the layout XML file.
This can then be used to distribute to other users if required. This is of course not needed if TBA is being used correctly as a web application as all users can use the same workflow.
Export Scripts
Scripts can be exported from the configuration screen by checking the box beside each script to be exported and then clicking the Export Selected button.
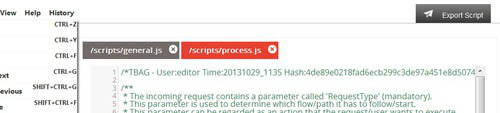
Scripts can also be exported directly from within the Script Editor by using the Export button in the top right corner of the Script Editor
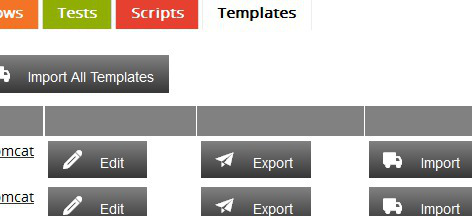
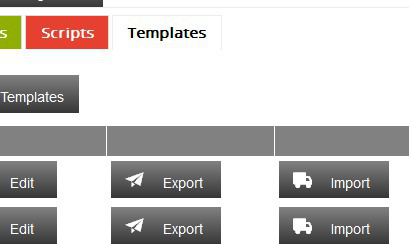
Export Templates
Templates can be exported from the configuration screen by checking the box beside each template that is to be exported and then clicking the Export Selected button.
Export Warning Messages
After export the TB engine will reload it's resources. If there are errors in configuration or scripts when the engine reloads these will be reported back to TBA and displayed in a list as a warning.
Import
Where applicable items can be imported from TB Servers. This includes complete configurations, scripts, templates and workflows.
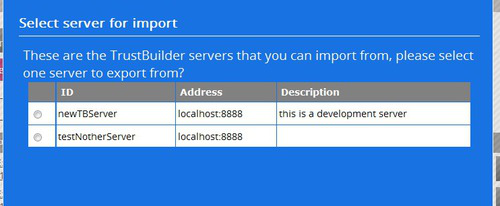
If a configuration is related to more than one TB Server then a single TB Server must be selected to import from.
Import Configurations
Configurations can be imported from already established TB Servers with populated TB Homes.
For the import to be able to function the TB Server must have a management port enabled and listening.
To import a complete configuration including any present workflow layout and workflow test files click Import button on the TB Server box.
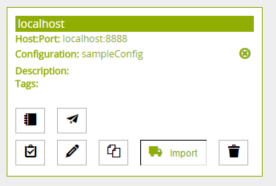
When a configuration is imported this way it is automatically related to the TB Server that it is related to. It can be related to other TB Servers or the relationship broken with the original importing TB Server without effecting the configuration.
If a TB Server is already related to a configuration the import will overwrite the current configuration within TBA
Import Workflows
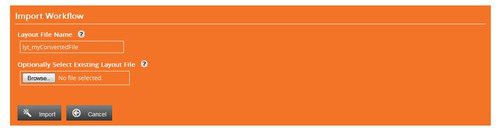
If you have received a workflow from an external source this can be added to the current configuration but uploading it.
Click the Upload and Import Workflow button on the workflows tab of the configuration screen. A new screen will be displayed with a form.
Field Name | Description | Is Required? |
|---|---|---|
Layout File Name | This is the name of the XML file that will be created by TBA which is a representation of the workflow. | yes |
Workflow ID | This ID will be used by the configuration to reference the workflow | yes |
Select Workflow File | Here select the workflow.xml file that you have from your local machine. | yes |
Select Existing Layout File | If a layout file has also been supplied with the workflow.xml file this can also be uploaded. | no |
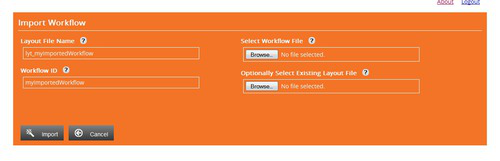
If no layout file is supplied then the workflow will be converted by TBA as per a usual import.
If there is a layout file already within the folder, in TBA, related to this configuration then that will be used if no layout file is supplied.
Once the Import button is clicked then the workflow will be uploaded and the workflow console screen displayed with the new workflow.
Import from TB Server → To import from a TB Server click the Import button beside the relevant workflow.
A new screen will then be displayed with a form to select the TB Server to import from. As this is a previously created or imported workflow the layout file name is already known.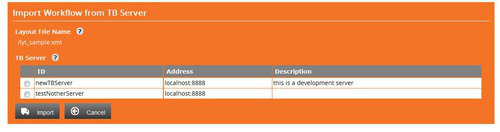
Once the desired server is selected click the Import button and the workflow console will be opened with the imported workflow.
Importing without Layout File → For any imported workflow to be used within the TrustBuilder Administrator it must have a layout file that represents the workflow in a graphical manner. If an imported workflow is imported without a layout file the option to create a layout file will be provided.

Click the Convert to Layout button and a form is presented, click the Import button to import the workflow and the workflow console will be displayed:
Form Field | Description | Required |
|---|---|---|
Layout File Name | Name of the layout file that is to be created | yes |
Select Existing Layout File | If a layout file has been provided it can be uploaded from the local machine. | no |
Import Scripts
Scripts can be imported from a related TB Server. If a script is imported then it overwrites the current script in TBA.
If there is more than one server the the desired server to import from must be selected.

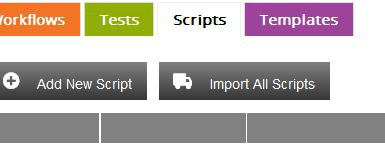
There is also the option to import all the scripts from one TB Server by clicking the Import All Scripts button.
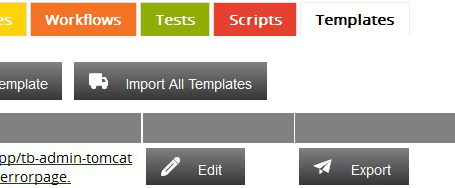
Import Templates
Templates can be imported from a related TB Server. If a template is imported then it overwrites the current template in TBA.
If there is more than one server the the desired server to import from must be selected.
There is also the option to import all the scripts from one TB Server by clicking the Import All Templates button.
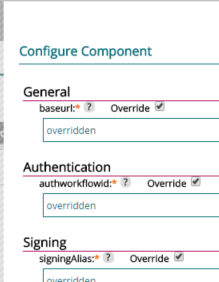
Overriding
Adapter elements defined in a configuration can be overridden by properties defined in a separate properties file.
This allows for different environments to use the same configurations with environment sensitive settings overridden for each specific server.
For instance if there are two environments dev and test. They both used a JDBC adapter but the datasource names are different in each environment.
The datasource element of the JDBC adapter can be overridden so each environment references the correctly named datasource yet the same configuration and the same adapter are used in both.
When data is overridden the values that are to be used are requested on export with a form for each TB Server that is to be exported to.
Overriding Adapter Elements
Individual settings of an adapter can be overridden by simply checking the override option beside each label on the adapter form:
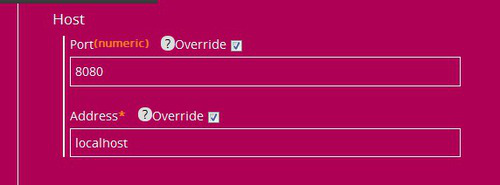
If Override is checked any values in the form will be overridden
When exporting the following form is displayed. Each overridden field will be listed as a form input so that the value that is to be used for each server can be entered.
The adapter property takes the name of adapterID.field(server name).
The server name is only present when a server element is being overridden such as an http server or ldap server. Due to the fact that there can be multiple servers.
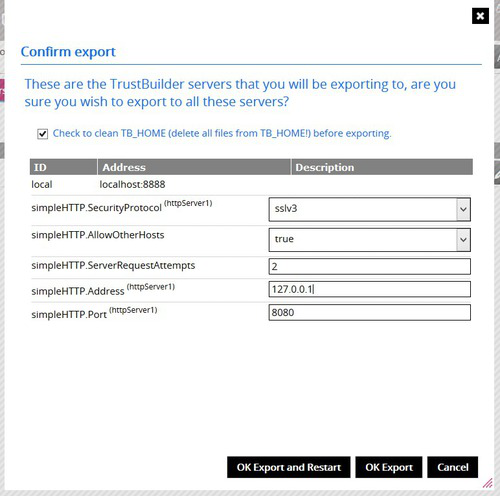
The form is validated before submitting. No override fields are mandatory but numeric fields must have a numeric value, if not the validation fails:

For boolean the options are restricted to true or false and for lists (enum) the appropriate values are displayed in a select box.
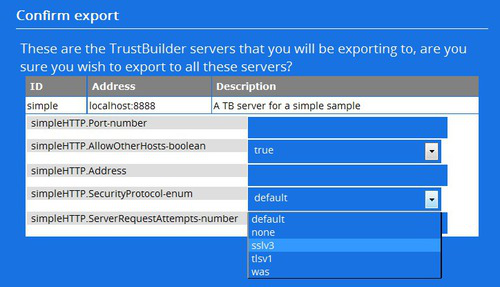
On export the config-override.properties file is created and populated with the provided values for each TB Server.
##Override properties each property is in the format of adapterID.field so if there is more than one HTTP adapter properties can be overridden individually.
simpleHTTP.Port-number=8080
simpleHTTP.AllowOtherHosts-boolean=true
simpleHTTP.Address=10.23.45.80
simpleHTTP.SecurityProtocol-enum=sslv3
simpleHTTP.ServerRequestAttempts-number=2
Overriding Components
Component values can also be overridden when it is configured. In the same manner for adapters check the Override check box beside the input field that should be overridden.
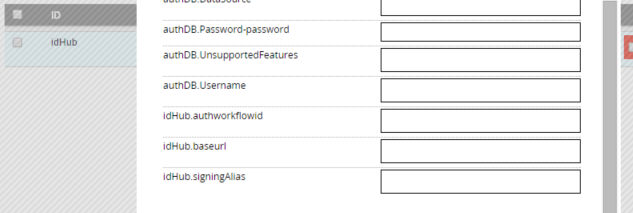
When the configuration is exported the override properties form will be displayed with the fields named after the component id and property label. For instance if there is a component with an id of idHub with a property of Username that is overridden then the override form will contain a field idHub.Username. If the component is de-configured the override properties are removed.
Persisting Override Properties
When the values for override properties are specified these are automatically saved to the database related to the specific server. When another export is made to the same server the override properties are pre-populated with the previous values so they do not need to be entered every time an export is made.
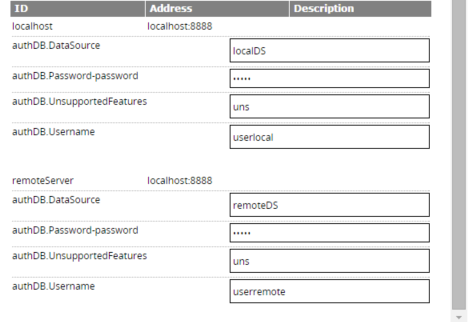
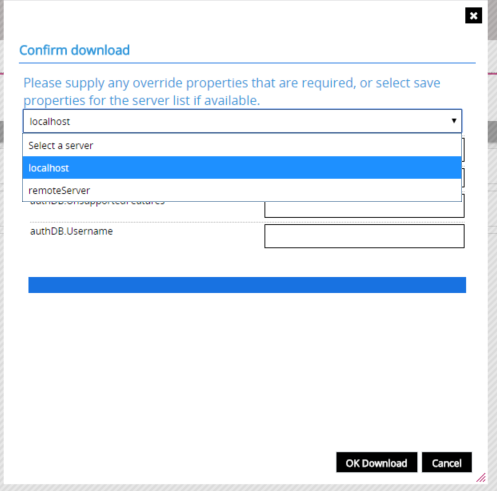
The saved values can also be used when downloading the complete configuration for export using the Download for Export button. If there are servers that have values then a select box is shown listing the servers whose values can be used. Selecting a server populates the fields and the override properties are processed in the traditional manner using those values.