Client Credentials grant
This section deals with the OAuth 2 client credentials grant - a flow designed for machine-to-machine communication, e.g. a client app in an unsafe environment calling an API behind an API gateway, without any user context.
The more common OAuth2 flows, such as the authorization code grant, work within a user’s context after the user has been authenticated. In those flows, a client app can “borrow” some of the user’s privileges when calling an API. Without a user’s context, the client app cannot borrow the user’s privileges and needs to obtain an access token using the OAuth 2 client credentials grant.
There are a number of situations in which client apps need to operate as themselves rather than on behalf of a user. Even if a user happens to be signed in at that time of access, a client app might exercise privileges that the user does not have.
API Key
A traditional way of working is to give the client app an “API Key”. The best thing about an API key is its simplicity. You merely log in to a service, find your API key (often in the settings screen), and copy it to use in an application, test in the browser, or use with one of these API request tools. Along with the simplicity, though, comes both security and user experience downsides to API keys.
An API key, however, typically gives full access to every operation an API can perform, including writing new data or deleting existing data. If you use the same API key in multiple apps, a broken app could destroy your users' data without an easy way to stop just that one app. Some apps let users generate new API keys, or even have multiple API keys with the option to revoke one that may have gone into the wrong hands. The ability to change an API key limits the security downsides.
Many API keys are sent in the query string as part of the URL, which makes it easier to discover for someone who should not have access to it. A better option is to put the API key in the Authorization header. In fact, that’s the proposed standard: Authorization: apikey 1234567890abcdef. Yet, in practice, API Keys show up in all sorts of places: Authorization Header, Basic Auth, Body Data, Custom Header, or Query String.
API keys make sense when the users of an API are only developers. However, as developers created tools for themselves, they started sharing them with others. End users often find themselves fumbling through API documentation, registration, and settings just to find the API key that a tool needs, often without even knowing what an API is. This opens the floodgates and exposes the API and all data it has access to.
So, API keys may be useful in very closed environments where developers build internal applications that don’t need more access than shared data. In open environments where microservcies are develoopped independepntly of each other and are exposed to client apps, the API Key simply represents too high a security risk.
OAuth 2 JWT access tokens
Enter the OAuth 2 client credentials grant. TrustBuilder enables a client app to obtain an access token and take it along when calling a protected API, the so-called Relying Party. Before issuing the access token to the client app, however, TrustBuilder checks the policy whether it should indeed issue the token with the requested privileges. The flows is as follows:
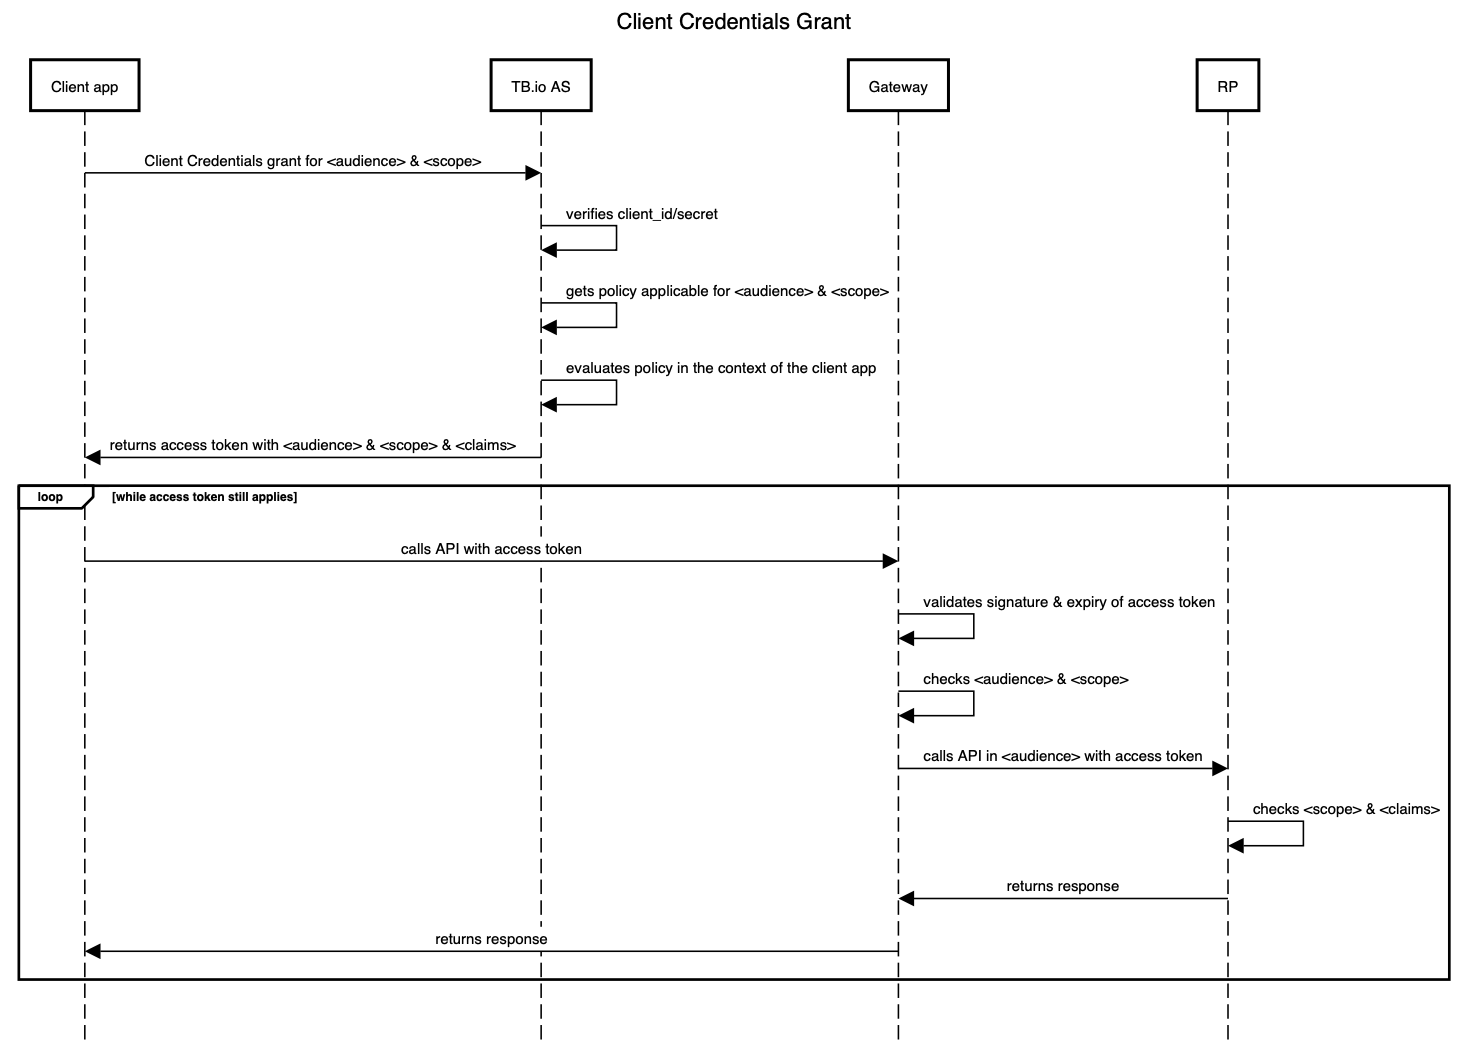
The ‘TB.io AS’ is the OAuth Authorization Server of the TrustBuilder platform. The ‘RP’ is the OAuth Relying Party, i.e. the intended API endpoint referred to by <audience> & <scope>. As long as the access token has not expired, and, the API endpoint is the same (read: <audience> & <scope> are the same), the access token can be reused (hence the loop in the diagram).
Configuration
First, ensure your client app can be authenticated. You can obtain credentials in the form ofclient_id/client_secret from TrustBuilder.
The use of a symmetric client_secret, however, exposes it every time an access token is requested and is also present and thus vulnerable in the code of the client app. A better alternative is passing on a token that is signed with the private key of the client app. This is standardized as the so-called private_key_jwt, see below ‘Token-based client authentication’.
Access Token Request
The client app requests a token by contacting the token endpoint directly with the Client Credentials grant. The request parameters are typically:
{
  "grant_type": "client_credentials",
  "client_id": "<client_id of the client app>",
  "client_secret": "<shared client_secret>",
  "scope": "<intended API endpoint>"
}
Remember that, as opposed to more common OAuth 2 grants, the client credentials grant only relies on the client’s own identity rather than requesting authorization through a user. So, from the OAuth 2 standpoint, the flow described here might just as well occur in a command-line tool, a long-running process, or in general, any kind of application executed in a context where distribution and protection of client credentials are possible.
The request is a customary HTTP POST, carrying the credentials of the client app, the grant_type set to client_credentials, the requested scope, in a given aud (audience) and a state value to protect against cross-site request forgery. The credentials can be a client_id/client_secret or can be token-based with a private_key_jwt (see below).
The scope parameter indicates the type of operation the client app wishes to execute, e.g. "get:hr_record".
The aud parameter indicates in what realm the client is requesting access. This information is crucial for an API gateway to distinguish between different microservices. Moreover, it is critical to distinguish between different tenants in a multi-tenant SaaS environment.
Token Response
The token endpoint response returns the requested access token and may add specific claims to the access token. These claims may indicate certain fine-grained attributes of the client app, such as its persona or tenant in the TrustBuilder context. Note that there is no id token, given that the grant doesn’t entail user identity in any capacity.
Important note: the mechanism should be used in an efficient way taking advantage of the fact that an access token can be reused until it expires. Once a client app requests and obtains an access token, it should keep it around in a safe place for the duration of its useful lifetime and re-use it whenever it needs to call the same API. Requesting a new access token from TrustBuilder every time again and again can be a costly anti-pattern, possibly draining performance and availability.
A TrustBuilder bearer access token is encrypted (e.g. VCJ943eyJzdWIiOiIxMjM...wIiwibmFtZSI6IkpvaG4). A decoded access token may look like:
{
  "iss": "https://<your domain>/",
  "aud": "<your domain>",
  "client_id": "<client_id of the client app>",
  "iat": 1590440782,
  "exp": 1590450969,
  "scope": "<intended API endpoint>",
  "tenant": "<tenant-id>"
}
The scope claim will only contain the scopes that (1) have been requested and (2) that can be granted to the user after evaluating the policy for the requested API endpoint. This means that less scopes may be returned in case the user does not qualify for all scopes given the user profile and the user session.
Since TrustBuilder 11.2.18, the custom claim principal_type has been added to the access token to differentiate between clients from users. In client credential grant, the principal_type value is set to client (the default value is user).
Calling the API
The call to the API occurs as usual with the access token in the authorization header:
authorization: Bearer VCJ943eyJzdWIiOiIxMjM...wIiwibmFtZSI6IkpvaG4The call happens without any dependency on how the client obtained the access token.
The API Gateway can first check whether the JWT access token is issued by TrustBuilder (by verifying its signature) and is issued for the client app that is doing the call.
The API Gateway can then orchestrate the call to the correct API given the aud and scope and can verify whether the scope corresponds to the API endpoint.
If the connection between the API Gateway and the API is sufficiently trusted (e.g. within the same environment), the API itself can then blindly accept the call. Optionally, it can further exercise fine-grained authorization using the claims that TrustBuilder has added to the access token, such as persona.
Token-based client authentication
The ‘client credentials’ to authenticate the client app and can be symmetric with client_id / client_secret or be token-based using an asymmetric key pair, in the form of a private_key_jwt. The token-based authentication has been standardized by https://openid.net/specs/openid-connect-core-1_0.html#ClientAuthentication. The private_key_jwt is basically a token signed by the client app using its private key.
When configuring the client app, its public key must be registered at TrustBuilder when registering the client_id. The public key can be represented as follows:
{
  "keys": [{
    "kty": "RSA",
    "alg": "RS256",
    "use": "sig",
    "kid": "<the public key identifier>",
    "n": "<the RSA modulus>",
    "e": "<the RSA exponent>"
  }]
}
When the client app requests an access token and authenticates itself, the private_key_jwt is constructed as follows:
{
  "iss": "<client_id>",
  "sub": "<client_id>",
  "aud": "<trustbuilder audience>",
  "exp": "<expiration time to represent a short lived jwt>",
  "jti": "<unique identifier to avoid replay"
}
The client app then adds this private_key_jwt to the request body (in lieu of the client_id and client_secret in the authorization header). The complete request body may look like:
grant_type=client_credentials
&scope=<requested scope>
&client_assertion_type="urn:ietf:params:oauth:client-assertion-type:jwt-bearer"
&client_assertion=<the actual private_key_jwt>
References
https://openid.net/specs/openid-connect-core-1_0.html#ClientAuthentication
https://tools.ietf.org/html/rfc7521
https://tools.ietf.org/html/rfc7523#section-2.2