User Enrollment and Authentication
This page explains how users enroll and authenticate using supported TrustBuilder authentication methods.
Enrollment is the process by which the user activates their account by activating their first authentication method.
Authentication is the process where user proves their identity using one or more of their enrolled authentication methods.
TrustBuilder supports the following authentication methods:
TrustBuilder Authenticator Web
TrustBuilder Authenticator Mobile
TrustBuilder Authenticator Desktop
Security keys compliant with FIDO2
Each method has its own enrollment and authentication flow described below.
TrustBuilder Authenticator Web
Enrollment
The Web Authenticator is browser-based and does not require installation.
Here are the enrollment steps:
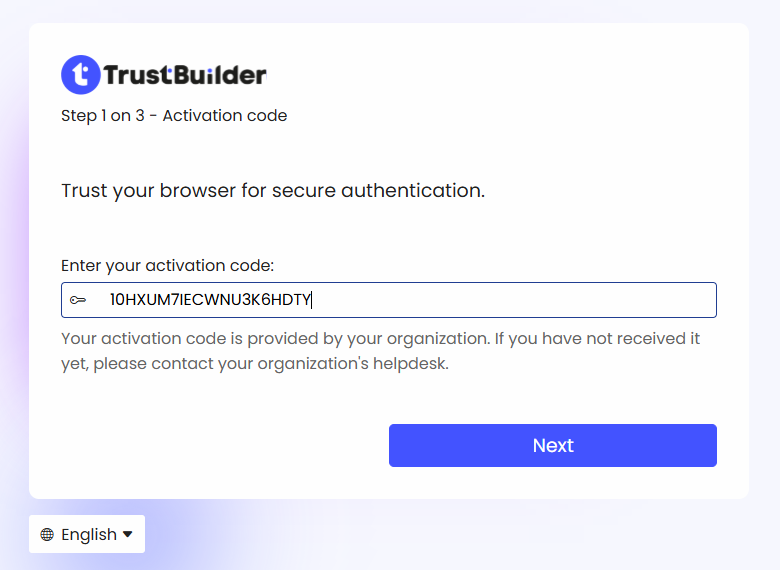
Click on the enrollment link.
This link could be sent by email or provided manually by admins.On the login page, choose TrustBuilder Authenticator - web.
The activation code should be filled-in. Click Next.
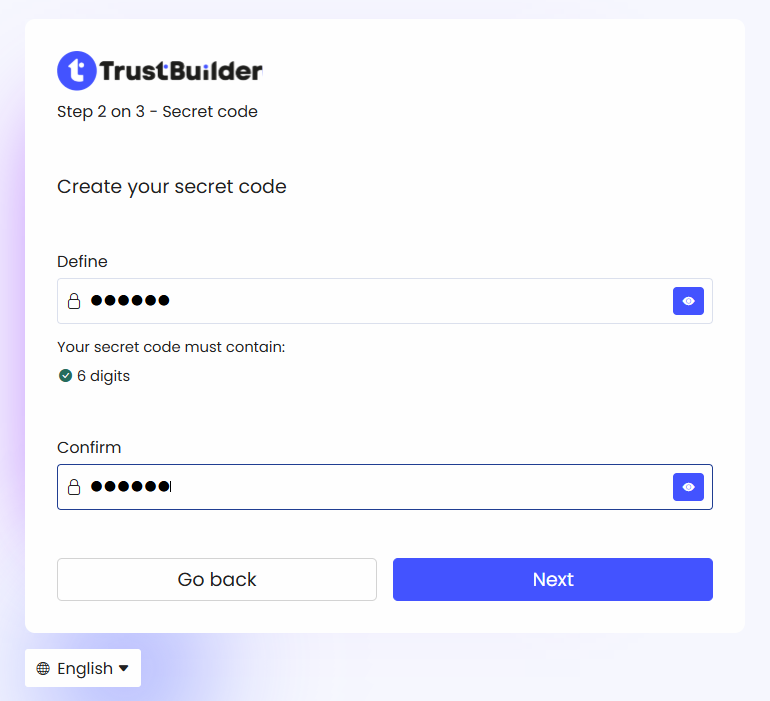
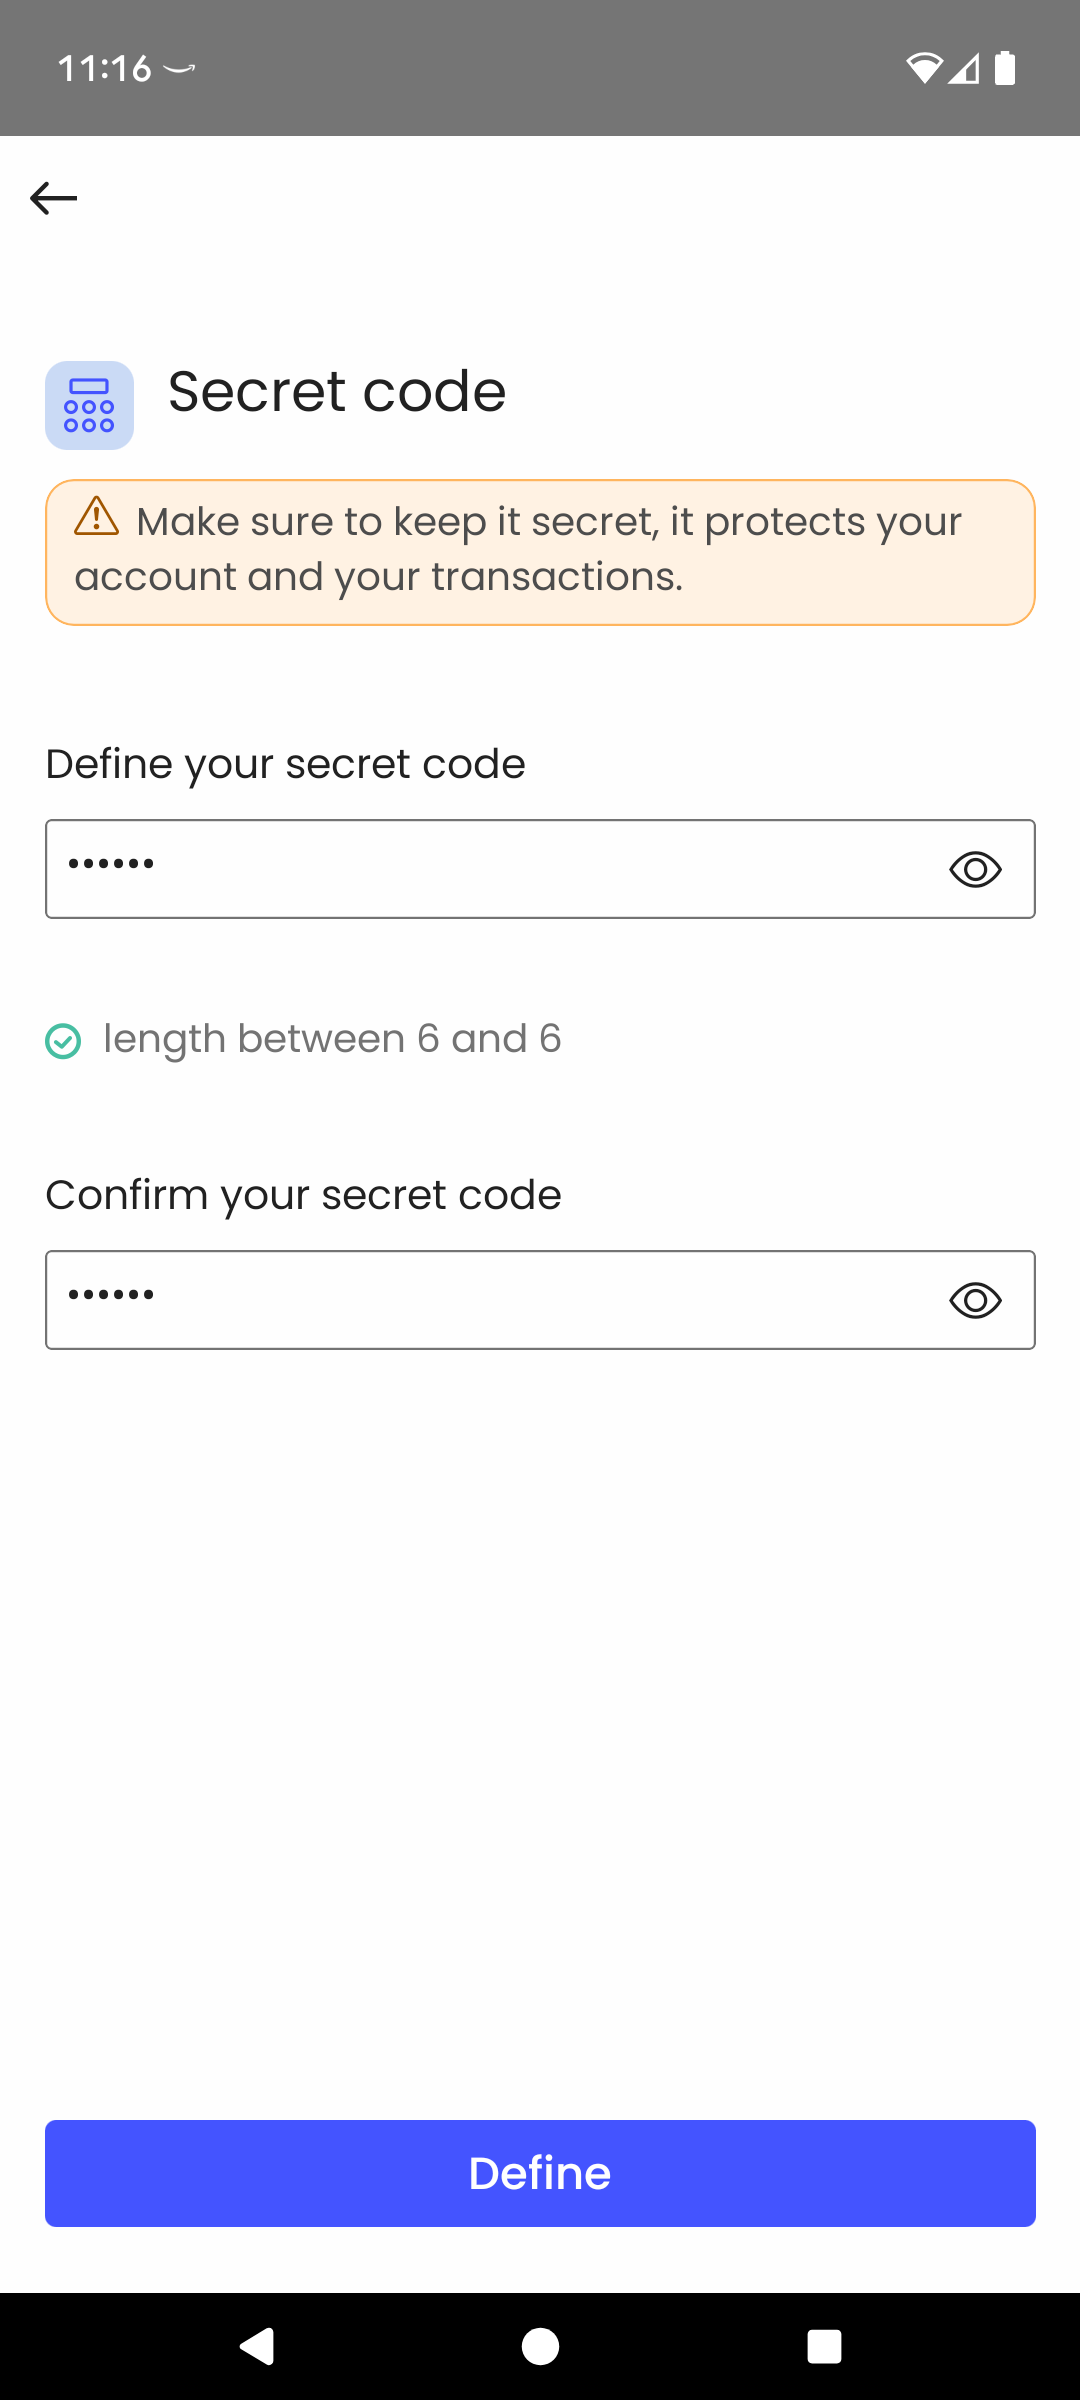
Define your Secret code in the required format and click Next.
Enter a name for this authentication method.
You can edit it later in the self-service Portal.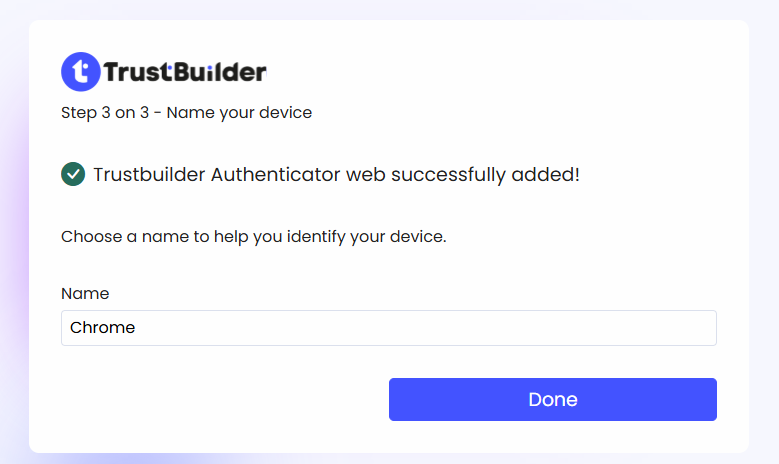
Click on Done.
User account is now activated. The enrolled authentication method can now be used to authenticate.
Users can add other authentication methods from the Self-Service Portal.
Authentication
On the login page, choose TrustBuilder Authenticator - web.
Select your account or enter your login and click Next.
Enter your secret code.
Click Sign-in.
User is successfully authenticated.
TrustBuilder Authenticator Mobile
Enrollment
The user must install TrustBuilder Authenticator mobile app (iOS/Android).
Here are the enrollment steps:
Click on the enrollment link.
This link could be sent by email or provided manually by admins.On the login page, choose TrustBuilder Authenticator - mobile.
If not already installed, scan the QR code or click on the link to download the application.
Click on Next step.
Launch TrustBuilder Authenticator application:
Click on Get started to accept the Terms & Conditions.
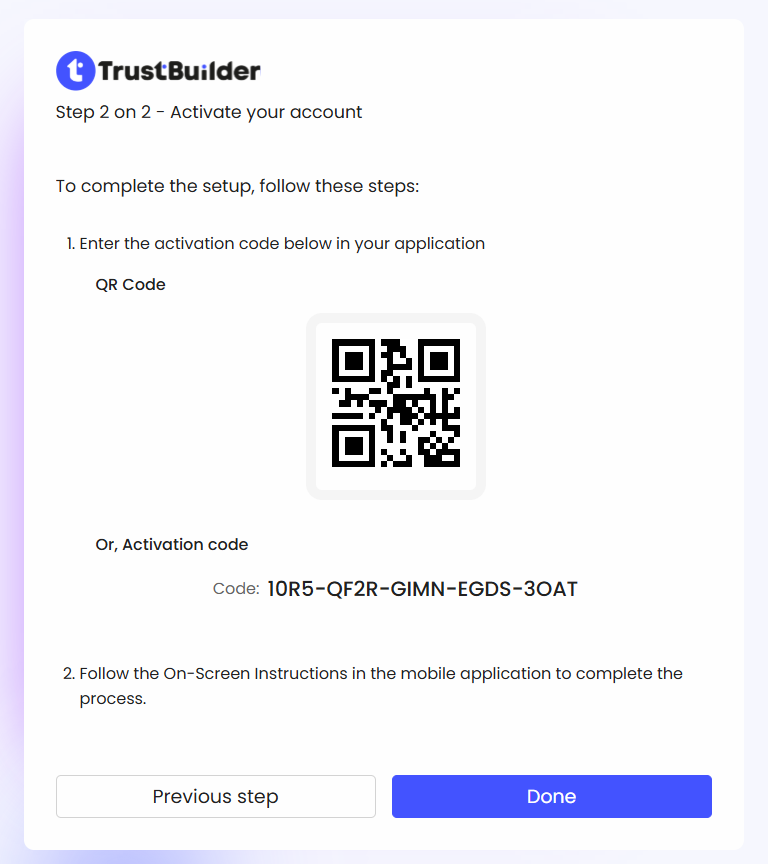
On the “Activate your first account” page, choose QR code or Activation code.
Scan the QR code or enter the activation code shown on the login page.
Define you secret code and click on Define.
On the login page, click on Done.
User account is now activated. The enrolled authentication method can now be used to authenticate.
Users can add other authentication methods from the Self-Service Portal.
Authentication
On the login page, choose TrustBuilder Authenticator - mobile.
Select your account or enter your login and click Next.
On your mobile:
Click on the received notification.
Or open TrustBuilder Authenticator app and click on Pending operation.Click on Yes, it’s me to approve the request.
-20241202_115503.png?inst-v=58aef0b0-325b-44b0-bca2-045b36ee3afb)
Enter your secret code.
User is successfully authenticated.
TrustBuilder Authenticator Desktop
Enrollment
The user should install TrustBuilder Authenticator desktop app (MacOS, Windows, Linux).
Here are the enrollment steps:
Click on the enrollment link.
This link could be sent by email or provided manually by admins.On the login page, choose TrustBuilder Authenticator - desktop.
If not already installed, click the link to download the app.
Click on Next step.
Launch TrustBuilder Authenticator application:
Click on Get started to accept the Terms & Conditions.
Copy the activation code displayed on the login page and paste it into the application.
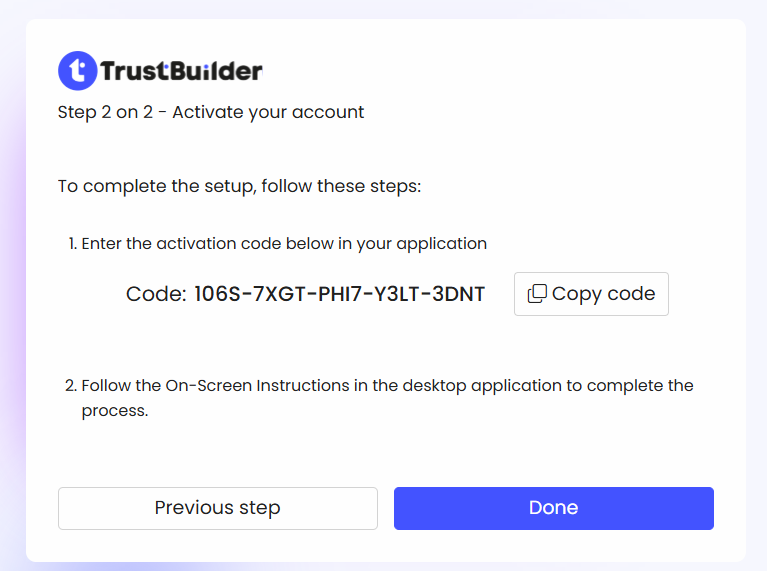
Define you secret code and click on Define.
On the login page, click on Done.
The user account is now activated. The enrolled authentication method can now be used to authenticate.
Users can add other authentication methods from the Self-Service Portal.
Authentication
On the login page, choose TrustBuilder Authenticator - desktop.
Select your account or enter your login and click Next.
Click on the received notification.
Or open TrustBuilder Authenticator app and click on Pending operation.Click on Yes, it’s me to approve the request.
Enter your secret code.
User is successfully authenticated.
Security Keys (FIDO2)
Enrollment
The user must use a compatible security key. The enrollment process may vary depending on the device and operating system.
Here are the enrollment steps.
Click on the enrollment link.
This link could be sent by email or provided manually by admins.On the login page, choose Security keys.
Click on Register key.
Enter a name for the security key.
Follow the instructions in the pop-up window. These vary depending on the type of key used and OS used.
User account is now activated. The enrolled authentication method can now be used to authenticate.
Users can add other authentication methods from the Self-Service Portal.
Authentication
On the login page, choose Security keys.
Click on Sign-in.
Follow the instructions in the pop-up window.
The manipulation differs depending on the type of security key used and the operating system.
User is successfully authenticated.